Windows 10 offers automatic method for the users to install a new rollout through Settings app. However, the process is not as smooth as it seems always rather; you might end up encountering errors and complications. Some error codes may appear preventing the system from looking for the new patches or even installing them after downloading. 0x8024001d is such an annoying error code responsible for the failure to install an update. Furthermore, “RSAT installer encountered an error: 0x8024001d” may occur when you attempt to re-install the tool after the successful installation of a patch.
It’s hard to assume truly from where error 0x8024001d is generated and forbidding the update installation to the system. Generally, such issues occur from wrongly configured Windows Registry entries, invalid Date & Time, corrupted Windows file system, and internet access problems. Besides, defective Windows Update services, misconfigured hard disk, malware infection can bring forth the same. Although, some common fixes might rectify the error.
Windows Update Error 0x8024001d
Here is how to Fix Windows update Error 0x8024001d –
1] Prepare Windows 10 for successful RSAT installation
After upgrading Windows 10, you find Remote Server Administration Tools missing from your system. Once you download RSAT tool manually and try to install it, the process throws error 0x8024001d. If the same happens to you, go through the below steps for a successful installation.
- Press – Windows + S.
- Type – cmd.
- Right-click on Command Prompt and choose – Run as administrator.
- To allow User Account Control, click – Yes.
- In the black pane, insert –
net stop wuauserv. - Hit – Enter.
- Minimize Command Prompt.
- Now, Open Registry Editor.
- Navigate to –
HKEY_LOCAL_MACHINE\SOFTWARE\Policies\Microsoft\Windows\WindowsUpdate\AU
- From right-pane, double-click – UseWUServer.
- Put 0 in the Value data box.
- Click – OK.
- Go back to Command Prompt.
- Run –
net start wuauservcommand. - Thereafter, copy the following command-line and paste the same in elevated Command Prompt –
DISM.exe /Online /add-capability /CapabilityName:Rsat.ActiveDirectory.DS-LDS.Tools~~~~0.0.1.0- Press – Enter.
- Now, revert the UseWUServer value to 1 that you changed through Registry Editor.
- Reboot Windows 10.
- When the system powers up, try installing RSAT again.
- This will fix 0x8024001d RSAT error.
2] Run System File checker
Oftentimes, the system finds it complicated to read the files necessary to complete an installing process. Hence, some unexpected errors might show up one of which is Windows update Error 0x8024001d. To obliterate these error codes, fixing the system files is only the option.
Some errors are too associated with missing system components or corrupted ones. The one tool that can fix all of these torments is System File Checker. But if the found corruption is too much complicated, you might need to run DISM tool to make the System File checker work. Therefore, we will run the DISM command-line prior to SFC scan in order to save some time.
- Click search icon present on taskbar.
- Type – cmd.
- Press – Ctrl+ Shift+ Enter.
- Permit User Account Control by hitting – Yes.
- Copy-paste the following commands in the black pane one by one and hit Enter after each–
dism /online /cleanup-image /scanhealth
dism /online /cleanup-image /checkhealth
dism /online /cleanup-image /restorehealth
- Once you are done running the above commands, type in
sfc /scannowand then press – Enter. - Wait and let the scanning process ends fully.
- If the found corruption gets fixed, close Command Prompt and reboot the PC.
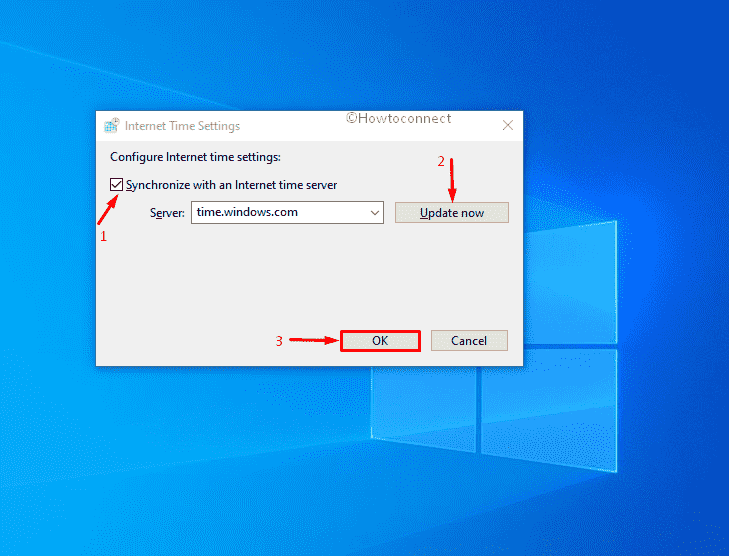
3] Set correct the Date & Time
Windows update process often fails to initiate if the Date & Time settings are incorrect. This happens when someone changes time zone and the automatic syncing of time is not toggled on. However, this can be easily settled by adjusting Date & Time Settings. Here are the steps to follow –
- Press – Windows + R.
- In the Run command, type – control.
- Click – OK.
- Set the View by option to Category.
- Click – Clock and Region.
- From the right pane of the subsequent page, hit – Date and Time.
- Shift to Internet Time tab.
- Click – Change settings.
- Check the box set before Synchronize with an Internet time server.
- Hit – Update now.
- Finally, click – OK.
4] Reconnect internet connection
The autonomous Windows updating process starts only when a stable internet connection is available. If you have encountered Windows update Error 0x8024001d unexpectedly, check the internet connection first for proper connectivity.
When everything seems alright, disconnect the computer from Wi-Fi connection or remove the ethernet cable for the time being. After some time, reconnect the connections and try updating Windows again. This will possibly resolve the issue.
5] Reset Windows Update Service
In order to function Windows updating Process properly, number of services work together. If accidentally any of these services are unavailable in Windows, the updating process will end up in trouble and may bring forth error 0x8024001d. Resetting the Windows Update Service and other associate components may help in such a case.
- Click the Start button.
- Type in – cmd.exe.
- Press – Ctrl + Shift + Enter.
- When User Account Control prompts, click – Yes.
- Copy the following commands in turn and paste them into the appearing black pane. Don’t forget to press Enter after each line –
net stop wuauserv

net stop cryptSvc

net stop bits

net stop msiserver

ren C:\Windows\SoftwareDistribution SoftwareDistribution.old

ren C:\Windows\System32\catroot2 Catroot2.old

net start wuauserv

net start cryptSvc

net start bits

net start msiserver
- Close Command Prompt.
- Restart your Windows machine.
- After signing back in, check whether the error shows up anymore.
6] Start Windows in Clean Boot to fix 0x8024001d RSAT
Clean Boot is a specialized startup process where Windows negates all third-party services, applications, and settings and runs with default setup only. Quite often detrimental third-party suits, services are too responsible to block the Windows updating process hence you can see Error 0x8024001d on screen. To eliminate this issue, boot Windows in Clean Boot and see if it helps. Guidelines are as following –
- Press – Windows key.
- Type – msconfig.exe.
- Hit – Enter to launch System Configuration.
- Select the radio button present before Selective startup.
- Uncheck – Load startup items.
- Shift to Services tab.
- Tick the checkbox set for Hide all Microsoft services.
- Click – Disable all.
- Move to the Startup tab.
- Click the link – Open Task Manager.
- When the dedicated window turns up, disable all startup programs.
- For that, right-click on each application individually and choose – Disable.
- Go back to System Configuration window.
- Click Apply and then OK.
- Restart the PC.
- When PC starts in clean boot mode, try updating Windows.
7] Unplug USB devices
USB peripherals like speaker, mouse, keyboard, scanner/printers are also found to be causing trouble in Windows updating process hence you can experience Error 0x8024001d. This might seem strange and the exact reason behind this is yet to be known. There is no official explanation from Microsoft as well to settle down the matter.
For instance, you can unplug the USB device that is causing trouble until the Windows updating process ends up smoothly. If you don’t know which specific accessory is at fault, pull out cords of all peripherals gently. Reconnect necessary peripherals when the system finishes installing updates successfully.
8] Run Windows Update Troubleshooter
This is quite normal that the Windows update entangled with numerous bugs and issues from time to time. Starting from searching the latest patches to installing them to Windows, you may come across error codes obstructing the process. Hence, Microsoft came up with a suitable utility so that users can fix the associated issues and have the latest patches installed smoothly. Windows Update Troubleshooter exists in every version of the Operating System and makes sure you utilize this in case of problems.
- Press – Windows + I.
- Click – Update & Security.
- From the left sidebar, choose – Troubleshoot.
- Move to right-pane and then click – Additional troubleshooters.
- Select – Windows update.
- From the expanded tray, click – Run the troubleshooter.
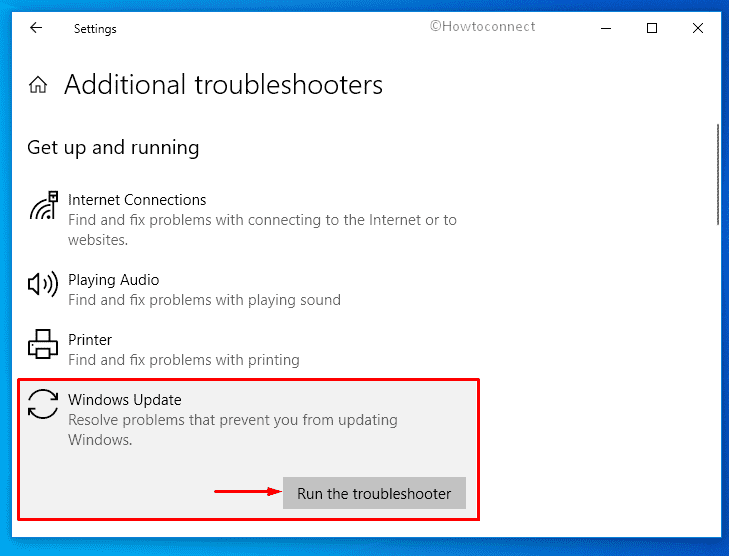
- Comply with on-screen instructions to continue the process.
- After scanning the system; if the utility comes with a resolution, click – Apply this fix.
9] Fix the hard Disk corruption
Check disk tool is an amazing utility that can bring forward hard disk defective areas and resolve them automatically. Since error 0x8024001d is often caused by poor portions in the Hard Disk, running the tool may help to resolve the issue. Follow the below steps to run the utility in Windows –
- Open Command Prompt as administrator.
- In the command prompt, insert –
chkdsk C: /f /r /x - Hit – Enter.
- If the volume is currently in use, press Y to initiate the scanning process at the next startup.
10] Uninstall third-Party anti-virus
Anti-malware programs often misinterpret the update components as malware and block them eventually. This doesn’t only obstruct the Windows Update but also generates error codes like 0x8024001d. You can uninstall the third-party anti-malware programs straightway following the below instructions –
- Right-click Start button and choose – Run.
- In the dialog box, type – appwiz.cpl.
- Click – OK.
- When the ‘Programs and Features’ window shows up, look for the third-party antivirus program installed on your system.
- Right-click the same and then select – Uninstall.
- Comply with on-screen instructions to finish the removal process.
11] Disable Default Windows Firewall
Disabling the Firewall is not recommended at all since malware is always looking for a sleek chance to break into the system. However, we have found some update files might have issues with the Windows Firewall. Keeping the service enabled, you cannot accomplish the installation process and therefore, disable Firewall temporarily using the below steps –
- Press – Windows key.
- In the search bar, type – firewall.cpl.
- Hit – Enter.
- From the left sidebar of the newly appeared window, click – Turn Windows Defender Firewall on or off.
- Select the checkboxes of Turn off Windows Defender Firewall (not recommended) for both Private network settings and Public network settings.
- Click – OK.
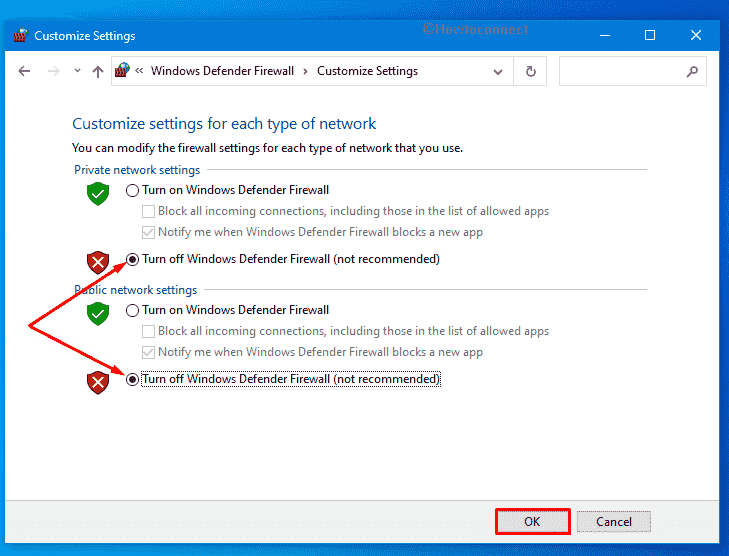
Note – Don’t forget to enable Windows Firewall after resolving the update error.
12] Download the update from Windows Update Catalog
Windows Update Error 0x8024001d mostly arises when the system tries to install updates through an autonomous process. And most of the time, it gets fixed when you initiate the process manually. Doing so is quite simple if you follow the below steps precisely –
- Visit the webpage of Windows Update Catalog.
- Click the search bar of the website.
- Type KB number you want to get.
- Click – Search.
- When the result appears, look for the version that matches your PC specs.
- Click Download present next to the suitable package.
- Doing so will bring forth a new window.
- Click the link available there.
- If prompted, opt for Save File and then click – OK.
- Double-click the msu file you downloaded.
- Allow User Account Control by clicking – Yes.
- Comply with on-screen instructions to finish the process.
Methods list:
1] Prepare Windows 10 for successful RSAT installation
2] Run System File checker
3] Set correct the Date & Time
4] Reconnect internet connection
5] Reset Windows Update Service
6] Start Windows in Clean Boot
7] Unplug USB devices
8] Run Windows Update Troubleshooter
9] Fix the hard Disk corruption
10] Uninstall third-Party anti-virus
11] Disable Default Windows Firewall
12] Download the update from Windows Update Catalog
That’s all!!!