Windows 10 lets you Change Default Sound Device such as Headphones, speakers, Bluetooth headsets, earphones easily. Sometimes an audio equipment does not play when you input its cable into port unless setting it as a default. In addition, few users want to know the way generally so that they could switch the audio device setting. You can follow the method for both the purposes ahead –
How to Change Default Sound Device in Windows 10
There are quite a few processes in order to do so. These are:
Through Taskbar The Easiest Way (Few seconds)
Step-1: Head to notification area in the Taskbar and click on the Speaker icon.
Step-2: Click on the Expansion ‘up-arrow’ as indicated in the picture below. You will not notice this arrow if you do not have more than one device connected.
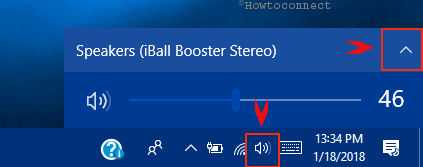
Step-3: Select the Default Sound Device from the menu that you prefer to use.
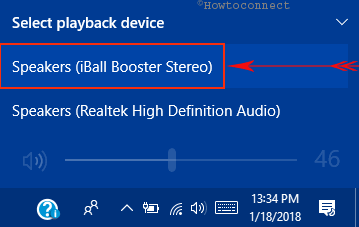
Thus, Windows will switch the default audio device upon your choice.
Using Settings app
Step-1: Use Win+I hotkeys for the sake of opening the built-in Settings app. Instead, you can also use your preferred ways to launch the same. Click on the System icon from lots of categories.
Step-2: Upon opening System page, hit on Sound section from the left pane.
Step-3: Additional settings will be available on the corresponding right side. Quickly head to Choose your output device section and click its drop-down to select your preferred one. You can leave the page if you have successfully completed the task.
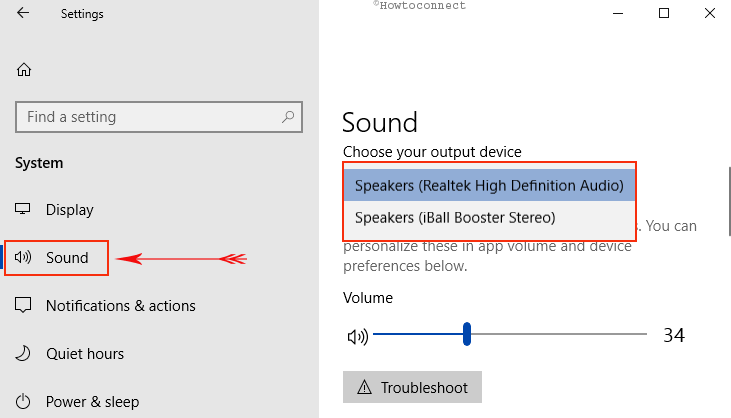
Note – Remember, you cannot select preferable audio device if you don’t connect more than one device.
More methods are available to do the same. If you find this one difficult, you can try the next one.
Accessing Sound Settings
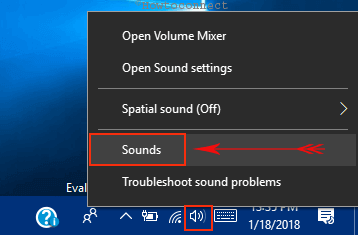
Step-1: Here also, go to the system tray and then do a right-click on the Speaker icon. From the few options, click Sound (see snapshot).
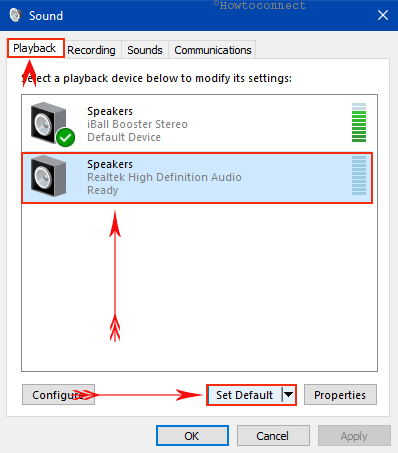
Step-2: Switch to the Playback tab and you can see all the connected audio devices listed out.
Step-3: Choose the playback device you wish to use and perform a click “Set Default” button. Opting this way will enable both Default Device as well as Default Communications Device.
Step-4: As an alternative, right-click the device of your choice and click Set as Default Device as depicted in the given picture.
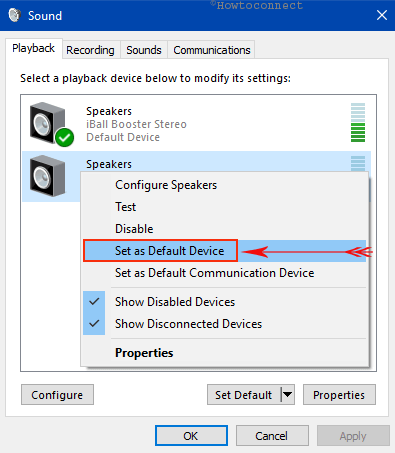
Step-5: Lastly, hit Apply and OK buttons to Change Default Sound Device on your PC.
So, these are the three best ways that will let the system to Change Default Sound Device in Windows 10 according to your choice.
Conclusion
Setting an audio device into default allows you to play sound from a computer with the audio peripheral you want. Microsoft made all these tasks easier to execute providing setting options. However, others ways are also available to do the same. Therefore, we tried to cover all possible means to Change Default Sound Device in Windows 10. You can use any one of these or try another to get the desired output.