For the last few days, many users are having HP Laptop Mouse Pad Locked in Windows 10 issue. It becomes really difficult for them to manage their work and device when the touchpad fails to work. There are many reasons that disable this input device, including human error. However, if you are also facing HP Laptop Mouse Pad Locked, then we show you certain promising solutions. The below-listed resolutions will help you to take care of the problem especially if you are a beginner. You can also find solutions for another brand here – Fix: Asus Touchpad Not Working in Windows 10.
How Fix HP Laptop Mouse Pad Locked in Windows 10
HP has gained goodwill over the years for manufacturing laptop with higher configuration and sleek design. Users were highly satisfied with its performance as well. Unfortunately, many of them are experiencing a problem as the input device gets locked. Problematic drivers can also lead to this issue. However, the following resolution processes might be helpful for you.
Workaround-1: Unlock by tapping
On few laptops, there is a small light on the left of touchpad where tapping twice locks and unlocks it. By mistake, anyone can double tap the point and hence the trackpad can be locked. Therefore, tap twice the point and Mouse pad enabled indication sign will appear on screen momentarily confirms that it is unlocked. Tapping twice again will lock the pad and inaccessibility sign will appear for a moment.
Workaround-2: Through Mouse Properties
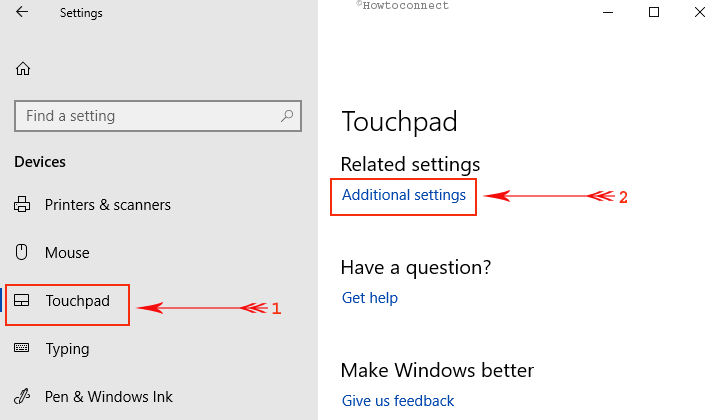
Step-1: Altogether hit Windows+I hotkeys or any other preferred method with a view to open default Settings app.
Step-2: When different categories show up, head to Devices. Click Touchpad section on the left column of the next page. Switch to the right pane of the page and click on Additional Settings as shown in the given image.
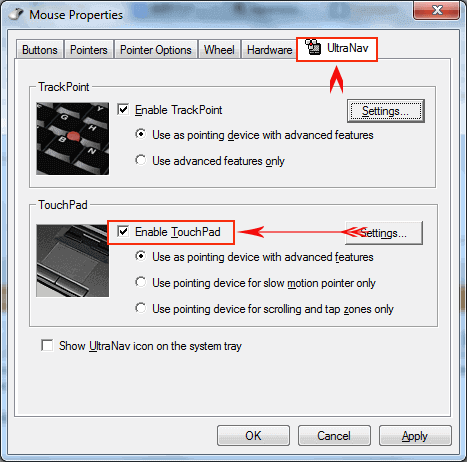
Step-3: Mouse Properties pop-up will appear, shift to the Ultranav tab.
Step-4: Go to the Touchpad section and checkmark Enable TouchPad box (see snapshot). Press Apply first and then Ok before closing in order to implement the modifications.
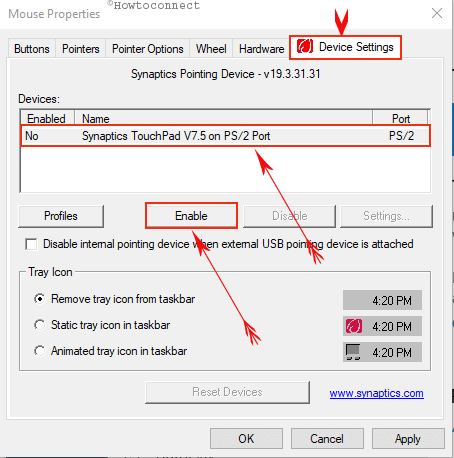
Step-5: If you cannot see the Ultranav tab, then go to the Device Settings tab. Here, select your touchpad followed by a click on Enable.
Try to check the touchpad is working or not. If it doesn’t work doing so, follow the next method.
Workaround-3: Enable Mouse Pad from BIOS
Step-1: Switch On the laptop and in the meantime press delete, f2 or f10 keys from the keyboard with a view to open BIOS Setup.
Step-2: Navigate to the following path in BIOS utility
System Properties => Keyboard/Mouse Features =>Device Options
Use the Arrow keys from keyboard to move and Enter button to engage in this regard.
Step-3: Reach out to Internal Pointing Device in the Advanced tab and press Enter button. Use the arrow keys for enabling or disabling the touchpad. Remember, based on the models, these keys can play differently in BIOS while accessing.
Workaround-4: Reinstalling Mouse pad driver
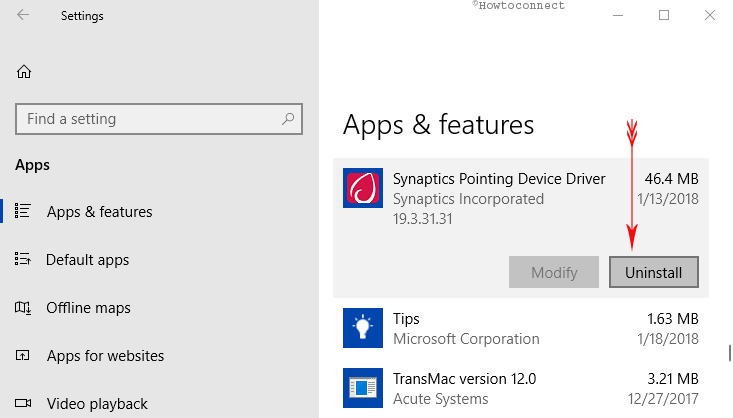
Step-1: Open the Start Menu, type in apps, and hit Enter key. This instantly launches Apps & features page on the Pc screen.
Step-2: Now, find the driver for the touchpad and select it, click Uninstall and wait for the uninstallation process to end properly.
Step-3: Next, visit the “HP official website” and download the correct driver complying with the model number of your device. Install the downloaded driver by observing the guidelines that appear on the screen.
This method is most successful in resolving the mouse pad issues in HP laptops.
Workaround-5: Enable or Disable Mouse pad using Function keys
The pointing device for HP laptops might be inaccessible sometimes due to pressing function keys by mistake. However, using the key combination, you can enable or disable it again. Here, you can use functions keys from f1 to f12 along with fn key depending upon the model number of the laptop. Try the following combinations until you resolve HP Laptop Mouse Pad Locked in Windows 10 issue completely:
1. fn + f6
2. fn + f9
3. fn + f12
4. fn + f5
5. Shift + f5
Workaround- 6: Rebooting device
The system might play abnormal sometimes jamming and it requires a reboot. The touchpad can also be disabled due to system jamming too. In this case, pursue the below guidelines.
Step-1: Open the Start Menu and click on Power icon. Select Restart from the list. The laptop will restart in a while.
Step-2: Take out the battery from the laptop and wait for about a minute. Put back the battery and Start the system normally. This resolution also bypasses HP Laptop Mouse Pad Locked in Windows 10 issue completely.
Workaround-7: Check the Mouse pad connection
Sometimes, due to hard bump or exposure to hit, the connection between Mouse pad and main board become loose. If the same happens, it will not work anymore, in that case,
Step-1: Shut Down the device normally click on the Power Icon from Start menu.
Step-2: Disassemble the Laptop and ensure the secure connection of mouse pad with the main board. Assemble it after checking everything perfectly.
Start the laptop now and check the functionality of mouse pad.
Conclusion
Laptops are the best-suited device that supports mobility and provides the best execution of the task. No doubt that touchpad is an important part of a touch or non-touch laptop. However, locking of it created a hindrance for smooth working with laptop. We have covered all possible means to resolve HP Laptop Mouse Pad Locked in Windows 10 issue and all these solutions are equally effective. Try each and check the problem is resolved or not. Hope, any of these will fix the problem and you can have better output from it in HP laptop.
The article is interesting and useful. I tried it and found it really useful. Thank you very much.