This article is all about INSTALL_MORE_MEMORY BSOD error and its bug check value 0x0000007D in Windows 10. The error shows that the affected device made an attempt to execute non-executable memory. Two major reason for this BSOD issue is due to corrupt files and the absence of some system files. Other reasons like low disk space, an obsolete operating system, and piling up of junk files can also lead to this problem.
After encountering with this BSOD, the PC reboots itself in order to avoid further vitiation of the device. Moreover, the desktop will hang up and as a result, you will not be able to work on the computer. It is important to take immediate steps to solve this issue once detected. Let’s go through each of them below –
INSTALL_MORE_MEMORY Error in Windows 10 Solutions
Here is how to fix INSTALL_MORE_MEMORY Error in Windows 10 –
1] Disable Automatic Restarting of Windows
BSOD error causes severe harm to a computer system. To decrease the effect of these damages, Windows always reboots itself. This creates up a lot of problem to the user as nothing can be done on the computer. You need to deactivate this process if you want a suitable environment for carrying out other resolutions. Let’s learn the steps to do that –
Step-1: Begin with saving and closing all the processes that are running. Press Windows and D key simultaneously from the keyboard to go to the desktop directly.
Step-2: Right-click on This PC icon present in the desktop. Select the Properties option from the menu that shows up.
Step-3: From the left pane select “Advanced System Settings”.
Step-4: The wizard of System Properties will show up on the screen and you will get into the Advanced tab. Here, click Settings present under Startup and Recovery heading.
Step-5: Go to System failure area when another wizard comes into view.
Step-6: Remove tick mark from the option namely for “Automatically restart”.
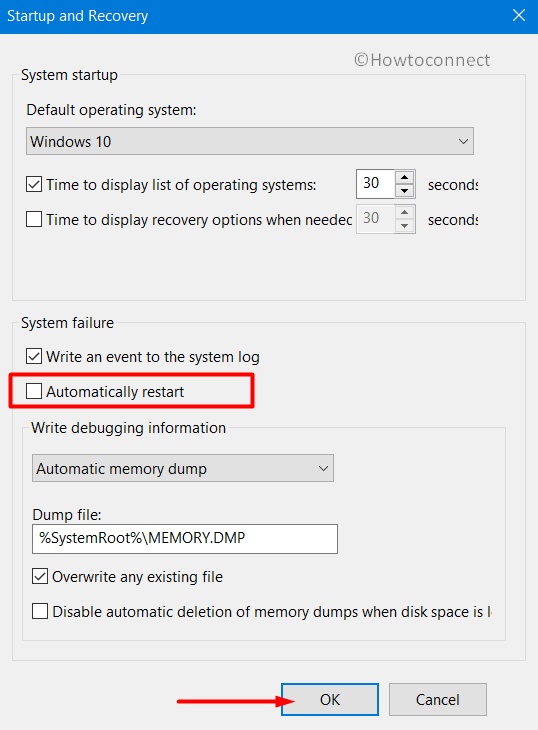
Step-7: Click on the OK button at the bottom to save all the changes.
After you have followed the above steps, the computer will not reboot all by itself without any prior notice. Now you can work on your PC without any irritation.
2] Perform Safe Boot to load basic programs
Since Windows gained its popularity, there were several issues that caused harm in it. But still we are lucky enough to have one way that gives hope in all the cases and it is the boot in safe mode. In this Startup process, Windows loads only some of the primary applications. This resolves most of the problem which leads to issues like INSTALL_MORE_MEMORY error. Follow the guidelines to execute the process –
- Press Windows Key along with S from the keyboard simultaneously to get Taskbar Search.
- As soon as you are able to see the search bar, write msconfig in the vacant space.
- Select System Configuration from the results that are shown up.
- Go to the Boot tab when the wizard comes in.
- You will get the Boot Options in the lower half of the window. Mark the checkbox which says Safe Boot.
- Choose Minimal from the list. Click on the Apply button and then OK.
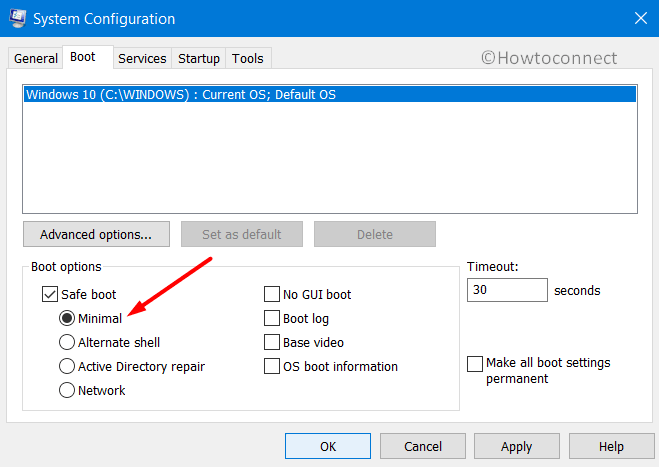
- Get out of this window and initiate a reboot in a prevalent method.
- As the system is booting, at startup, keep pressing F8 key from the keyboard continuously.
- As soon as the Advanced boot menu is displayed, select “Safe Boot” option.
- Enter into the Safe Mode.
3] Find Malware in Windows Security
Surfing on the Internet is the most unsafe thing to do. You could easily become prey to malware by clicking on baited links. Along these lines, the bugs figure out how to go into the framework. This leads to missing and deterioration of system files. Thus the system ends up with INSTALL_MORE_MEMORY error. The only method to protect your computer is by wiping them out using Windows Security. Let’s follow the steps to do that –
- Press Windows and Q key simultaneously on the keyboard to open Taskbar Search.
- Type “Security” in the vacant text box. Choose Windows Security from the result to open it.
- From the left pane, go to Virus & threat protection category.
- Hop to the corresponding side and click on the link of Scan options.
- Select the radio button of Full Scan.
- Click on Scan now button to start the detection process.
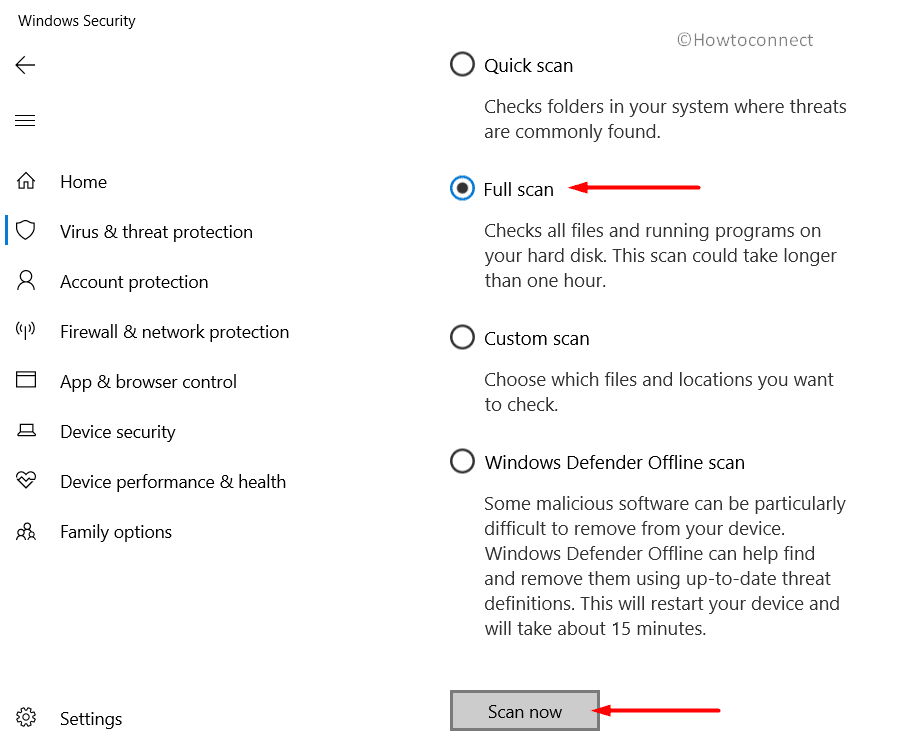
- After the completion of the detection process select the option Clean threats to delete the malware that is traced.
- Choose Remove and then Start actions from the following page.
- At the end of this process, all your viruses will get deleted and your computer will be safe to use.
4] Run Windows Blue Screen Troubleshooter
INSTALL_MORE_MEMORY BSOD error is so much dangerous that it can cause permanent harm to your whole system. To tackle this problem, Microsoft has made a handy tool known as Windows Blue Screen Troubleshooter. If you are utilizing any version of Windows 10 Fall Creators update then you can enjoy the utility to fix blue screen error. This tool is already present in your computer under the Settings app. Let’s look upon the way to use this Troubleshooter –
- Press Windows and I keys together and initiate the Settings app.
- Go to the section of Update and Security.
- From the left pane select Troubleshooter subsection and go to the corresponding side.
- Locate and select the Blue Screen option on the right pane.
- Click on “Run the Troubleshooter” button.
Any problem that will be detected by the tool will be automatically resolved. You will get rid of INSTALL_MORE_MEMORY BSOD error.
5] Resolve INSTALL_MORE_MEMORY by fixing Bad areas of Hard disk
Due to prolonged use, bad areas may be formed in the Hard disk. In such situations, experts suggest you run the Disk Checking tool. It is powered up by an Elevated Command Prompt and all the problems are fixed there. Let’s see its procedure –
- Right-click on Taskbar and from the flyout menu, choose Task Manager.
- As soon as the app will be displayed, click on File option.
- Click on Run a new task from there.
- Type cmd in the vacant text box of the dialog box that comes up on the screen.
- Check the box for “Create this task with administrative privileges”.
- Press the Enter key and you will be guided to Elevated Command Prompt window.
- Type the following command as soon as it’s loads completely.
chkdsk C: /f /r /x
- Press Enter key to run the command.
- All the bad locations in your hard disk will be automatically resolved using the disk checking utility.
- Restart your computer after the process comes to an end.
- After the rebooting process is completed, check for the error if any.
6] Farewell to Memory Problems
When Windows get memory-related issues in them then there is a high chance to get an INSTALL_MORE_MEMORY BSOD error. To solve this kind of problem Windows Memory Diagnostic comes into play. Now problems can easily be detected and resolved quickly. Go through the guidelines below –
- Open Windows Settings app by jointly hitting “Win logo + I” hotkeys.
- In the search box that you will see in the screen type “memory”.
- From the list, go ahead with the result “Diagnose your computer’s memory problems”.
- You will be guided to the “Windows Memory Diagnostic”.
- Choose “Restart now and check for the problems (recommended)” from the wizard.
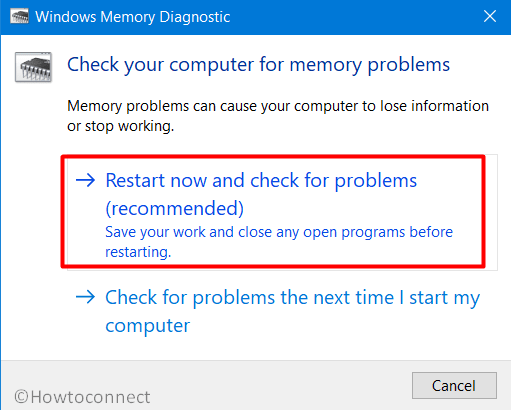
- After a cycle of restarts by your operating system, you will see a blue screen detecting memory issues.
- The device reboots again when the progress hits 100 percent.
- Check the output of the diagnosis from the System tray notification area as the computer powers up.
7] Install all newly released patches to prevent INSTALL_MORE_MEMORY
Microsoft releases cumulative updates which consist of the latest features and mostly contains fixes for bugs and problems. But still, most of the people ignore them. If the operating system has become outdated that it loses its strength and causes INSTALL_MORE_MEMORY BSOD error. It is recommended to get all the cumulative updates installed. To reduce time consumption you need a super-fast internet connection to get these updates downloaded. Turn Off Metered Connection if you are using a mobile hotspot. Follow the guidelines below if all the arrangements are set –
- Right-click on Start icon and choose Settings.
- Go to Update & Security in the app.
- Select Windows Update on the left pane when the screen gets loaded up.
- Click on Check for Updates button and don’t get worried if you are getting a dialog box which says “You’re up to date”.
- Click on the Download button as soon as all the patches are available.
- Downloading is followed by Installation automatically.
- After complete installation restarts your computer.
8] Uninstall Applications that causes a collision with each other
If there are applications that are much more similar then there is a high chance for them to get collided. Their collision causes them to lose necessary components from them as well as from the PC and thus makes way for INSTALL_MORE_MEMORY. One of the best ways to be away from these problems is to uninstall one of these. To get a program deleted from the computer follow the guidelines given below –
- Right-click on the Start icon and choose Apps and Features option from the Win+X menu.
- On the right side of the Apps Settings page, you will find all those apps that are colliding with each other.
- Select them and hit Uninstall.
- Choose Yes if UAC is asking for permission.
- Follow the guidelines displayed on the screen to proceed smoothly.
- Restart your computer and check for the BSOD error if available.
- If all the errors are resolved then you can again download the deleted program if necessary.
9] Run System Restore to undo new changes
If any changes are made in Windows then the registry is modified automatically. This is an advanced framework and any irregular rotation can lead to INSTALL_MORE_MEMORY error. Straightforwardly, you can get away from the error and head back to the previous state. Performing System Restore undoes the new changes in the presence of a previously created restore point. If you are lacking in that then just skip this method. Follow the guidelines if you have one –
- On the taskbar search field type rstrui.
- Press Enter and allow the System Restore Wizard to show up on the screen.
- Select Show more restore points from the wizard that appears.
- Choose the latest one from all the available points.
- Select the Next option to continue.
- Click Finish and this will eventually initiate the restoring process.
10] Perform Clean Boot to stop INSTALL_MORE_MEMORY
There may be some programs or services that can cause INSTALL_MORE_MEMORY BSOD error in your computer. We need to deactivate them to fix this issue. One of the best ways to do that is through the Clean Boot. Follow the steps below to do it –
- Type “msconfig” in the taskbar search. Hit the Enter key to open System Configuration.
- By default, the General tab shows up. Here, get down and select Selective startup from the current tab.
- Remove the tick mark from the option Load startup items.
- Go to the Services tab and put a check on the option namely Hide all Microsoft services.
- Click on Disable all and select Ok button.
- Now, moving ahead, go to the Startup tab and click on the link Open Task Manager.
- This will immediately launch the Manager with the Startup tab into focus.
- Right-click on each item and choose Disable.
- Return to the System Configuration window after disabling all the startup applications.
- Click on Apply and then OK to implement the modifications.
- Restart your device and check for INSTALL_MORE_MEMORY BSOD error.
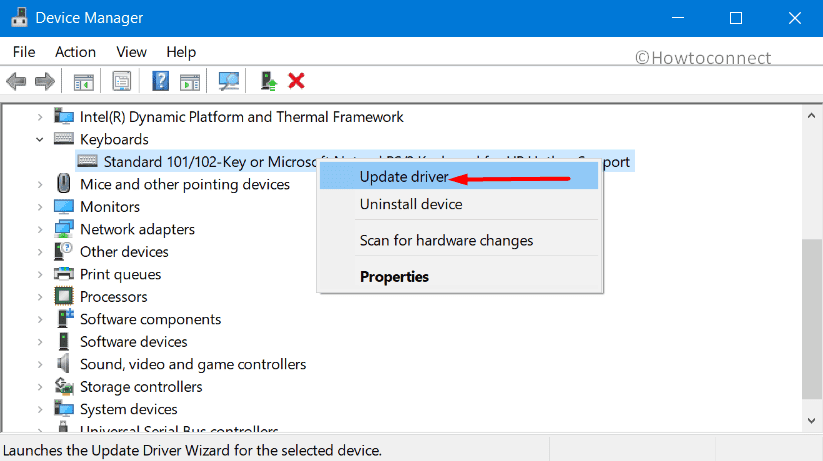
11] Update the Drivers
Each time when there is an issue related to BSOD, the major reason is due to obsolete and defective drivers. These tasks are autonomous in Windows 10. However, sometimes, they may stay out of touch and end up in causing vulnerabilities. We can use Windows Device Manager to update them. Follow the instructions below –
- Press “Win logo and R” key simultaneously and open Run dialog box.
- Write devmgmt.msc in the vacant text area.
- Select the OK button that is situated beneath the box.
- Look in the console if any yellow mark is present next to the device’s category. Once you find it, select it to expand.
- It will show you the drivers. Right-click on it one by one.
- Choose Update driver option from the drop-down menu.
12] Resolve INSTALL_MORE_MEMORY by running SFC Tool
Due to the presence of malicious invaders all around there is a good chance for the corruption of system resources. Additionally, due to the presence of similar applications, DLL files also go missing. All of them can lead to INSTALL_MORE_MEMORY BSOD error. To resolve this, System File Checker will be a good option. Let’s see how to use it –
- Write cmd.exe in the vacant space of taskbar search.
- Right-click on Command Prompt from the results.
- Choose Run as Administrator option from the menu.
- If UAC prompts for permission then select Yes.
- Insert
sfc /scannowafter the black window shows up on the screen. - Press Enter key to enable the System File Checker tool. All DLL and missing files as well will be detected and fixed automatically.
- Be patient as the procedure is a bit long.
- Restart your device after the process ends up. Look for any BSOD error in your computer after it powers up again.
13] Get rid of all 3rd party Anti-Malware programs
Everybody uses third-party antivirus software to defend viruses. But due to the presence of Windows Security, they are unnecessary. There is quite a sharp chance for INSTALL_MORE_MEMORY error because of the presence of these antiviruses, we need to remove them from our computer. Let’s see the steps to do that –
- Get access to the Run dialog and write appwiz.cpl in the vacant area of the box.
- Press Enter key to start Programs and Features window.
- Look for all the third-party antivirus programs.
- Right-click on it and choose Uninstall.
- Choose Yes if UAC is asking for permission.
14] Use the DISM tool to resolve defective image files
Defect in Windows image files is also a major reason for INSTALL_MORE_MEMORY BSOD error in Windows 10. To resolve them, the Deployment Image tool can be used. We need to take the help of Elevated Command Prompt for using it. Follow the instructions below –
- Right-click on Start menu and select Run.
- Type cmd in the vacant box that appears.
- Press Ctrl + Shift + Enter keys to go to Elevated Command Prompt.
- Type
DISM.exe / Online / Cleanup-image /Restorehealthin the black window. - Press Enter to run the “Deployment Image Servicing and Management” (DISM) tool. This will resolve all Windows image files that contain an error in it.
- Patiently wait for the process to get completed.
- Reboot the system as soon as the process ends.
15] Delete Terminate Windows Update files
It is seen that sometimes the Windows Updating process ceases abnormally during the installation of patches. This is the rarest reason for INSTALL_MORE_MEMORY error. We just need to delete those files to get rid of this risk –
- Launch the built-in Settings app using any of your preferred methods.
- Go to the Update and Security region.
- Click on View update history followed by selecting Uninstall updates link.
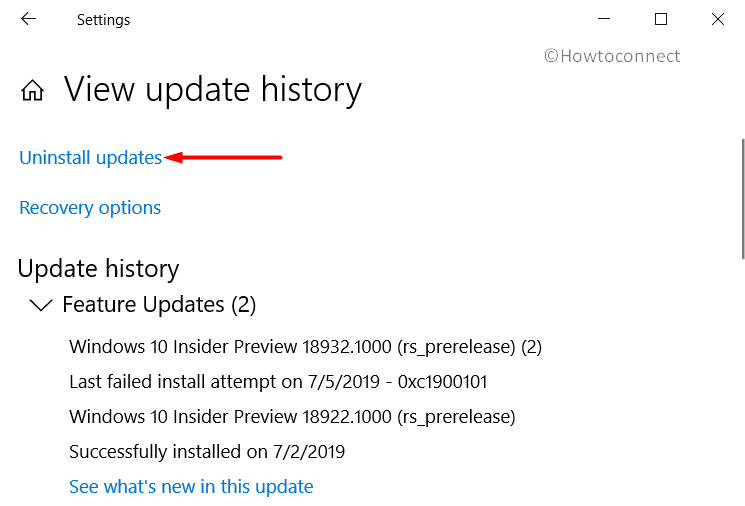
- A new “installed Updates” page will open within a few seconds.
- Follow further guidelines as shown on the screen until they get removed completely.
16] Get rid of Junk to fix INSTALL_MORE_MEMORY
Temporary files that get created only for the execution process are called junk files. But they take up a large amount of system’s storage space and makes the computer very slow. The Hard Disk starts to get the pressure and it leads to INSTALL_MORE_MEMORY BSOD error. Disk Cleaning feature removes all the files and creates space in the storage devices. Follow the steps to use it –
- Press Windows and R key simultaneously to access the Run dialog.
- Type cleanmgr in the vacant space.
- Press Enter and within few seconds a dialog box will appear. It will ask for that drive that you prefer to clean. Choose C: from the dropdown menu and click on the OK button.
- Get down and choose Clean up system files after the wizard shows up on the screen.
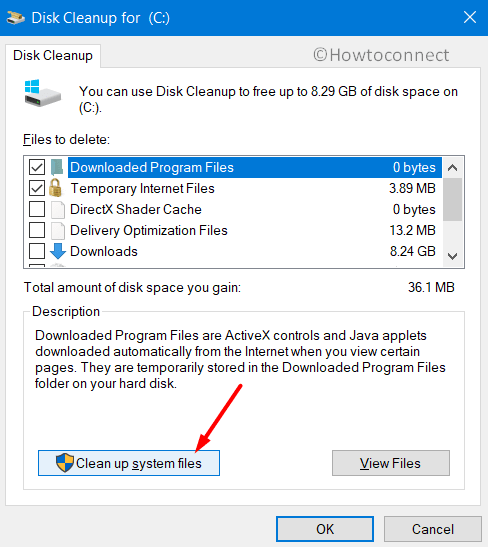
- The previous small popup dialog box will appear again. Choose C; in the same manner and press Enter key.
- As you get the Disk Cleanup for C: in the display, go to Files to delete the section.
- Check all the boxes except Downloads.
- Press OK to initiate the cleanup procedure.
Be cautious about the things to Recycle Bin as they will be erased. It’s better to reestablish them before starting to clean.
17] Provide some break to External Hardware components
It is seen that people are facing the INSTALL_MORE_MEMORY BSOD error because of connecting external Hardware accessories with the computer. Disconnecting them solves the issue temporarily. You can connect it later using the process as discussed below –
- Disconnect External hardware devices from your computer.
- Restart Windows 10 PC.
- Check for INSTALL_MORE_MEMORY BSOD error after the completion of rebooting.
- If everything is solved then connect the devices that you removed earlier.
- Go to the manufacturer’s website for respective hardware accessories.
- Download and install the latest driver for the smooth functioning of your system.
Thus, we have gone through all the resolution processes to fix INSTALL_MORE_MEMORY BSOD error in Windows 10 and we guess that you have resolved them own self. If you are still having any issue related to it then just reinstall your OS. This will be the last solution for all the issue that is remaining in your computer.
It is advisable that you have a backup of all the files and folder before performing any of the above processes. You can also contact any skilled people in this niche to assist you.
Methods:
1] Disable Automatic Restarting of Windows
2] Perform Safe Boot to load basic programs
3] Find Malware in Windows Security
4] Run Windows Blue Screen Troubleshooter
5] Fix Bad areas of Hard disk
6] Farewell to Memory Problems
7] Install all newly released patches
8] Uninstall Applications that causes a collision with each other
9] Run System Restore to undo new changes
10] Perform Clean Boot
11] Update the Drivers
12] Run SFC Tool
13] Get rid of all 3rd party Anti-Malware programs
14] Use the DISM tool to resolve defective image files
15] Delete Terminate Windows Update files
16] Get rid of Junk
17] Provide some break to External Hardware components
That’s all!!