In this post, you will read How to Make Advanced Startup Options Shortcut to Start straight from the desktop and operate various repairing tools like refresh, reset in Windows 10.
Assuming the readers to be an advanced user of Windows 10, we would like to share something very interesting about Windows 10 Advanced Startup Options for you all. You must have known about the basics of the Advanced Startup Options. We will portray some important facts of the Advanced Options and will also walk through the process which will help you in creating its shortcut on your desktop. To begin the discussion let us see what does Advanced Startup Options has in its store for its users.
To describe in easy terms, ASO or Advanced Startup Options is a menu that exhibits the repair, recovery and also troubleshooting tools in Windows 10. It is also treated as the Boot Options menu. The Advanced Startup Options provide you the tools – refresh, reset, and repair. Along with these tools, the Advanced Startup Options holds diagnostic, troubleshooting and Start recovery tools. It also provides an option to boot from a device or disk. You will also be able to get into the system’s firmware. The Advanced Startup also restores Windows and selects which OS to boot on the system if it finds various operating systems installed on it.
Now, with the above brief about the Advanced Startup Options, we will walk through the steps that will help you to Make Advanced Startup Options Shortcut in Windows 10 for easy use. Lets’ learn the process step by step.
Table of Contents
How to Make Advanced Startup Options Shortcut in Windows 10
Step 1
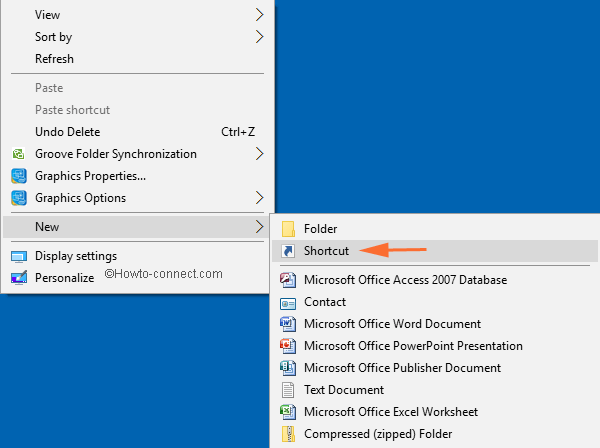
Execute a right-click at a vacant space of your Desktop and choose New followed by Shortcut.

Step 2
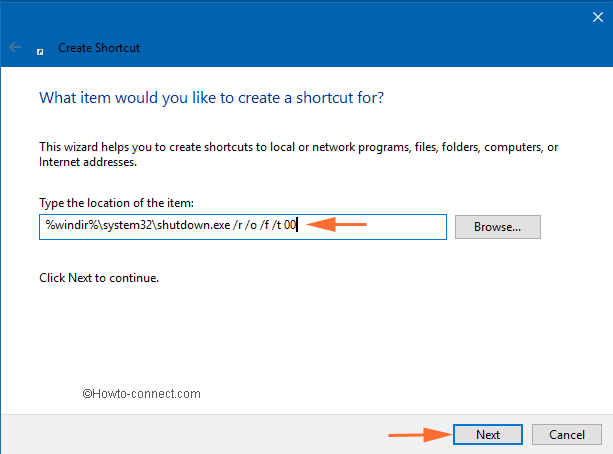
In the arrived Create Shortcut window, you will see a blank field where you need to Type the location of the item. So, copy and paste the following location or type it if you want.
%windir%\system32\shutdown.exe /r /o /f /t 00

Step 3
After providing the above path in the proper field, click Next to proceed.
Step 4
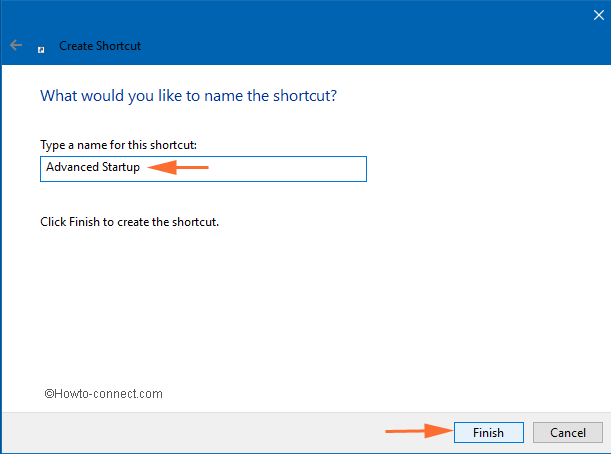
In the following window, you need to provide a name for the shortcut. You can write Advanced Startup and then make a click on the Finish button to wrap up the process. (Note: You can provide any other name as per your choice)

Step 5
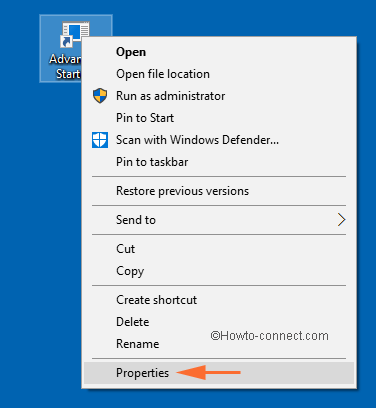
You will notice the newly created shortcut on your Desktop. Now, right-click on it and choose Properties.

Step 6
On the arrived Advanced Startup Properties window, take your attention to the Shortcut tab. Click on the Change Icon button.
Step 7
A Change Icon wizard will pop up, click Ok to continue.
Step 8
For the option, Look for icons in this file, copy and paste this path: %windir%\System32\bootux.dll and hit the Enter key.
Step 9
Pick the icon which is displayed in blue (see the screenshot) and click Ok to confirm the selected icon. (You can pick up any icon as per your preference).
Step 10
Now, the shortcut is created. If you wish you can Pin to Taskbar, Pin to Start or Start List and do many more things.
In the End
With the creation of the Advanced Startup shortcut, it will be easier for you to access the tools of it. We hope that we are provided you sufficient knowledge regarding the creation of shortcuts of Advanced Startup and hope that you will be able to fulfill the creation. If you have any extra information, please do leave them in the comments below.