Method to Manage Permissions for Cortana on Windows 10 with steps. – You all may know that Cortana offers various features and services. But this digital assistant needs your permission to carry out its functionalities. For example, Cortana demands to access your location so that she can assist you in finding directions and much more. But, in case you don’t wish to grant all rights to Cortana, you can take it back anytime. You can also Enable Cortana Keyboard Shortcut to Listen Commands Windows 10.
So, in this guide, you will learn the steps to Manage Permissions for Cortana in Windows 10 through Settings application. With the advent of build 16188, Microsoft introduced another category to the Settings program – Cortana. You might also want to read How to Enable and Disable Cortana Speech Services on Windows 10.
Cortana Settings page contains all the settings of the digital assistant, including permissions. Hence, let us begin the steps and explore the permission options and see how to manage them.
Manage Permissions for Cortana in Windows 10
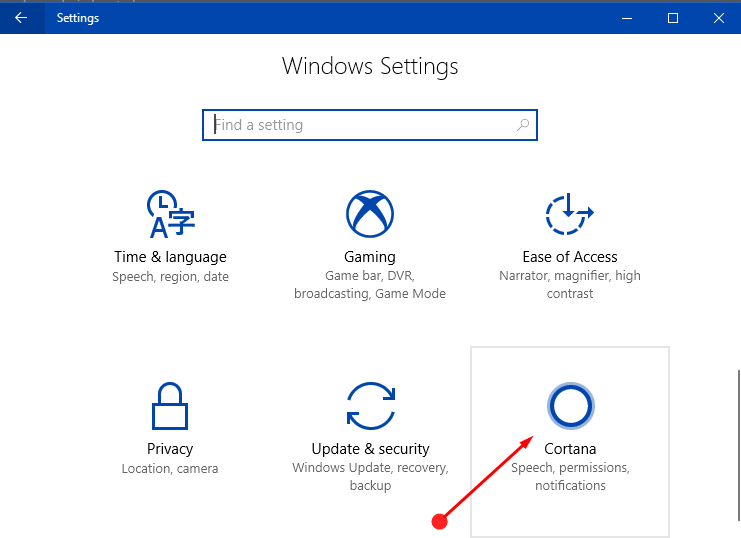
Step 1 – Press Win&I keys altogether on your keyboard and let the Settings app open up. From the list of various tabs, locate and click Cortana.
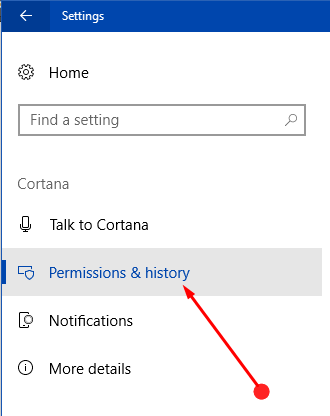
Step 2 – On the left sidebar, click Permissions & history.
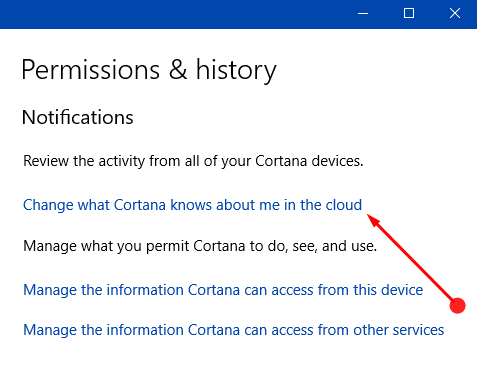
Step 3 – Now, on the right pane, you will notice several settings to Manage Permissions for Cortana in Windows 10.
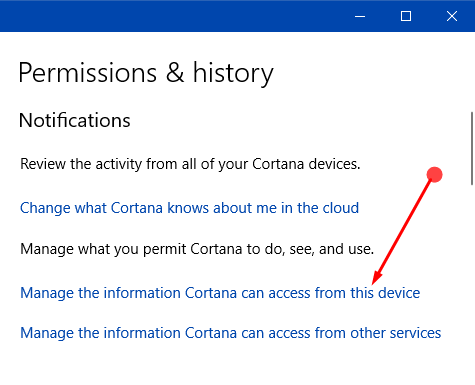
Change what Cortana knows about me in the cloud
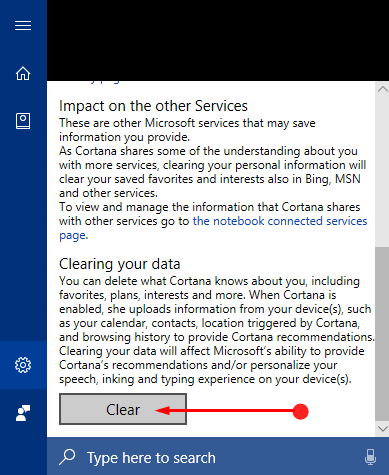
Cortana is powered by Bing search and whatever you browse using this digital assistant, Bing keeps a track of it with an intention to serve you better. So, in this way Bing records all your data and if you don’t prefer this behavior, you can remove the information. Hence, with the below steps, you can easily clear off all the data that Cortana stores in the cloud so that she van provide you better service.
Step 1 – Stay in the Permissions & history page. Go to the opposite side and click the first option that reads as Change what Cortana knows about me in the cloud.
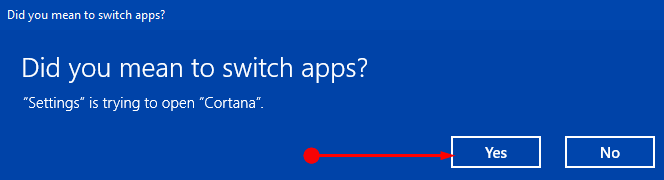
Step 2 – A pop-up will launch asking you to switch apps, click Yes.
Step 3 – This will immediately open Cortana and she will display all the personal information. Scroll till the end and click Clear button. All your personal information that Cortana stores in the cloud will get removed instantly.
Manage the information Cortana can access from this device
Step 1 – Moving ahead, click the second option Manage the information Cortana can access from this device.
Step 2 – Another Permissions page will open up. The page lists all those options that can perform only if you permit them to use your device.
Step 3 – The page shows a toggle for Location, Contacts, Browsing history, and moreover suggested reminders. Let us see look at them one by one.
Location – Turn this toggle ON when you wish Cortana to collect your location and its history. When you enable this option, Cortana can remind you about the places you select, assist you in finding directions and so on.
Contacts, emails, calendar, & communication history – The digital assistant will help you in suggesting reminders, will prepare you for the commitments if you give access to this service. Moreover, she will collect your contacts, communication history from apps and messages.
See How to Enable Suggested Reminders in Cortana Windows 10 to learn more.
Browsing history – If you turn this ON, the voice assistant will offer you personalized suggestions. She will help you to start from where you left off on Microsoft Edge websites.
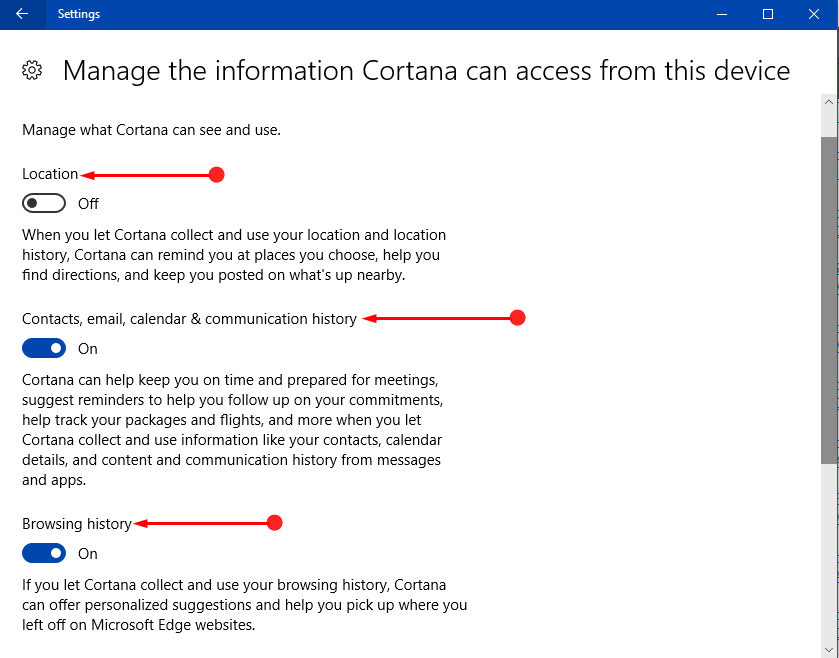
Step 4 – So, turn On the options you want to. If you decide to toggle OFF any option, Cortana will not gather any data of that specific feature and put into use.
Manage the information Cortana can access from other services
Step 1 – Head back to the Permissions & history page. On its right-hand side, click the option Manage the information Cortana can access from other services.
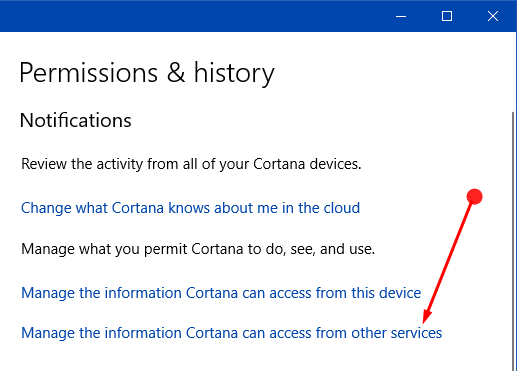
Step 2 – Cortana’s Notebook will come into view where you can notice all the connected services.
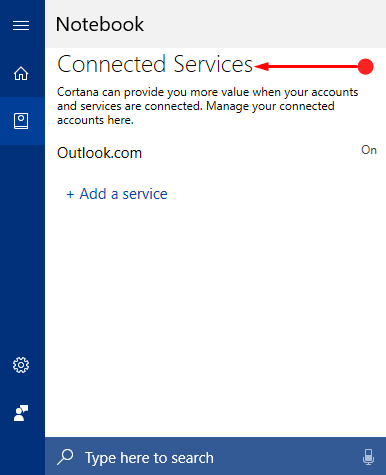
Step 3 – If you want you can Add a service or can turn Off the existing one.
Read Search Office 365 Through Cortana in Windows 10 to know more.
Conclusion
So, Microsoft has made it pretty much easy to Manage Permissions for Cortana in Windows 10 from one place. Many users continuously in favor of adding Cortana to the Settings application as all the settings can be controlled from one place. Hopefully, after completing the above steps you will be able to Manage Permissions for Cortana in Windows 10 effortlessly. If you have more tips on this permissions topic, kindly write to us.