In this article, you can learn everything about how to manage Sandbox in Windows 10 and 11. You download apps, videos, music and many other files from the internet, however, there is no assurance of those being safe. The stuff you get may come with hidden threats and malware which can trouble you with potential risk to your system. This security feature will be available from Windows 10 1903.
Windows 11 or 10 offers the Sandbox feature as a solution for this. With the tool, you can download such extra apps while defending your system from unwanted viruses and malware. Some malicious code downloaded from several files to Sandbox will not find a way out of the box. In simple words, it is your secret space that keeps away the untrusted installations away from affecting the mainframe in any manner. Sandbox can create extra storage that helps the users to access files whenever they need them. Read on to know more about it and learn how to use Sandbox in Windows 10 easily.
Manage Sandbox in Windows 11 or 10
Is Sandbox in Windows 11 or 10 useful?
There are some obvious benefits in managing Sandbox in Windows 11 or 10 –
- No requirement of VHD, it is part of Windows 11 or 10. By using Sandbox, a user can access Enterprise Insider build 18305 or later.
- Safe and clean every time it runs over the window.
- Closure represents disposal of everything sandbox has.
- It is highly secured and trusted.
- Virtual GPU and Smart memory management make it efficient as well.
It is a security mechanism that is used to execute the untrusted program. Managing sandbox is very simple, similar to the mobile app as it carries the files stored and those files aren’t reflected on your mainframe.
How to access and manage Sandbox
For now, the user needs to be a part of the Windows Insider Program to enjoy this feature. If your system is running on the latest application, simply follow the below-listed steps –
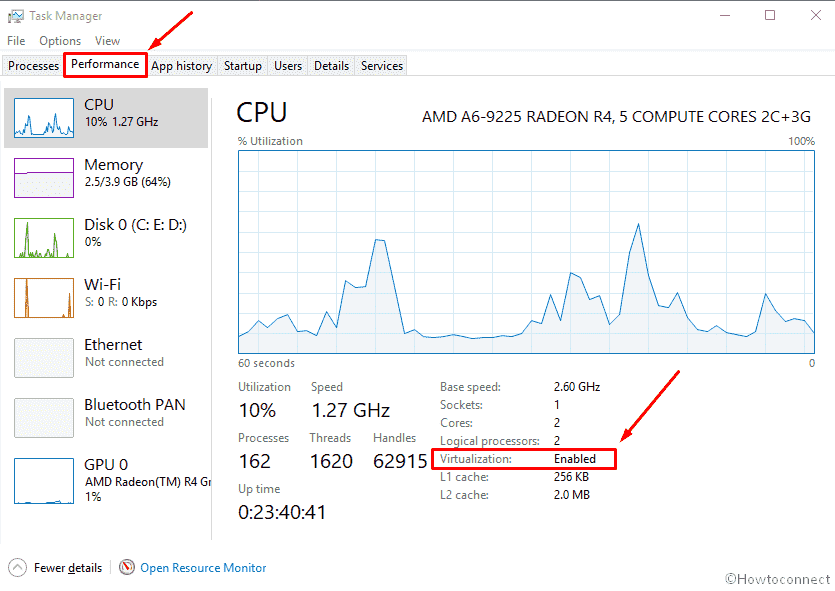
Step-1: Press Ctrl + Shift + Esc to open Task manager.
Step-2: Click on Performance tab and from the list of categories, check the status of Virtualization is enabled under the section of the CPU
In case, your system is running over the host system in a virtual machine, you need to switch on the Nested Virtualization by using the command
Set-

VMProcessor –VMName <VMName> -ExposeVirtualizationExtensions $true
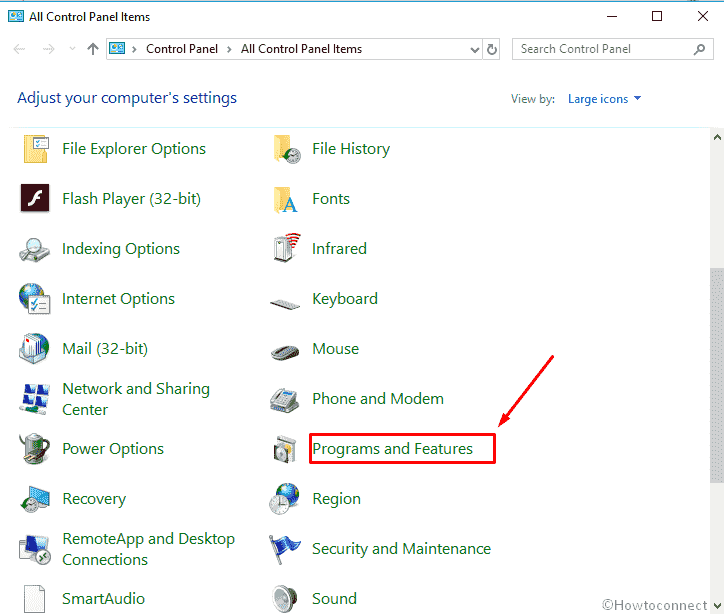
Step-3: Press Win key, type control then hit Enter.
Step-4: Click on Programs and features.
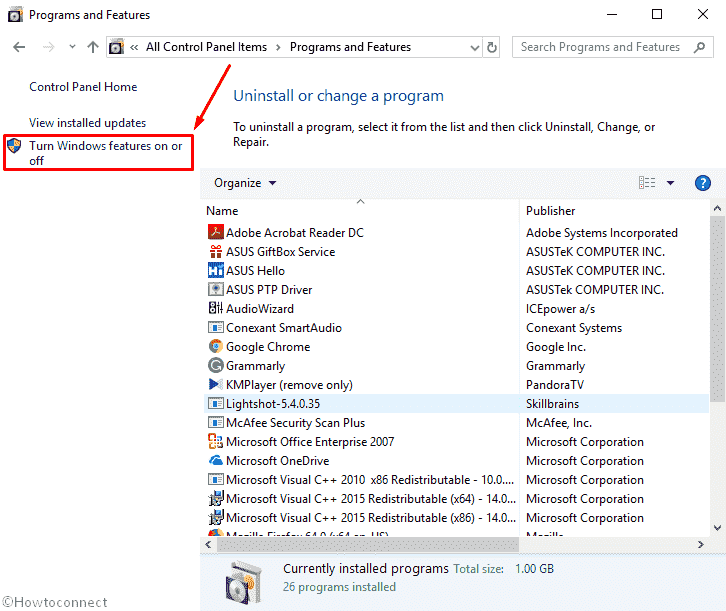
Step-5: From the options available on the left side of the screen, click on Turn Windows features on or off option.
Step-6: A small wizard will pop up.
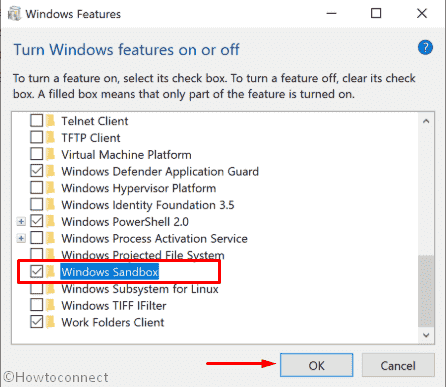
Step-7: Tick marking the checkbox corresponding to Windows Sandbox and then click on OK.
Step-8: Restart the system.
Step-10: Look for Sandbox in the start menu and open it.

Step-11: Click and allow the administrative privilege if prompted.
You now have Sandbox ready. You will be able to see a fresh replica of Windows, with nothing but the default apps and settings.
Some other tips for managing Sandbox
- Simply copy or download the files you want to test.
- You can manage sandbox by downloading and testing any suspicious executable file or app.
- If you delete something from the Sandbox, it doesn’t move to the Recycle Bin rather stamp out from the mainframe. You will receive an alert sign before you permanently delete those files.
- Once the Sandbox is closed, all the files and work have been done presently there will be eternally dispensed with. So whenever you open it, you will find in the default condition, clean state.
- It will run on minimal hardware and that too without a dedicated graphics card.
- Traditional drag-drop won’t work while taking files to Sandbox.
- You can simply close sandbox as any other app.
That’s all!!