It is very important to manage Windows 10 Indexing as this activity puts a lot of loads on Windows 10 devices. Basically, Search indexing actually accumulates and preserves folders so as to bring back fast and correct search when needed. So it is vital to configure the Search Indexing of the PC so that you can maintain the speed of a processor or a hard drive. See a guide in this concern – Search Items From Non indexed Locations in File Explorer Windows 10.
Search Indexing is a good option to those PCs that have a good speed of a processor or a hard drive because it causes a great load on the device. In case, the search option is not much in use, you may Manage Windows 10 Indexing in order to decrease the load of the device. You will wonder to find that you can also Save Search in File Explorer on Windows 10.
Usually, there are three ways to manage Indexing – Deleting folders from indexation, Deactivating indexation for certain content and Deactivating entire Search indexing. It entirely depends on you to choose either of the ways as per your preference.
Manage Windows 10 Indexing
Deleting folders from Indexation
There are many folders which usually keep adding on and deleting information. In this case, it becomes a lot of work for indexing as it needs to retain the info of both existing and deleted folders. Therefore, it is always advisable to stop indexing such folders if they are not important.
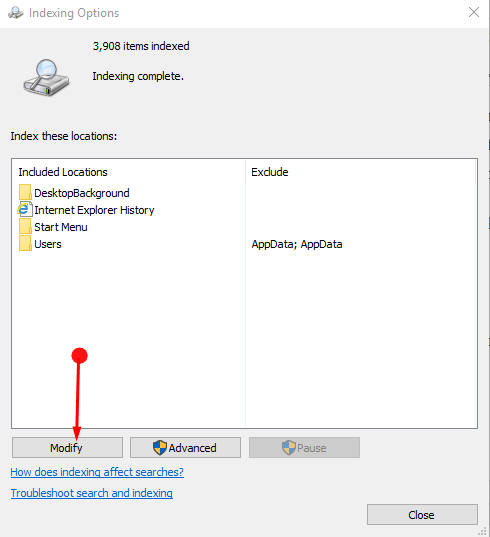
Step 1 – In the Control Panel applets, locate for Indexing Options. Once the option comes to sight, click on the same.

Step 2 – This opens up a new window where there is a list of items in the index at present. It even shows the indexing status. Here, click the Modify button as shown in the given screenshot.
Step 3 – The above action leads to a two-panel box showing all locations in the top pane, and indexation folders on the bottom.
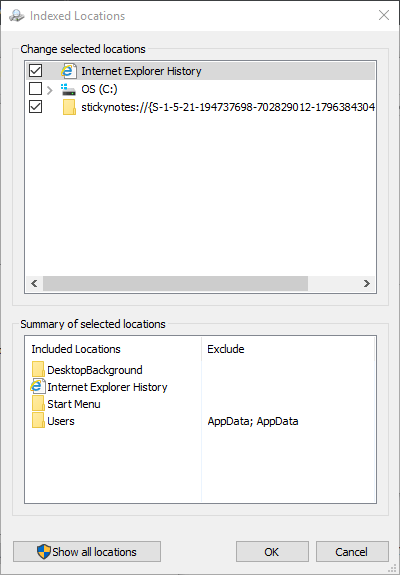
Step 4 – Here it gives the liberty to add new files or discard old files by hitting their respective box.
Deactivating Indexation for Certain Content
This helps in getting a clarity on whether indexing is done only on the file content or the properties as well. If it indexes the properties too then obviously the load on the indexing is more. Hence, in this case, it is advisable to put to index only the file content and not the properties. So, to do so, carefully observe the below given steps.
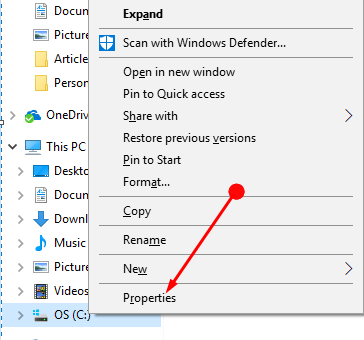
Step 1 – Open File Explorer and input a right-click on the Local Disk which is usually C. Out of all the options, click Properties.
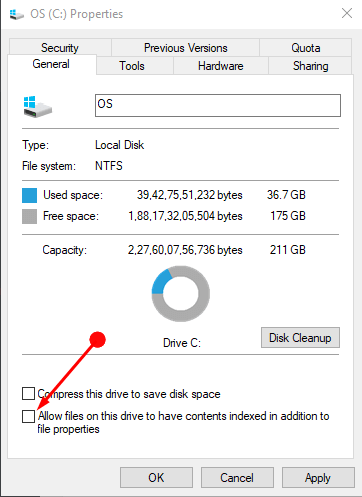
Step 2 – Reach out to the General tab of the new box. Moving on, locate and deselect the option namely “Allow files on this drive to have contents indexed in addition to file properties“. Do not forget to click Apply and the OK buttons to implement the indexing changes.
Deactivating entire Search indexing
Another way to manage Windows 10 Indexing is to totally end Search Indexing. This releases the device of the load that the entire indexing process causes.
Step 1 – Type services.msc in the Taskbar field and let the Windows Services Manager unfold.
Read our another tutorial to How to Start, Stop, Configure Windows Services in Windows 10.
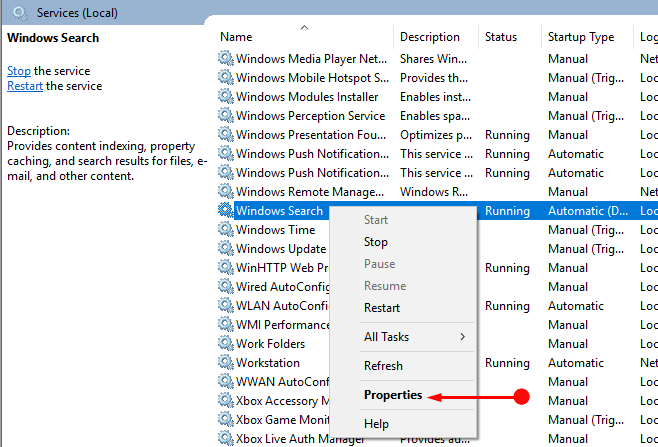
Step 2 – When it opens reach out Windows Search and select the same. Though there are many services yet they are all arranged alphabetically. Hence you won’t find any difficulty in searching it out.
Step 3 – After reaching to Windows Search input a right-click on it. From the given list of options, click Properties.
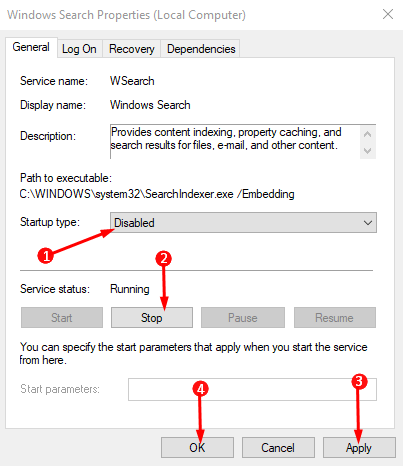
Step 4 – Use the drop down key beside the option Startup type and set it to Disabled. Even underneath the Services status section, click the button namely Stop. Do not forget to click Apply and the OK buttons to make the indexing changes effective.
Concluding Words
Hence, you can use either of the three given methods to manage Windows 10 Indexing. But again here it is very important to choose the correct method depending upon your use. After deactivating the indexing completely the device will have no records of the search. In this case, any of your searches will definitely take a longer time. Therefore, it is always suggested to manage the index searches wisely.