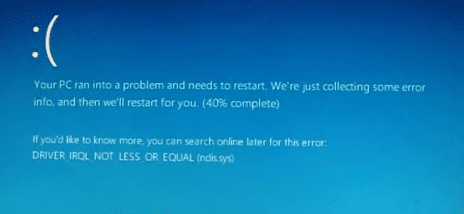
The ndistpr64.sys Blue Screen Of Death Error (or BSOD) in Windows 10 OS commonly happens during the booting phase of the system. Consequently, it typically prevents the affected computer from startup. ndistpr64.sys is a file often associated with IRQL_NOT_LESS_OR_EQUAL stop code. Technically, experts classify this as a software driver that blocks certain security software or anti-virus from operating.
The Blue Screen of Death (viz BSOD) is one of the major technical issues that annoys all categories of Windows users. This problem causes a lot of inconveniences that includes; freezing the computer system, constant restarting of the computer system and loss of progress already attained in the course of system boots. There are lots of causative factors responsible for this setback. Unfortunately, there is no general technique for resolving such computer issues. In other to solve ndistpr64.sys Blue Screen of Death Error, you must first evaluate the report displayed by the BSOD and deduce the accurate message regarding the problem. In Windows 10, understanding the information is relatively easier than what is obtainable in older versions.
The first method to apply in resolving the issue is to scan the computer for malicious programs. You can either rename/delete the file that causes the error or gain permission of the Ndistpr64.sys File. It is safe to rename or delete the file, as it is actually a system file.
Fix: ndistpr64.sys Blue Screen of Death Error in Windows 10
Solution 1: Change the name of the file responsible for the error
Step-1: Boot the system into the “Safe Mode” and to achieve this, you have to first discontinue the normal startup process for three continuous times. At the fourth attempt, the screen will display the Automatic Repair mode.
Get a detailed guide to Enter Safe mode During Boot Failure on Windows 10.
Step-2: The first thing you observe is the following message; Preparing Automatic Repair. It simply implies that Windows is conducting an automatic diagnosis of the computer system. You must exercise some patience and wait for the computer to display the Automatic Repair screen, after which you can click on the Advanced options button.
Step-3: After clicking on it, you can notice the Troubleshoot window. Moving ahead, navigate to Troubleshoot => Advanced options => Startup Settings => Restart and then press the F4 key.
Step-4: This instantly takes you into minimal Safe Mode. You can press F5 to take you to “Safe Mode with Networking” or F6 for the “Safe Mode with Command Prompt” accordingly. Alternatively, you can just select any of the options in the minimal safe mode.
Step-5: Once you have booted the system into the Safe Mode, you have to navigate to the specific folder containing ndistpr64.exe.
Step-6: To accomplish this, go to Local Disk (C:) => Windows => System32 => Drivers. Here, locate ndistpr64.sys within the driver folder, right-click on it and rename it to ndistpr64.old.
Step-7: Reboot the system in the Normal Mode and navigate to the Boot tab by typing msconfig in the Search bar.
Step-8: Once in the Boot tab, uncheck Safe Boot option, click OK, confirm when prompted and restart the computer.
If the ndistpr64.sys Blue Screen of Death Error still persists to happen, you should give a shot to the next solution.
Solution 2: Obtain Permission for the Ndistpr64.sys File
Step-1: Launch File Explorer and go to Local Disk (C:) => Windows => System32 => Drivers.
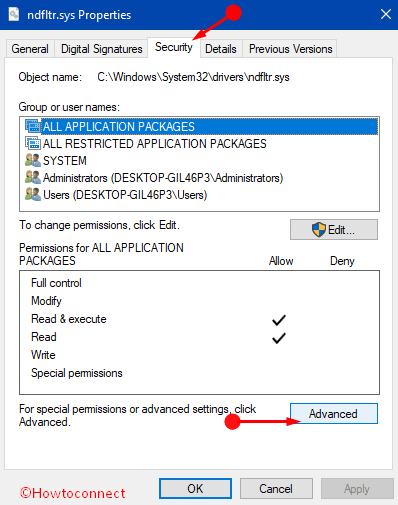
Step-2: Find out ndistpr64.sys, right-click on it, select Properties and then switch to the Security tab.
Step-3: Under the Security tab, click the Advanced button situated at the lower-right of the dialog. This action immediately shows up the Advanced Security Settings box.
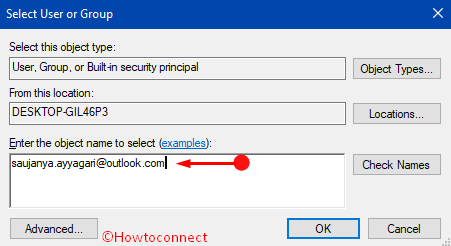
Step-4: Click on the Change link and select the User or Group window that is displayed. Enter your user account in that section that says ‘Enter the object name to select’ and hit the OK button.
Step-5: Alternatively, you can change the ownership by selecting checkbox namely “Replace owner on subcontainers and objects” which is also available in the Advanced Security Settings wizard.
Step-6: The next step is to enable your account to have full access to the file. To achieve this, navigate to Local Disk (C:) => Windows => System32 => Drivers and locate ndistpr64.sys. Right-click on the file, select Properties, shift to the Security tab and then hit the Add button.
Step-7: This process takes you to the Permission Entry. Click on Select a Principal and then pick your account. After this, set permission to Full Control in that same window and click OK.
Step-8: Alternatively, is to make a click on “Replace all existing inheritable permissions on all descendants with inheritable permissions from this object“. Choosing this option will substitute permission on the descendant objects with those from the parent objects. Lastly, click OK to grant full access to your account.
Run Blue screen troubleshooter
Many times running Blue screen troubleshooter gives a positive result when you encounter ndistpr64.sys Blue Screen of Death Error in Windows 10. So follow the steps ahead:
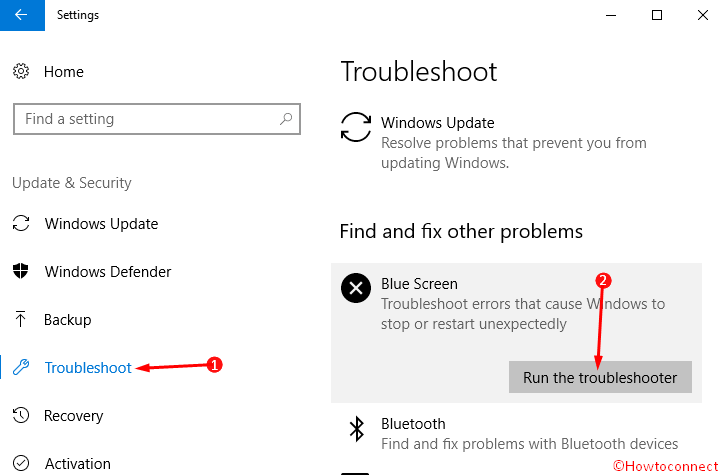
Step-1: Go to Settings=>Update & Security=>Troubleshoot and from the right pane click on Blue Screen.
Step-2: Once the section expands, make a click on Run the troubleshooter. The tool will automatically scan the culprit element so follow the on-screen instructions and finally restart your PC.
To know more about this, read our guide on How to Change File Permission to Grant Ownership in Windows 10.
Conclusion
The article discussed two short but highly effective options for fixing ndistpr64.sys Blue Screen of Death Error in Windows 10. It is important to note that the file involved in this case is a system file. This explains why it can be replaced during booting after it must have been renamed or deleted. We recommend making use of the Safe Mode with Networking. However, if you make use of the Command Prompt, then be cautious and ensure to avoid making dangerous modifications to your system. At times, using the first solution may not work accurately. If this occurs, then it means you don’t hold any permission to access, delete or rename the file and in that case, try the second workaround to take over the file ownership.