4 Procedures to Prevent Chrome from updating Automatically on Windows 10. – Google Chrome’s auto-updating feature allows the browser to download and install update files at the same time Chromium project releases. This makes the web browser always remain Advanced. But many times buggy updates create trouble for Chrome and you have to face different errors. So many users decide to disable the automatic update in Google Chrome. Follow a guide to lessen annoyance staying on this browser – How to Stop Push Notifications on Chrome.
So here you will find few easy methods regarding How to Prevent Chrome from updating Automatically in Windows 10. It does not provide the user with complete control over the updating. It ensures that updates will install automatically on computer systems.
Prevent Chrome from updating Automatically in Windows 10
Way 1 – Through Task Scheduler
Step 1 – Click on Start button and type Task Scheduler in the search box. Now in the result section, input a right-click on Task Scheduler. Out of all the options that appear on the Context menu, click on Run as Administrator option.
You can get the help of the Guide – Windows 10 Task Scheduler Access, Functions, Operation, Summary.
Step 2 – In the Task Scheduler, reach to the extreme left and double click on Task Scheduler Library for its expansion.

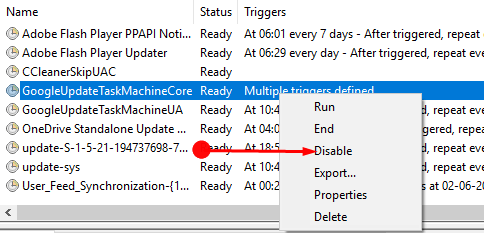
Step 3 – Now go to the adjacent pane and look for GoogleUpdateTaskMachineCore. Then input a right-click and select the Disable option from all the other options.
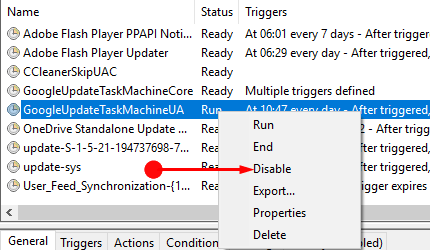
Step 4 – Similarly locate GoogleUpdateTaskMachineUA in the same pane and disable it.
Way 2 – Through System Configuration
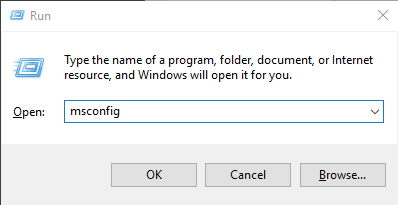
Step 1 – Press the combination of Win + R and then type the command msconfig inside the space in the box. After that do not forget to press Enter to execute the command.
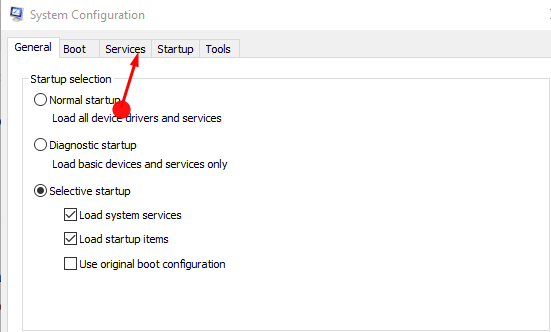
Step 2 – This will open a new window containing the System Configuration of your device. Here, move to the Services tab to Prevent Chrome from updating Automatically.
Step 3 – Here check the box Hide All Microsoft Services at the end of the window. This is just a preventive measure so as not to stop any important services by mistake.
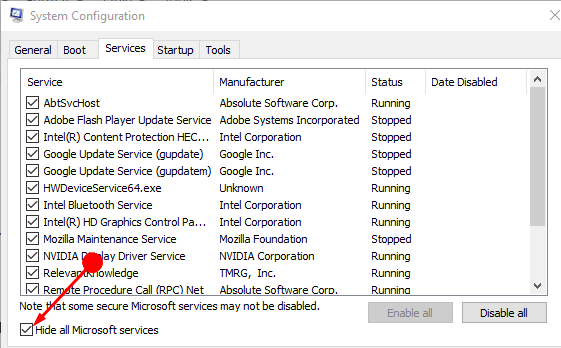
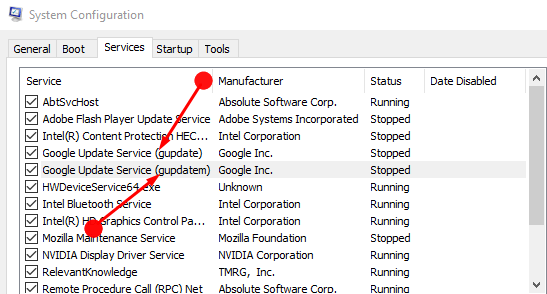
Step 4 – Locate Google Update (gupdate), Google Update (gupdatem) in the services list. Here, stop check only the boxes before both the Services and click Disable button. Finally, select Apply and then OK and reboot your PC.
This article may be useful for you 5 Ways to Manage Services in Windows 10.
Way 3 – Through Registry Editor
Step 1 – To Prevent Google Chrome from updating Automatically using Registry hack first access Registry Editor.
So, click on the Start button from the extreme left side of the taskbar. Type regedit and then press Enter. After pressing Enter the User Account Control may seek permission. Click on the Yes button to permit.
Step 2 – After opening the Registry Editor, open the entries according to the path below to reach the Update Key.
HKEY_LOCAL_MACHINE\SOFTWARE\Policies\Google\Update
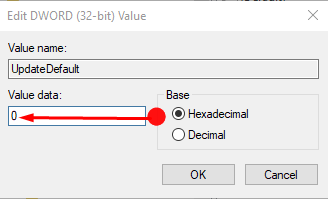
Step 3 – Once you access the Update Entry, jump to the right pane and locate UpdateDefault. Double click on the UpdateDefault key and type 0 in the Value data section and click on OK.
Many users don’t find Google key in the registry editor. So follow the steps if you are unable to locate the Google Entry in the registry editor.
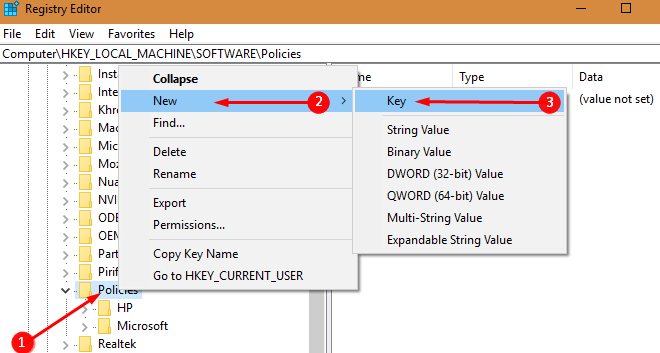
Step 1 – Right click on Policies key and select the New followed by Key option. Here name this new key as Google.
Step 2 – Right-click on the newly created key Google and select New followed by Key. Give a name to this key as Update.
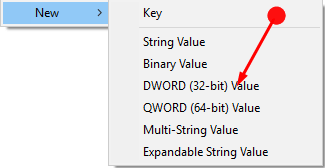
Step 3 – Moving to the right pane, input a right-click and select New and after that DWORD (32-bit) Value. After that give the name to this as UpdateDefault.
Step 5 – Change the value data of the UpdateDefault to 0 by double-clicking on UpdateDefault key and writing 0 in the value data box and selecting OK.
After making the change, Restarting the PC will be pretty enough to Prevent Chrome from updating Automatically in Windows 10.
Way 4 – Rename the GoogleUpdate.exe File
Renaming the GoogleUpdate file is an easy task to Prevent Chrome from updating Automatically in Windows 10. Follow the process –
Step 1 – Go to C:\Program Files (x86)\Google\Update and locate GoogleUpdate.exe in the folder. Now rename this file like GoogleUpdate1.exe or GoogleUpdate2.exe and restart your System.
Note – For 32 bit PC, follow C:\Program Files\Google\Update
Conclusion
Therefore, these are the simple procedures to Prevent Google Chrome from updating Automatically in Windows 10. Now the browser will not receive the files from Chromium project after every release and you will stay with the same version.