Scanning and faxing program in Windows 10 allows you to Receive and Send faxes in a form of written text, or documents generated in various applications, or scanned images or notes. This program is stored a little deep in the Start Menu and is labeled as Windows Fax and Scan. In this post, we will showcase the steps of How to Receive and Send Fax on Windows 10.
The computer from which the fax will be sent or on which the fax will be received must possess a few essential things –
- Firstly, a fax modem via your phone line must be connected to the computer.
- Alternatively, a fax server should be connected with the computer.
- And most importantly a fax account must be created beforehand.
When your system is equipped with the above things, you are ready to go ahead with the steps. So, let us begin the steps of How to Receive and Send Fax on Windows 10.
Table of Contents
How to Receive and Send Fax on Windows 10
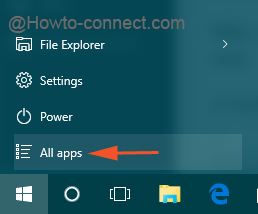
- The prime work to perform is to click the start icon which will bring the Start Menu on the screen and go with a tap on All apps.
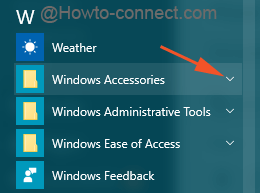
- Get to the extreme down of the list and expand Windows Accessories.
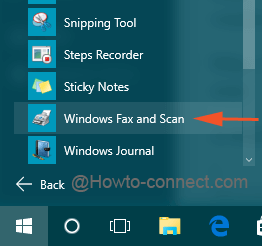
- Now underneath it look for Windows Fax and Scan and open it.
- The Windows Fax and Scan window will soon appear on the screen.
To Send a Fax
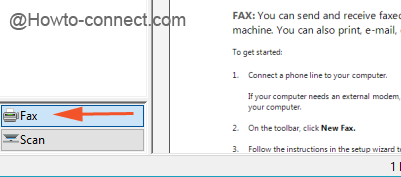
- See the bottom left fringe and do a click on Fax button.
- Click New Fax button of the blue ribbon on the top.

- A separate New Fax box will appear on the screen where you need to provide the necessary details in order to send a fax.
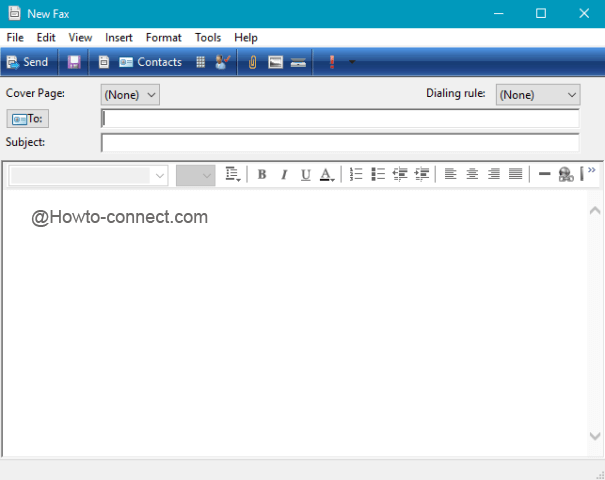
- Most of the entries are self-understandable such as the To field is to enter the contact details to whom the fax will be sent, subject area for the brief of the fax.
- You can either pen down the text by yourself or if it is present in another location, you can copy it from there and paste it in the text area of the New Fax box.
- Apart from this, you can make use of Attach symbol to add the required documents.

- Images from the Pictures folder or from any other area can also be dispatched using its icon.

- Or in the current fax, you can go ahead by adding scanned documents and images.

- Once the fax is ready for dispatch, click Send button on the blue ribbon of the New Fax window.

To Receive a Fax
- By this time you know how to access this program. So when you are about to receive a fax, open this application beforehand.
- Make a tap on the Receive a Fax Now button that is present on the blue ribbon of the main screen of the application.

- And you get your fax.
The entire procedure to Receive and Send fax on Windows 10 is very simple. The only care that is essential to take care of is setting up the connection and getting the account number. If the connection is obtained from the phone line, the connection providers will only provide you the account number.