Methods to Reset OneDrive Synchronization in Windows 10. – OneDrive is a place to store files and numerous various important data that you need in day to day life. After syncing items to the cloud storage, you can obtain them from any local device or from its Website with the help of Internet.
OneDrive is very closely related to the Windows 10 OS and thus it has the same login credentials as that of the Microsoft account. Once you log in, Windows starts prompting to use OneDrive cloud to save data. This hosting service allows pushing important files as well as other data in the cloud. OneDrive also syncs files to PC and accesses it at times of need. See an article on the same topic Windows 10 – How to Start OneDrive Automatically when Login.
Reset OneDrive Synchronization will delete the whole configuration and sync settings of this cloud storage app on Windows 10. This is useful for the users getting certain trouble in running the app. Either when you want to fresh start with the OneDrive this guide is helpful. In case, you are experiencing problems while handling the application follow – How to Troubleshoot OneDrive on Windows 10 if Sync Gets Stuck. But few prefer not using this utility and storing files on PC and so they wish to reset the sync of OneDrive. So, See this guide to reset.
Methods to Reset OneDrive Synchronization on Windows 10
Method – 1
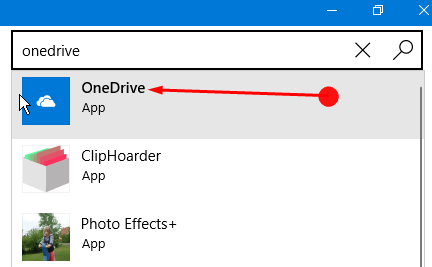
Step 1 – Click the Store icon on the taskbar and once the Windows Store appears on the screen, type OneDrive in the Search box and press Enter on the Keyboard.
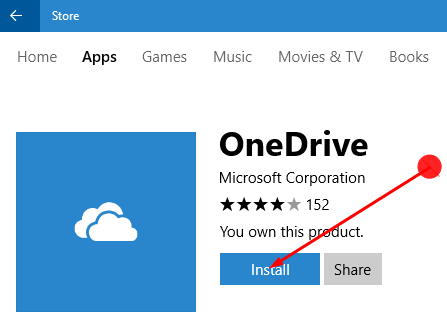
Step 2 – You will see the OneDrive, so click on the Install button. Wait until the installation of the OneDrive gets over.
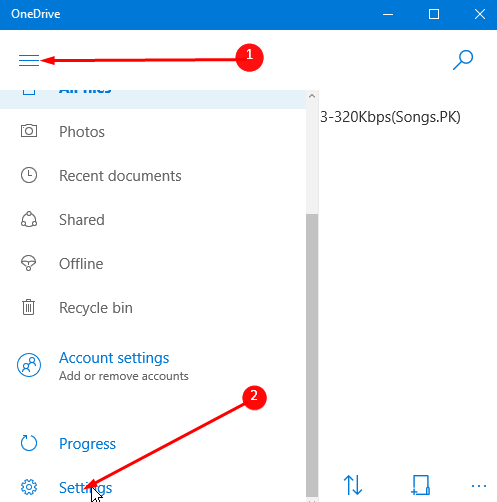
Step 3 – Launch the Application and click on the Hamberger menu (3 lines icon). When the right pane comes into view, click the Settings icon.
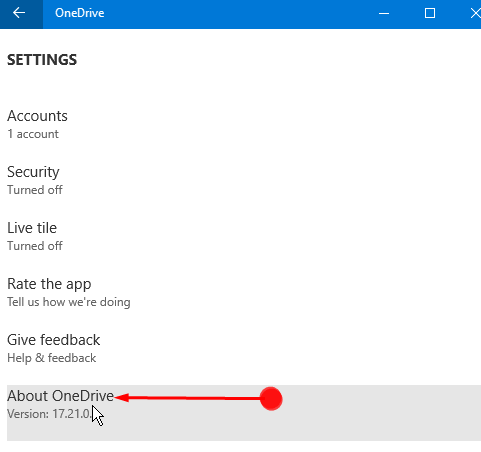
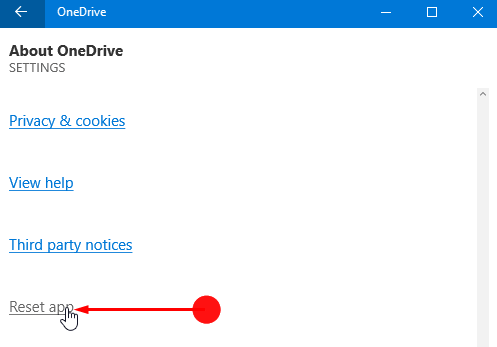
Step 4 – On the Settings page, select About OneDrive.
Step 5 – The last option on the About OneDrive page is Reset app. Click on this link.
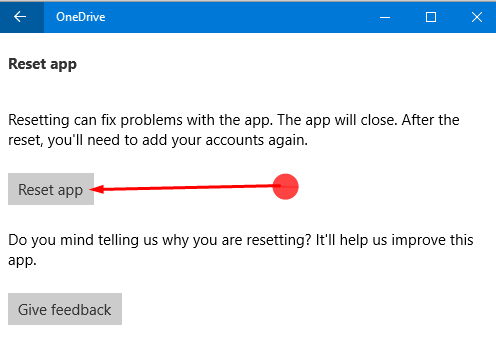
Step 6 – Once the next section appears, click on the Reset app button.
Method – 2
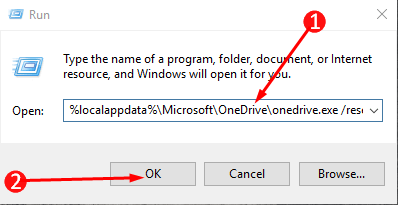
Step 1 – Use the keyboard shortcut of Win + R to open the Run box. Press both the keys on the keyboard. The other way to launch this box is by right-clicking on the Start button. This will bring forward a list of options, choose the Run option from the list.
Step 2 – In the box, type the below given commands one by one, and do not miss out to press Enter.
%localappdata%\Microsoft\OneDrive\onedrive.exe /reset
C:\Program Files\Microsoft OneDrive\onedrive.exe /reset
C:\Program Files (x86)\Microsoft OneDrive\onedrive.exe /reset
Step 3 – As soon as you press OK the command starts working and will reset one configuration and settings of OneDrive. The synchronization to your location will commence in a minute or two all by itself.
We know that the OneDrive icon takes a place in the system tray. But when this action of resetting synchronization grabs a place the OneDrive icon in the system tray will vanish and reappear back.
It is noteworthy to mention that if the OneDrive icon does not come back in a few minutes then sign out and log in to the Microsoft user account. This will now definitely highlight the OneDrive symbol.
Final Note
Thus now you have seen the simple ways to Reset OneDrive Synchronization on Windows 10. This is a very handy tip that lets you delete all the customizations and tweakings in the application. So follow and cheer up!