Guide and Steps to Save Windows 10 Custom Theme. – You might have known that Themes section has migrated from the traditional Control panel to Personalization Settings on Windows 10. Moreover, you will find a few tools here using which you can perform cool things with Windows 10 themes. One example is already available in this concern – How to Get More Themes online From Store Windows 10.
You all give a personal touch to the Windows 10 PC by combining various Personalization options. So, it will be an impressive idea if you can save all the changes into one theme.
With the help of Personalization Settings page, you manage the awesome look of your Windows 10 PC. You can change transparency Settings, or add background color to Start or can organize many little settings from one place. So, once the customization of the Desktop is finished, you can save it as a Theme. Hence, in this guide, we will explain you the steps to Save Windows 10 Custom Theme.
Once the custom theme is saved, you will be able to share it with friends or can also apply it in future. Let us begin the detail steps and see how you can do this.
Way to Save Windows 10 Custom Theme
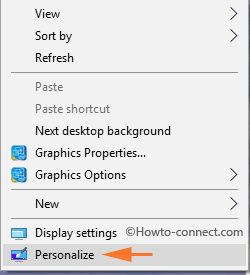
Step 1 – First of all, start the method by finding a blank space on your desktop. Next, make a right-click there and click Personalize.
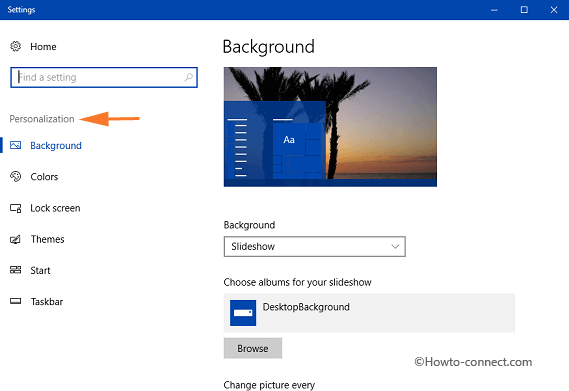
Step 2 – This will directly enter Personalization Settings on the screen.
Step 3 – Now, using the options in Background, Color and Themes sections, give a personal touch to your PC.
In this reference, follow a guide on a different location – How to Choose a Custom Accent Color Using Settings App on Windows 10.
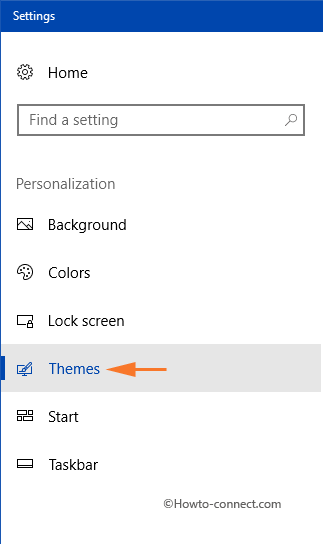
Step 4 – After personalizing your PC, select the section Themes.
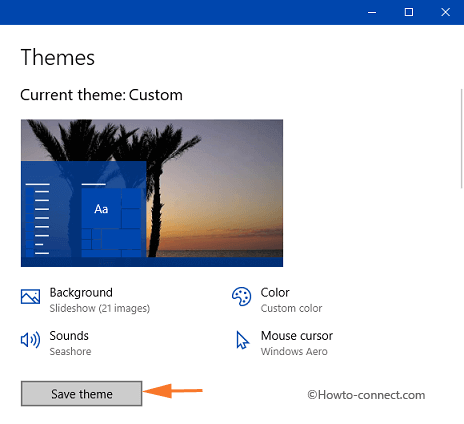
Step 5 – In the right pane, you will notice the Current Theme as Custom. This custom theme specifies that when you were changing Background and color Settings (Step 2) you unintentionally made changes in the theme too. For example, when you changed color, the color of the theme was also changed. But you’ve not saved it yet.
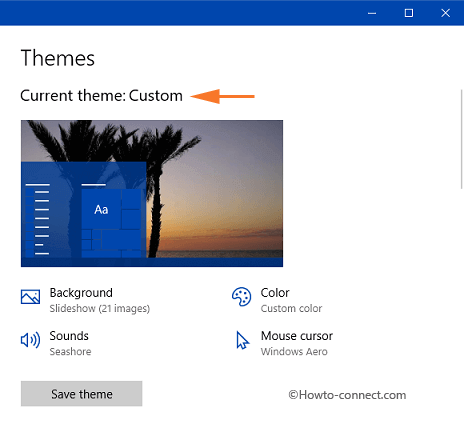
Step 6 – So, to save Windows 10 Custom Theme, select the button Save theme that appears just below the preview image.
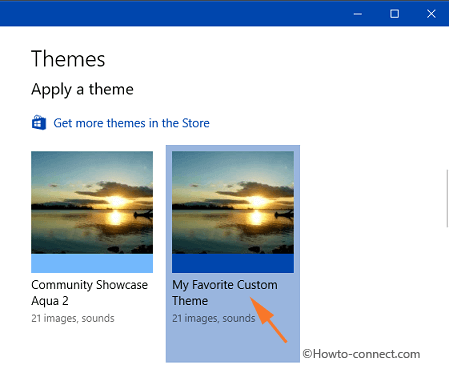
Step 7 – Next, give a name to the custom theme in the small box that pops-up. So, type any name and select Save button.

Step 8 – Finally, you will find your custom theme name in Themes list.
Conclusion
You experience the important changes related to the appearance in Windows 10. One such change is it allows you to Delete Installed Themes in Windows 10. Now, as the Creator Update is to arrive in the few months, the team is experimenting with all the aspects of the OS. If you have more tips and information on to Save Windows 10 Custom Theme, write to us in the comments form.