Microsoft Windows 10 users can Set Data Limit Per Network in computers like they could do in mobile phones previously. With the advancement of technology, you are equipped with WiFi, Dial up and broadband networks. Most of these network providers offer unlimited plans used in a billing method. But few data packages offered by ISP might have certain limits. In that case, you need to manage your data usage to avoid excessive use and billing amount.
Windows 10 operating system has made your tasks easy as you can now set a certain limit for multiple networks separately. When the usage will reach your preset range, the system will turn the internet data off in order to save usage. This will send a warning message before the utilization reaches the deadline. In order to Set Data Limit Per Network in Windows 10, the default Setting app includes the option. Currently, this feature is available for Insiders having at least build 17040 but later it will be included in Windows 10. Let’s see the process:
How to Set Data Limit Per Network in Windows 10
You can follow the below-mentioned steps in order to set your data limit for a particular network. Here are the steps:
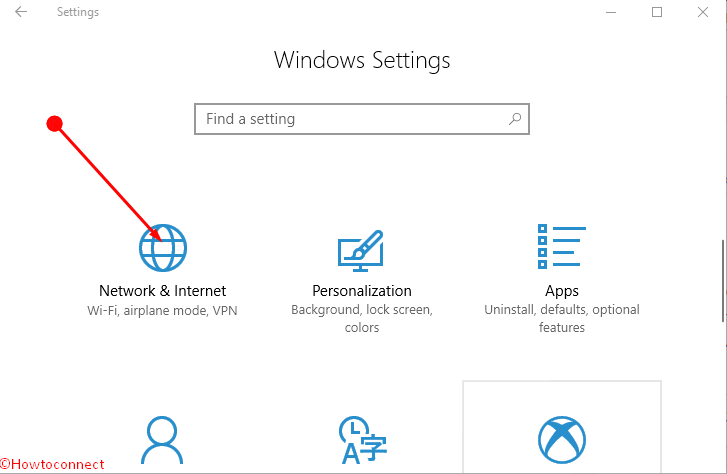
Step-1: Depress Windows logo key on the keyboard and click on the Setting icon from the Start menu. As a substitute, you can use Win&I shortcut keys.
Step-2: In the following Setting app homepage, you will find an option Network & Internet. Perform a click on it to open different settings in the category.
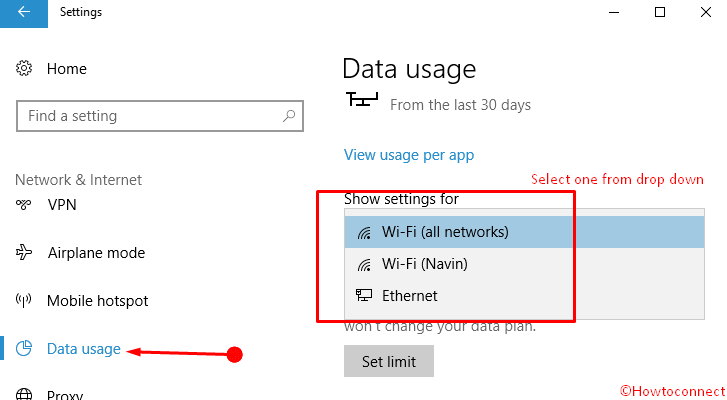
Step-3: Choose Data usage from the left facet of Network & Internet Window. Proceed to the right side and click on the drop down available just under Show settings for and select one for which you want to set Data Limit.
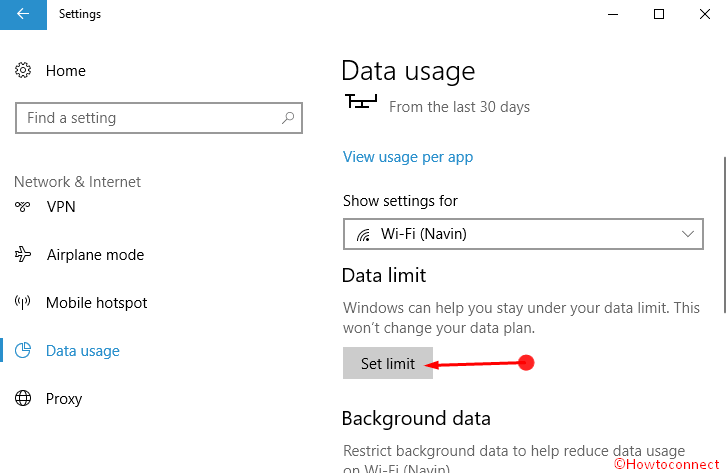
Step-4: Click on the Set limit button and allow Set data limit pop up to appear.
Step-5: Fill up the Set data limit form by following the further information and click on Save.
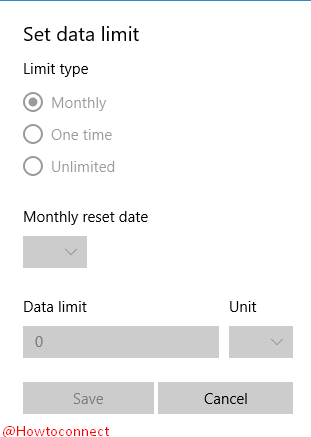
Limit type – provide the period for you are going set the limit. 3 options are here – Monthly, One time, Unlimited, select one from these.
Reset date – This is the particular date of the month when the internet data count will start from zero. A drop-down is placed here letting you choose a date.
Data limit – You need to write here the amount of internet data that Windows 10 will use as a deadline. While crossing the usage the system will turn off the set network after a warning.
Unit – This is as per your choice as MB or GB.
After you save the form to Set Data Limit Per Network in Windows 10 it starts working from the time.
Conclusion
Whenever you are sharing data from an ISP whether 4G or 3G device, router or modem as a hotspot, wired or wireless, setting a limit is very important in order to budget your billing. Fortunately, Windows 10 provides this feature to save you from a huge internet expenditure. If you Set Data Limit Per Network in Windows 10, it will send warning messages and all need to take it into notice.