When 2 computers are connected to a single IP address using LAN, then there is a possibility of IP Address Conflict occurrence. This issue takes place when more than one communication endpoints on a network system impose a single protocol. It ends up making either the devices unusable for network operation moreover internet access.
IP Address Conflict in Windows 10 appears when users either turn on a computer or wake up from sleep mode. Generally, this problem arises when you run two computers on the same LAN with a common IP Address. Either both or one of the systems fail to connect anymore with the network source
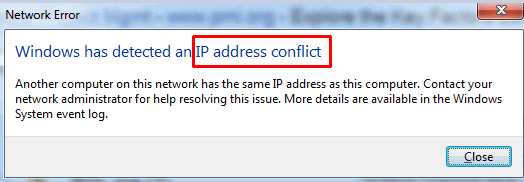
These messages are very frequent and can pop up anytime you have an IP address issue. The message is similar to following:
In some cases, this message can be with a little variation like the following one:
This IP address is already in use on the network. Please reconfigure a different IP address.
How to Fix IP Address Conflict in Windows 10
Both of the messages showing IP Address Conflict are nagging so it is relevant to discuss every point of the issue. First of all, we see the reasons that can lead the problem to occur –
Causes for IP Address Conflict in Windows 10
Multiple issues may cause the error –
- When two computers are engaged in the same static IP addresses.
- If a computer is assigned with a static IP from local DHCP (Dynamic Host Configuration Protocol) server while the server assigned another device with identical IP address.
- When you turn back a laptop from sleep mode and attempt to connect to a network which is assigned already with the same Address to another one.
- A device can be in conflict with itself too for having multiple network adapters.
- When you attempt to connect multiple routers to network and turn on DHCP in diverse devices.
Experts have come up with a number of ways to resolve this issue. Let’s focus on the solution processes straightway.
IP Address Conflict in Windows 10 solutions
Users can resolve this IP address Conflict issue easily using a simple tweak and following some instructions. We will start with the easiest one and will go deeper slowly. The ways are as follows:
Restart your computer
Whenever you have IP Address Conflict in Windows 10, the easiest way to resolve it is a Restart. Oftenly, after a reboot of computer, this message does not appear again and the network becomes functional.
Restart your Wireless Router
A simple Restart of your Wireless router can be a perfect solution for a bunch of problems. Due to prolonged use for a longer period probably for months, the software may start malfunctioning. While rebooting the router, we recommend you to restart your computer too. It is a wise idea. So power off the router for minimum 10 seconds and then switch on it and check whether IP Address Conflict no longer exists.
Renew IP Address
In order to renew the IP address, you need to follow the below steps carefully:
Step-1: Click on Start icon from your computer and type CMD. The search system will bring up the Command Prompt at the top when you finish typing. Right on it and select Run as administrator. Select Yes on the User account control prompts covering the Desktop screen.
Step-2: instantly the Command Prompt takes its shape, type the following command and hit “Enter” key
ipconfig /flushdns
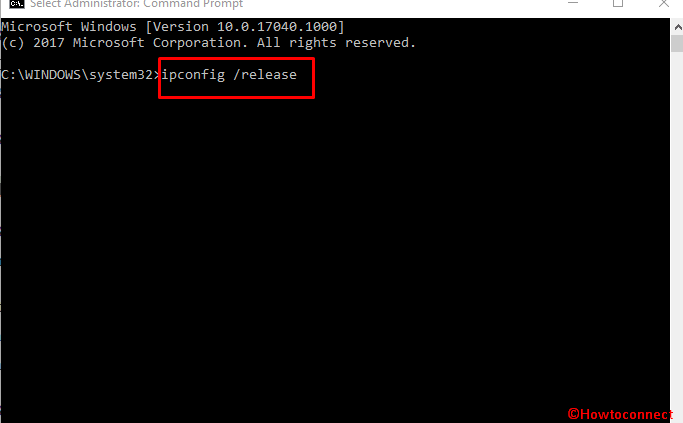
Step-3: The next command you will use is ipconfig /release. So either type or copy and paste the command line and gently strike Enter button.
Step-4: You will be able to see multiple results for the command depending upon the number of adaptors installed on PC.
If you have Ethernet ports, you will see Ethernet heading for the Ethernet adapter. Else, Wireless adapter WiFi in case of wireless cards. Sometimes you can see different results due to available networks in your surroundings.
Step-5: Occasionally, Setting up a new PC with a static IP address may invoke a warning message like the following:
The operation failed as no adapter is in the state permissible for this operation
If you come across such a warning then don’t worry move further with the next command.
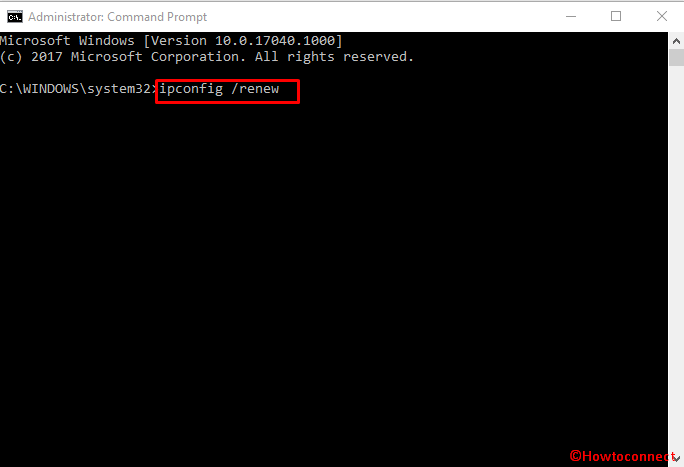
Step-6: Now in the Command Prompt black pane, type following command and press the Enter key.
ipconfig /renew
Step 6 – At last but not the least, type ipconfig /all and hit Enter.
DHCP server will then provide new addresses and after a while, you will see a list of results. In the result section, you will find the newly assigned IP addresses in the row of IPv4 Address.
Let’s move forward to another solution to resolve IP Address Conflict in Windows 10 issue.
Manually Configure your Static IP Address
Aside from using a static IP address, you can manually configure one from its Properties wizard on Windows 10. It may happen that the current is encountering conflict with a set of addresses in DHCP server. In this condition, manual operation is a way to fix IP Address Conflict in Windows 10.
Manual input of IP address is more likely to be a wrong one and eventually, it may cause additional errors. Therefore, you can get them directly from a DHCP server using a command.
Follow the below steps to accomplish the task smoothly:
Find out the IP address for assignment
Step-1: In the command prompt, either type or copy-paste ipconfig /all and subsequently press the Enter key. View the result and note down the IP address (preferably IPv4), furthermore additional data (Subnet mask, “Default gateway”, DNS server) you will configure in this process.
Configure Static IP Address
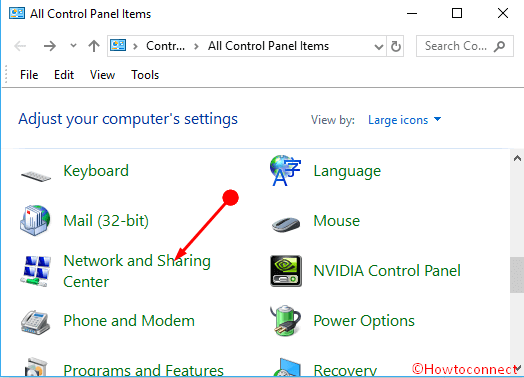
Step-2: Press Windows logo key on the keyboard, type Control and then Enter. In order to have a clear view, select the Large icons View from the top right corner. Afterwards, select Network and Sharing Center.
Step-3: From the next page, click on Change adapter settings option on the left flank.

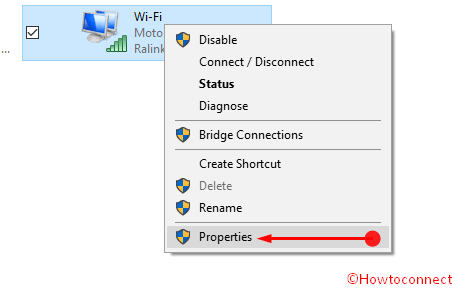
Step-4: Put a right-click on the network adapter which you are using now for Internet connection. From there, go with the option Properties.
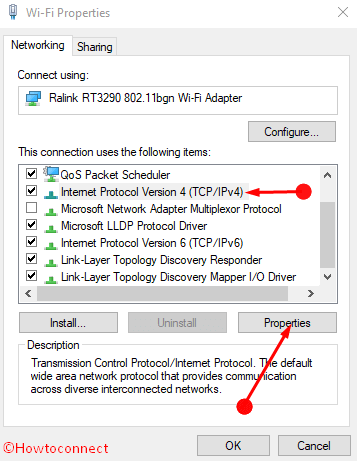
Step-5: In the following wizard, select Internet Protocol Version 4 (TCP/IPv4). Proceeding forward, you need to press the highlighted Properties button.
Step-6: Here, you have the choice to get the IP address automatically from DHCP server. To get them itself, hit a click on the option “Obtain an IP address automatically”.
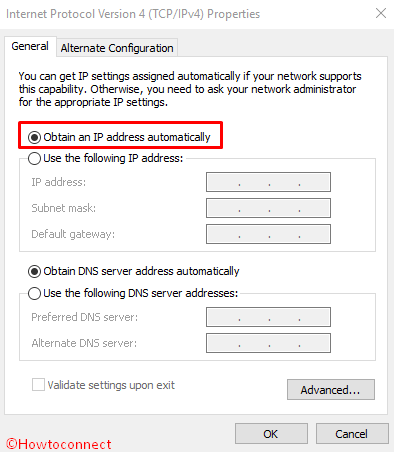
Manual IP address can also be inserted by choosing Use the following IP address option. It is better to choose the first option since you can avoid making mistake in this way. Selecting the first option will give you the IP address directly.
Step 7 – Otherwise, check the option “Use the following IP address” and feed the data you have noted down in step-1 such as IP address, “Subnet mask”, and Default gateway.
Step-7: If you have finished all the tasks properly, you can save the changes by clicking on the option Ok.
We can expect that these methods will be effective to resolve the issue else, you can go to the next method of fixing the router.
Update Firmware of Router
Sometimes, main DHCP server may crash when the user assigns more devices to use exactly same IP address. In that scenario, experts highly recommend updating the Firmware of the router. But this is a very rare issue and most of the people end up ignoring it promptly. As a result, the conflict can rise up between the IP addresses. Updating the firmware is easy and simple as well. But it can be much helpful in resolving the issue.
Here are the ways we can use in order to resolve the IP Address Conflict in Windows 10. Hope these will be helpful as well as effective in your case too.
Conclusion
IP Address Conflict in Windows 10 is a disgusting error. Therefore, this issue needs to be resolved immediately when you face it before being so worse. We have discussed various ways to resolve the IP Address Conflict in Windows 10 error including additional ways as alternatives. Follow the instructions keenly and apply accordingly in the right places. Hope you can get rid of the error and enjoy working with your PC.