Do you know that you can directly Skip Ahead to the Next Windows Release if you are an Insider in the Fast ring through Update & security category? Yes, Windows 10 provides you a drop-down selecting which you can make off from installing these boring updates. If you are spending too much in updates, quickly Limit Windows Update Bandwidth in Windows 10.
You all know that development of Redstone 3 is nearly at its end. And for many Insiders, the final builds of Redstone 3 seems to be a little boring. So, using the new option of Skip Ahead, you can simply jump to the future Redstone 4 branch. In this concern, you may like to read How to Get Windows Update With PowerShell in Windows 10. Hook to the tutorial to know more about using this skip ahead feature.
Skip Ahead to the Next Windows Release in Windows 10
1. Through Settings Application
Step 1 – Open Settings application to use this skip ahead feature. You can do this either by pressing Windows&I keys jointly or by choosing Settings from WinX menu.
Follow Windows 10 – How to Launch Settings and View Items on It.
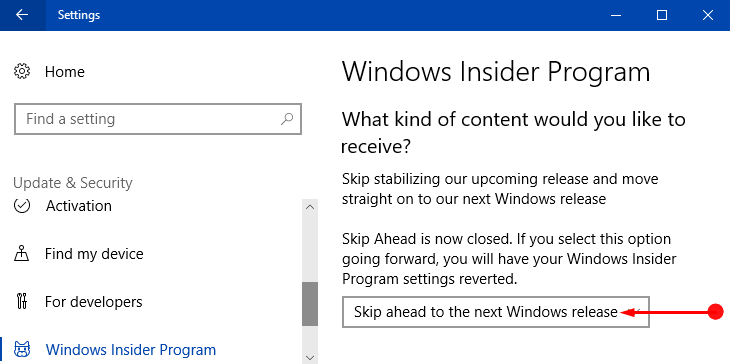
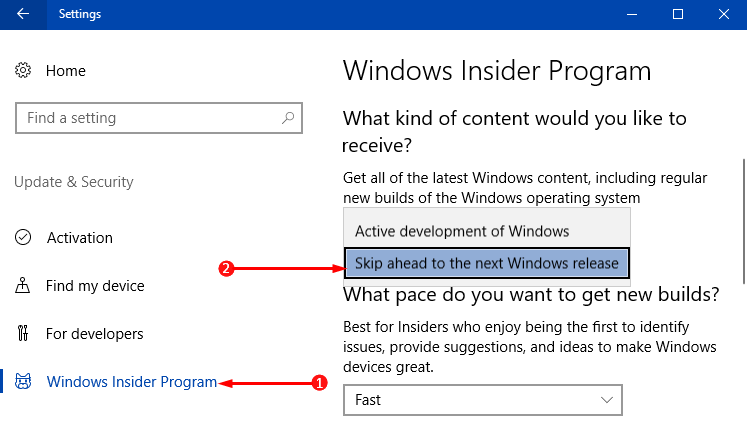
Step 2 – Out of various icons that show up on the home page of Settings, click Update & security.
Step 3 – The left sidebar of the next page displays a few sections, click Windows Insider Program. Now, move to the corresponding right panel and locate the option What kind of content would you like to receive?
Step 4 – Click its drop-down and thereafter choose the option namely “Skip ahead to the next Windows release“.
2. Using Registry Editor
If you are an advanced user, you can give a shot to Registry Editor to directly go to Windows 10 Redstone 4.
Step 1 – To start with, open Registry Editor by typing regedit on Cortana text field. Select the same command regedit that Cortana displays on top.
In addition, you can Access Registry Editor in Windows 10 using 5 Simple Tips.
Step 2 – When UAC prompts up on the computer screen, click Yes to agree.
Step 3 – On the Registry window, browse to the below-given path –
HKEY_LOCAL_MACHINE\SOFTWARE\Microsoft\WindowsSelfHost\UI\Selection
Step 4 – On the right pane of the Selection key, locate and double-click the String Value UIContentType.
Note – In case, you don’t see a String Value with a name UIContentType, generate a one.
Step 5 – Once its Edit box appears, set Skip as its Value data as shown in the below screenshot.
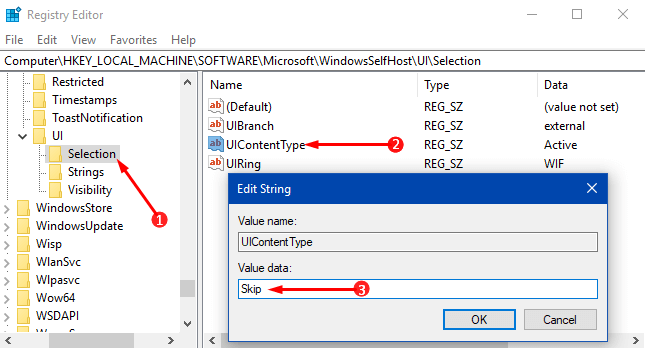
Note – To keep receiving the updates, assign the Value data as Active.
Conclusion
So, hopefully using any of these two different methods, you can Skip Ahead to the Next Windows Release in Windows 10 pretty much easily. Though Microsoft removed this feature sometime back, they are again offering this option to its users. If you know more about this skip updates topic, write them to us.