With pre-set Windows settings, users generally receive updates automatically but the process doesn’t go well always. People keep encountering errors every now and then which prevent the operating system from installing any rollout. Similar fatal codes may also occur when you initiate the update process manually. Error 0x80242016 is one such issue that you may experience while attempting to install updates automatically or manually. Even if the system finishes downloading the update files, the error may arrive during the installation.
Windows 10 update error code 0x80242016 may also appear with another dreadful code that says WU_E_UH_POSTREBOOTUNEXPECTEDSTATE. According to some tech experts, the issue usually takes place due to Windows search service. Since there is no say from the officials, we can’t decide on that particular cause. Therefore, you might need to try out different workarounds to find out what really works for your system. Before trying out advanced resolutions, make sure your PC is connected to a stable and active internet connection.
Error code 0x80242016
Here is how to fix Windows 11/10 update error code 0x80242016 –
1] Reboot Windows and initiate the update process again
Some of the update errors get fixed automatically when you restart the PC and start the process afresh. To reboot the device, here are the steps to follow –
- Save all ongoing tasks.
- Once on the desktop screen, press – Alt + f4.
- From the appearing dialog box, click the drop-down list and select – Restart.
- Click – OK.

When the system powers up, try to reinstall the update.
For Windows 10
- Press – Windows + I.
- Click – Update & Security.
- Move to the right of the dedicated settings page.
- Click – Check for updates.
- Download available updates and install them.
For Windows 11
- Open Settings app.
- From left column, choose – Windows Update.
- Shift to right.
- Click – Check for updates.
2] Reset Windows update to fix 0x80242016
Plenty of services are needed to make the Windows update process work error-free. When the system finds any of the required services unavailable, issues like 0x80242016 may evolve that obstruct the installation of the latest update. Thus, restarting the services is necessary. While doing so, you will have to reset associate components too in order to make it more effective.
- Press – Windows + S.
- Type in – cmd.exe.
- Hit – Ctrl + Shift + Enter.
- When User Account Control prompt for your consent, click – Yes.
- Copy the following commands in turn and paste them into the elevated Command Prompt. Make sure to press Enter after each line –
net stop wuauserv

net stop cryptSvc

net stop bits

net stop msiserver

ren C:\Windows\SoftwareDistribution SoftwareDistribution.old

ren C:\Windows\System32\catroot2 Catroot2.old

net start wuauserv

net start cryptSvc

net start bits

net start msiserver
- Close the Command Prompt.
- Restart Windows.
- After getting back to operation, retry the installation process.
3] Disable Windows search service
If Windows search service crashes time and again, Windows 11/10 update error code 0x80242016 may occur while installing the LCU patch. To overcome the issue, disable the service and then try again.
- Press Windows key and type services.msc.
- Hit – Enter.
- When the dedicated window shows up, look for Windows Search.
- Double-click the same to bring forth its properties.
- Set the Startup type to Disabled.
- Click Apply followed by OK.
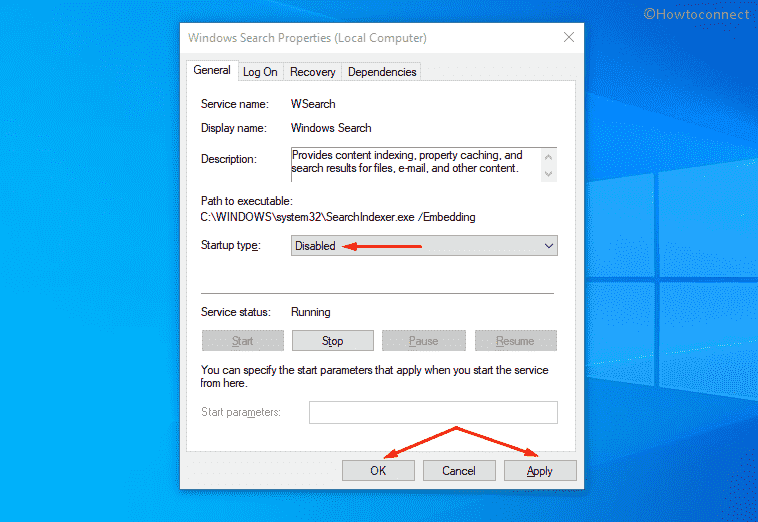
- Reboot your computer.
4] Run DISM along with System File Checker
When the system fails to read a file that is required to complete the installation process of Windows update, unexpected errors may evolve. To eliminate the corruption of system elements moreover recover missing ones, System File Checker is the ultimate choice. But the utility sometimes fails to resolve the corruption, in such a case, you will have to run DISM tool to make System File Checker work again. Therefore, it will be wise to execute DISM first and then SFC scan.
- Click the search icon from the taskbar.
- Type – cmd.
- From the right side of the result flyout, click – Run as administrator.
- To approve User Account Control, hit – Yes.
- In the appearing black pane, insert the following commands one by one and hit Enter after each–
dism /online /cleanup-image /scanhealth
dism /online /cleanup-image /checkhealth
dism /online /cleanup-image /restorehealth
- After executing the above commands, type in
sfc /scannowin the same black pane. - Press – Enter.
- Wait and let the scanning process hits 100%.
- Once done, close Command Prompt and reboot the PC.
- When the system powers up, initiate the update again.
5] Make use of Windows update troubleshooter to fix 0x80242016
Microsoft included a dedicated troubleshooter in Windows 10 and 11 that solves update-related errors. When you run the utility, it will go through all associated files to detect what is giving rise to error code 0x80242016. If the issue is not complicated enough, the troubleshooter will offer an automatic fix too.
For Windows 10
- Press – Windows + I.
- Click – Update & Security.
- From the left sidebar, pick – Troubleshoot.
- Move to right-pane and then click – Additional troubleshooters.
- Select – Windows update.
- From the expanded tray, click – Run the troubleshooter.
- Keep following on-screen instructions.
- When the utility comes with a resolution after scanning the system, click – Apply this fix.
For Windows 11
- Right-click on Start button and choose – Settings.
- Choose – Troubleshoot present on the right pane.
- From next page, click – Other troubleshooters.
- Click – Run present alongside Windows update.
6] Download standalone package manually
The system oftentimes ends up downloading broken update files and when you try to install the same, numerous error codes arise. Such a situation usually emerges when you use update assistant to install a CU patch. If this is the cause behind error code 0x80242016, download the standalone package manually and then try to install it.
- Visit the webpage of Microsoft Update Catalog using any of your preferred web browsers.
- Click the search bar of the website.
- Insert the KB number that is failing to install moreover giving the update error.
- Click – Search.
- From the appearing search result, find the suitable version that goes with your PC specs.
- Click Download present next to the compatible package.
- Doing so will bring forth a new window.
- Hit the link that ends with msu.
- If prompted, opt for Save File and then click – OK.
- Visit the directory where the system stores downloaded items.
- Double-click the msu file you got.
- To allow User Account Control, click – Yes.
- Comply with on-screen instructions to finish the process.
7] Unplug USB peripherals and retry the installation process
External hardware like printer, mouse, keyboard, or scanner oftentimes found to cause preventing Windows update. The exact reason behind this abnormal behavior is yet to be known. However, you can easily solve this kind of issue by disconnecting the peripherals.
First of all, unplug all the USB cords that are used to make connections between the accessories and Windows 11/10 PC. After that, check for updates and try to install the available patches. Once the system ends up installing the patch without error code 0x80242016, connect all the peripherals one after another.
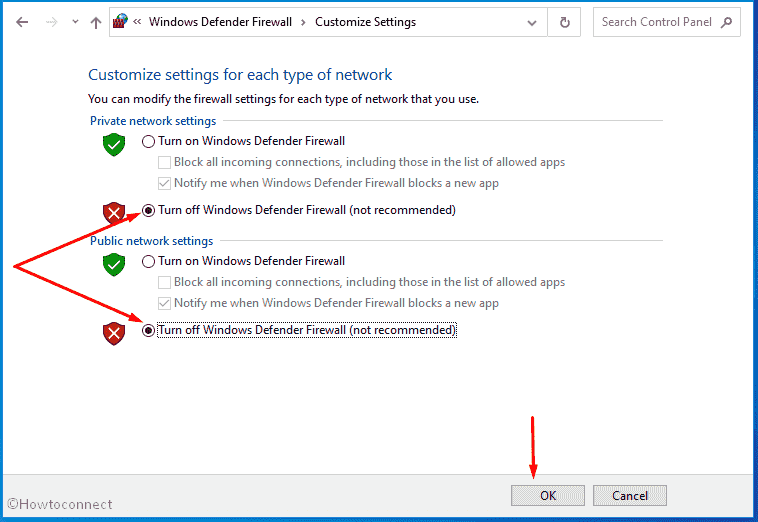
8] Turn off security suit for a while
Active antimalware programs oftentimes misconstrue update files and assume them as vulnerable threats. That’s why the security suite prevents them from entering into the system. However, this doesn’t necessarily mean that the update you are trying to download is malware itself.
If you are getting Windows 11/10 update error code 0x80242016 just because your antimalware program is misreading the update files, disable the antivirus program. Though keeping the security suite disabled for always is not recommended at all, you have to bring back the same in action after installing the update successfully.
Disable built-in Firewall to get rid of 0x80242016
- Press – Windows key.
- In the search bar, insert – firewall.cpl.
- Hit – Enter.
- From the left sidebar of the newly appeared page, click – Turn Windows Defender Firewall on or off.
- Tick the checkbox of Turn off Windows Defender Firewall (not recommended) option for both Private network settings and Public network settings.
- Click – OK.
Turn off or uninstall third-party security suite
Before uninstalling the antivirus program, disable the same to check whether it helps to fix update error. The process of doing so may vary from software to software but most of the options should remain the same or in different words with similar meaning.
- Click the up arrow symbol from the notification bar.
- Right-click the icon of installed antimalware.
- Choose Disable or the one that has a similar meaning.
- If asked, set a time slot after which the program will be enabled automatically.
After disabling the program, try installing the problematic update and see if the error appears anymore. If yes, uninstall the program completely to get rid of any interruption caused by the tool.
- In Windows search, type – appwiz.cpl.
- Press – Enter.
- When the Programs and Features window shows up, find the third-party antivirus program installed on your Windows 10.
- Right-click the same and then choose – Uninstall.
- Comply with on-screen instructions to finish the removal process.
9] Check whether Date & Time is correct
If the date and time of your Windows 10 PC are incorrect, the system can trigger update error code 0x80242016. Hence, make sure that you configured them correctly. To do so –
- Click Start button.
- Type in – control panel.
- Hit – Enter.
- Set the View by option to Category.
- Opt for – Clock and Region.
- From the right pane of the consequent page, hit – Date and Time.
- Jump into Internet Time tab.
- Click – Change settings.
- Check the box present before Synchronize with an Internet time server.
- Hit – Update now.
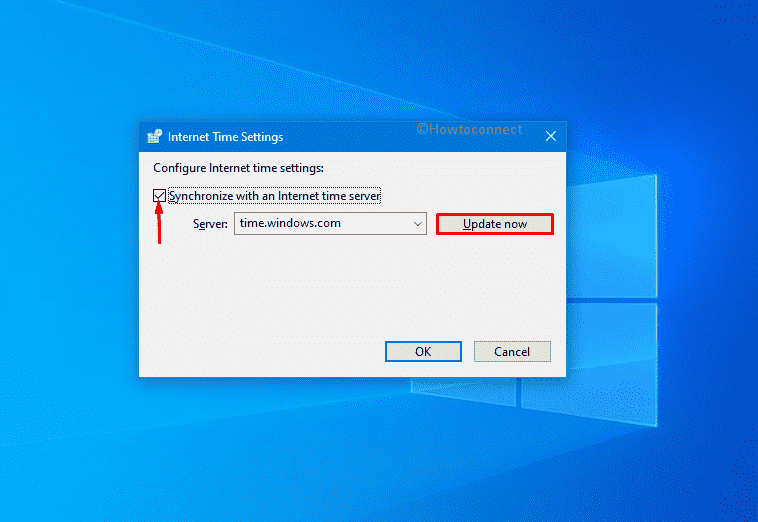
- Finally, click – OK.
10] Start Windows with clean boot to resolve 0x80242016
Many times third-party programs or services cause abnormalities in the system which later ends up with unexpected error codes. To avoid any issue caused by those components, make a suitable environment where the system starts with basic elements only. This way, no conflict will take place moreover you can install Windows updates without any hitch.
- Click the search icon present on the taskbar.
- Type – msconfig.exe.
- Hit – Enter.
- When System Configuration turns up, select the radio button set alongside Selective startup.
- Also, uncheck – Load startup items.
- Shift to Services tab.
- Tick the checkbox set before Hide all Microsoft services.
- Click – Disable all.
- Move to the Startup tab.
- Click the link – Open Task Manager.
- When the dedicated window prompts, right-click on a program listed there and choose – Disable.
- Repeat the same for all startup programs.
- Close Task Manager.
- Get back to System Configuration window.
- Click Apply and then OK.
- Restart the PC to start clean boot.
Methods list:
1] Reboot Windows and initiate the update process again
2] Reset Windows update
3] Disable Windows search service
4] Run DISM along with System File Checker
5] Make use of Windows update troubleshooter
6] Download standalone package manually
7] Unplug USB peripherals and retry the installation process
8] Turn off security suit for a while
9] Check whether Date & Time is correct
10] Start Windows with clean boot
That’s all!!!