Recently for Windows 10 Enterprise users, Microsoft declared that they have added extra care against the installation of the PUA to Windows Defender. Along with its regular scanning efficiency, it is possible to turn on the detection of PUA. This care is Antimalware.
Though Antimalware feature is not available for Home and Pro users, still it can be added to Windows Defender with the aid of Registry Editor. In this article, we will showcase the steps for How to Turn On Antimalware in Windows Defender on Windows 10. After you add and enable the adware protection, you can restrict the PUAs from installing on the system.
There are some undesirable applications that sneak into your machine and trick you in installing adware, toolbars and may also possess some other unclear intentions. These kinds of applications are entitled as none other than Potentially Unwanted Application, nicknamed PUA.
As the process includes the addition of registry keys, it is advised to backup the Registry Editor before you begin. Let us begin the steps for How to Turn On Antimalware in Windows Defender on Windows 10 in order to protect your machine from Adware and Restrict PUA by Efficient Regular Scanning.
How to Turn On Antimalware in Windows Defender on Windows 10
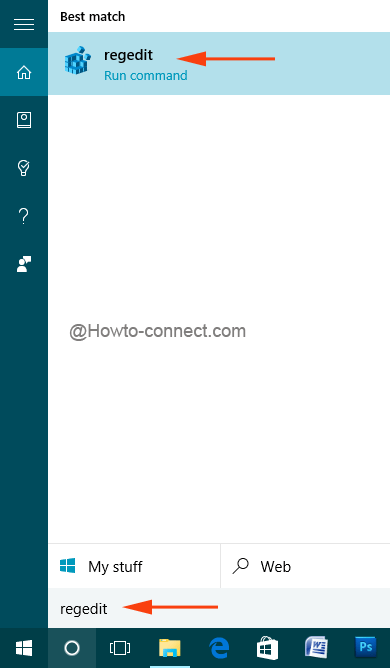
- Write the word regedit on the search area of Cortana and allow her to bring the identical result at the top. Click on the result when displayed.
- Agree with the UAC.
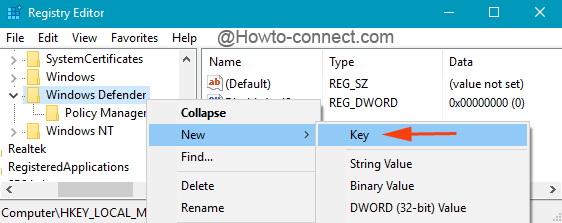
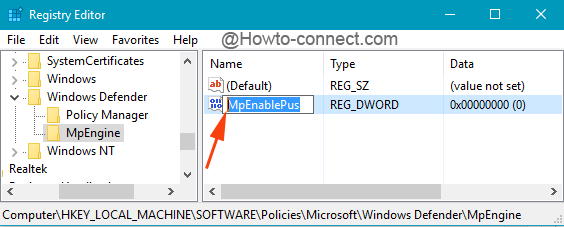
- Carefully travel this way –
HKEY_LOCAL_MACHINE\Software\Policies\Microsoft\Windows Defender\MpEngine - If you get yourselves unable to find the key named MpEngine, no worries. simply execute a right click on Windows Defender and pick up New => Key.
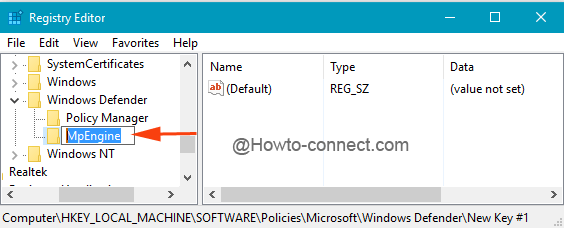
- Entitle MpEngine name to it.
- Now get into the other side of this key and look for a DWORD labeled with MpEnablePus.
- If you don’t see anyone with that name, create it yourself.
- Implement a right click on the unoccupied space and pick up New => DWORD (32-bit Value). (If you are working on 64-bit version, despite you need to create a 32-bit DWORD).
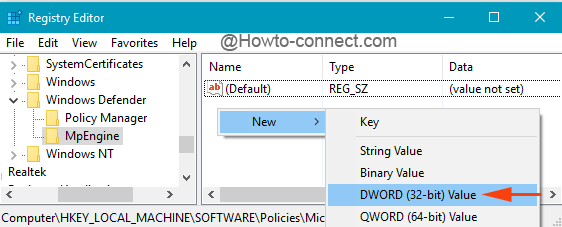
- Label it as MpEnablePus.
- Put Double click in effect on the DWORD and under the Value data assign 1 to turn On the PUA protection.
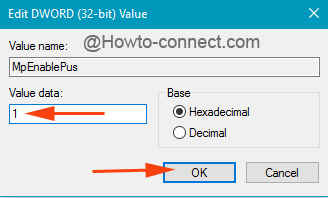
- In order to see the results, click OK and restart the system.
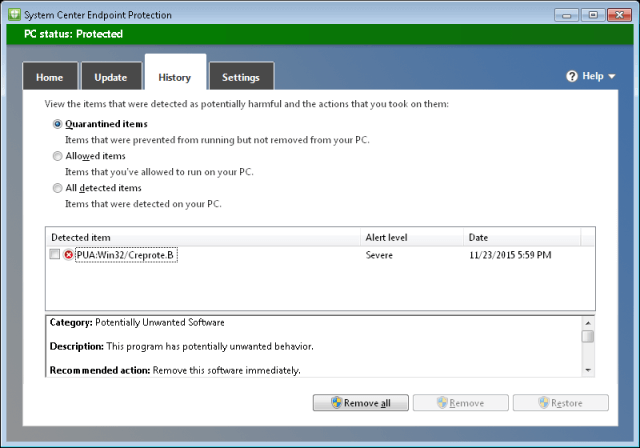
- From now onwards Windows Defender will restrict all the undesirable applications from being downloaded hereupon installed.
Note: In case you desire to turn Off the feature, remove the MpEnablePus DWORD value.
This is a great initiative from Microsoft for those users who believe in Windows Defender and do not use outside programs to delete threats. They stated the Antimalware protection is only for Windows 10 Enterprise, nevertheless, Home and Pro users can also avail this facility by observing the above steps.