Workarounds here will guide you to fix UCMUCSI_FAILURE Windows 10 error. You might have noticed that a BSOD issue crash the device illustrating a blue color screen with the message that your PC needs to restart. It has bug check code 0x000001D8 which represents endless spinning of a thread in a device. This Blue Screen of Death error occurs in a system as for malfunctioning graphics card driver or the card itself. Other outdated “drivers” and missing system resources are also responsible as well. Furthermore, memory issues, low disk space, and bad sector in hard disk also cause this BSOD.
UCMUCSI_FAILURE Error in Windows 10 can also appear on installing a new driver, Operating System or cumulative update. When the system gets affected, you can easily view a blue-colored prompt on the screen along with the fridged PC. To reduce the effect of damage, the computer randomly restarts leading to terminate major operations. Quick links to the resolutions are listed below for you to easily navigate them –
UCMUCSI_FAILURE in Windows 10 Solutions
Here is how to fix UCMUCSI_FAILURE BSOD Error in Windows 10 –
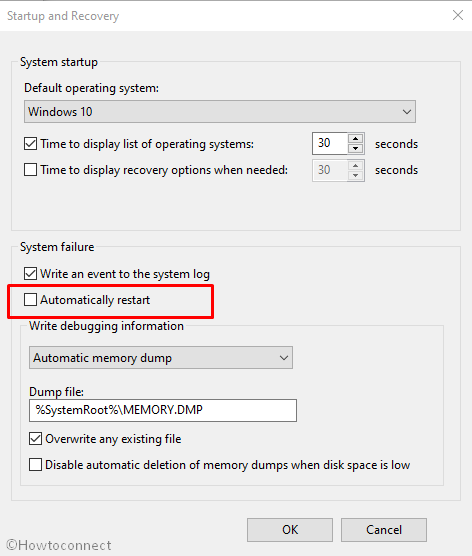
1] Disable Automatic Restart
Users often experience the constant automatic shutdown when the BSOD occurs. But if it starts happening a majority of times, you need to understand that your machine has run into some critical system failures like UCMUCSI_FAILURE. If you have been experiencing this situation too often, here is a solution for you. Follow the below steps to simply stop the automatic shutdown feature –
Step-1: Press Win+S hotkey to invoke Windows search bar.
Step-2: In the search bar, type control and press the Enter key.
Step-3: Make the view of control panel either with small or large icons, locate System and then do a click on it.
Step-4: From the left column, select Advanced system settings.
Step-5: Once a wizard prompts on the screen, select the Advanced tab.
Step-6: Select Settings located under the Startup and Recovery section.
Step-7: Go to the System failure and unmark the box prior to Automatically restart option.
Step-8: Click on the OK button to process ahead.
2] Run Blue Screen Troubleshooter to fix UCMUCSI_FAILURE
On Windows 10, Blue Screen Troubleshooter is a well known inbuilt application that can probably rectify any peculiar stop error on your device. The cause is, it can easily detect the problems associated with UCMUCSI_FAILURE and fix it up. Here is the procedure to use the tool –
- Make a right-click on the Start button and select Settings.
- On the following page, click on Update & Security section.
- From the left side, select Troubleshoot and then switch to the corresponding right.
- Scroll and locate Blue Screen option.
- Once you found, click on it and select Run the troubleshooter from the extended area.
Upon executing the tool properly, Windows 10 will fix Bsod error code UCMUCSI_FAILURE automatically.
3] Boot Windows 10 to Safe Mode
For dealing with several issues that Windows 10 comes across, one of the simple and efficient methods is Booting in Safe Mode. This is basically a special Startup mode where Windows load only root (or basic) applications. If the issue generates from the advance settings or additional apps, UCMUCSI_FAILURE BSOD might disappear while running your OS in a Safe Mode. Follow the below guidelines to use this tool –
- Press the Win+I hotkeys and let Windows Settings comes out.
- Click on Update & Security.
- Select Recovery and move along to right side.
- Underneath the Advanced startup area, click Restart now.
- As your Windows restarts, it will ask you to choose the next step. Choose Troubleshoot from Startup Screen.
- In the Troubleshoot menu click Advanced Options and subsequently on Startup Settings.
- At this time, you will be informed that your machine can be restarted with the use of additional settings which is Enable Safe Mode. Press Restart.
- Subsequent to this, choose Enable Safe Mode by pressing F4.
Now, the Operating System will be launched with default apps and services. In case the issue appears again, it is quite sure that any third-party application or Hardware problem is the real culprit.
4] Eradicate the faulty Windows update files
Microsoft releases Windows updates after a definite period which comprises the updated features and bug fixes. The team asks its users to download them using the Settings application. In fact, they do not indulge into troubles in the midway but if the installation process terminates abnormally, you will have UCMUCSI_FAILURE BSOD error in the Computer. All these problematic files need immediate removal in this respect. follow these below steps to do so –
- Press Win+I hotkey and let the Windows Settings appear.
- Click on Update & Security section.
- This will by default open Windows Update page.
- Move to the adjacent right and Select View update history link.
- Click on Uninstall updates in order to remove the faulty files.
5] Reconnect the External Hardware Devices
Often UCMUCSI_FAILURE BSOD error comes in after connecting an additional hard drive with the device. In that case, you have to remove the accessory and reconnect it again following correct procedures. The guidelines are as follows –
- Detach all the plugged accessories from the device and Restart it.
- When the operating system boots successfully, attach the accessories again with your PC successively and check which one is causing UCMUCSI_FAILURE.
- Thereafter, Download the updated drivers for that specific hardware from the manufacturer website and then install them.
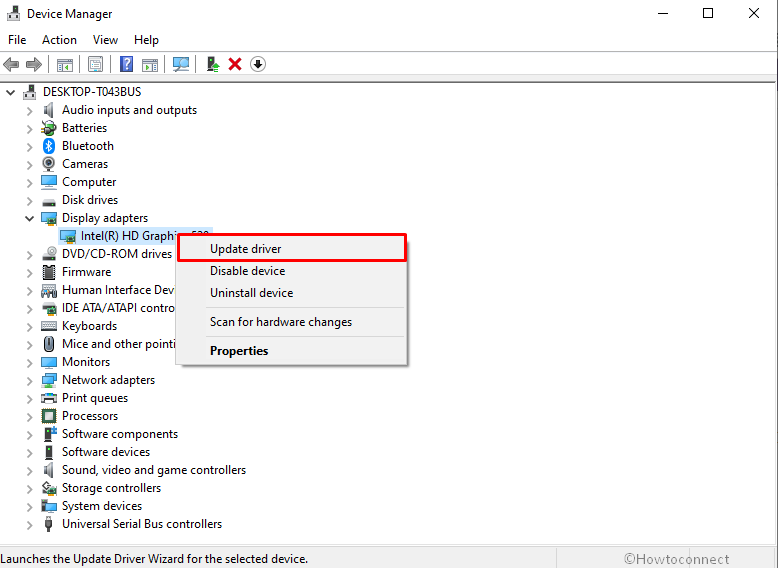
6] Update corrupted Drivers with Device Manager
Every time you encounter any BSOD error, the main reason comes up is a faulty or outdated device driver which creates lots of problems. Therefore, it is required to take proper steps to update them using Device Manager. Moreover, as we already mentioned earlier faulty drivers are one of the main causes of UCMUCSI_FAILURE BSOD. In an attempt to check and resolve any such situations, follow the steps provided below –
- Right-click on the Start button and choose Device Manager from the upper part of the list.
- Find out the devices having exclamation mark beside them in the console.
- Once you find, expand them by double-clicking.
- Now, right-click on each of them and select Update driver option to initiate the process.
- Presently, the system will show two options; Choose Search automatically for updated driver software.
- Restart the Windows to make the changes effective.
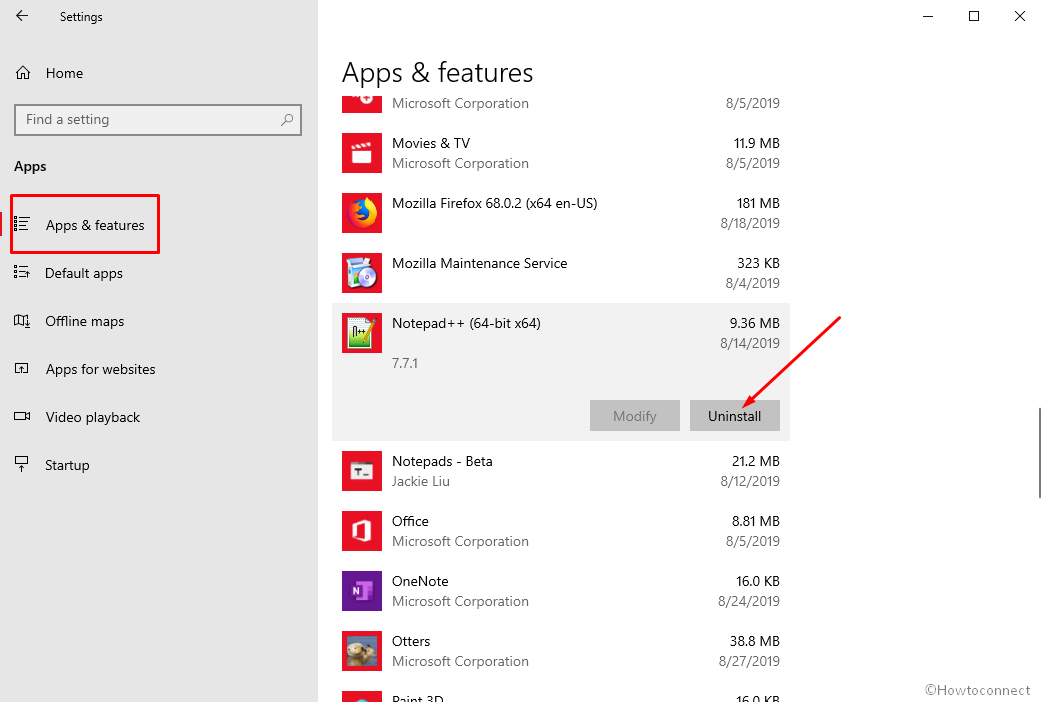
7] Uninstall Program causing UCMUCSI_FAILURE
In a few cases having multiple applications that do the same job can create some conflicts which cause UCMUCSI_FAILURE BSOD error in the PC. This creates collisions in the system leading to a malfunctioning computer. However, you are able to prevent this by uninstalling such extra apps. This is how you do it –
Step#1: Click on the Start button and select the Windows Settings icon.
Step#2: Click on Apps category.
Step#3: On the next page, move alongside right from the left pane.
Step#4: Locate the program may cause issues UCMUCSI_FAILURE or you have recently installed.
Step#5: Once found, make a click on it and select the Uninstall option from the extended pane.
Step#6: When a small pop-up appears, again click on Uninstall to confirm the process.
Step#7: Now, go to the official manufacturer website to Download and reinstall them again in PC.
You can also See the instructions here – How to Uninstall Software From Windows 10 After Creators Update
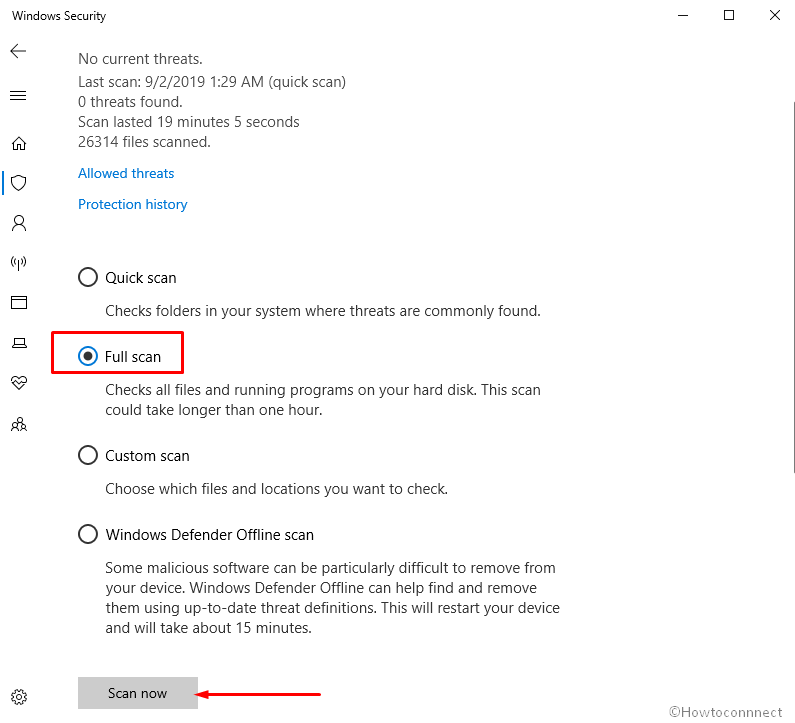
8] Scan your full system in Windows Security
In the tech developed world, malware is the worst enemies. We are no longer safe as they stay in disguise around the web. Whenever you visit a malicious site or click a suspicious link in the mail, they get entrance. In a further move, deteriorate the system resources and lose DLL files which result in the evolution of UCMUCSI_FAILURE error in the system. Windows Security is the latest inclusion in the security system of Microsoft. The app is super handy to detect a computer virus and diminish them. Here is the process to follow –
- Click on the Action Center icon from the extreme right of the Taskbar and select Expand => All Settings.
- Once the application opens up, click the Update & Security icon.
- Select Windows Security from the left column.
- In the right pane, click on Virus & threat protection option.
- On the subsequent window, select Scan options.
- Select the radio button adjacent to Full Scan and then click Scan now option to initiate the process.
9] Remove Third-Party Antivirus Program to solve UCMUCSI_FAILURE
In the earlier time, we used to recommend various third party anti-malware programs to prevent the bugs. As Windows Security is persistent now, there is no need for them. Additionally, being free and third party tool, there is a risk of getting a UCMUCSI_FAILURE BSOD error. Therefore, it is better to uninstall them if you are using them by following below steps –
- Press Win+R at a time to launch the Run dialog box.
- In the void, type appwiz.cpl and select the OK button.
- On the following page, locate the 3rd party Antivirus from the list and do a click on the same.
- Hit the Uninstall button from the top menu.
- On subsequent window, select the Uninstall tab at the bottom and then click on Next.
- At this time, a UAC dialog prompts, give your consent by choosing the Yes option.
- Wait for a while, an affirmation message will appear entitled Uninstall finished.
- Upon completion, choose the Restart button and then hit Finish.
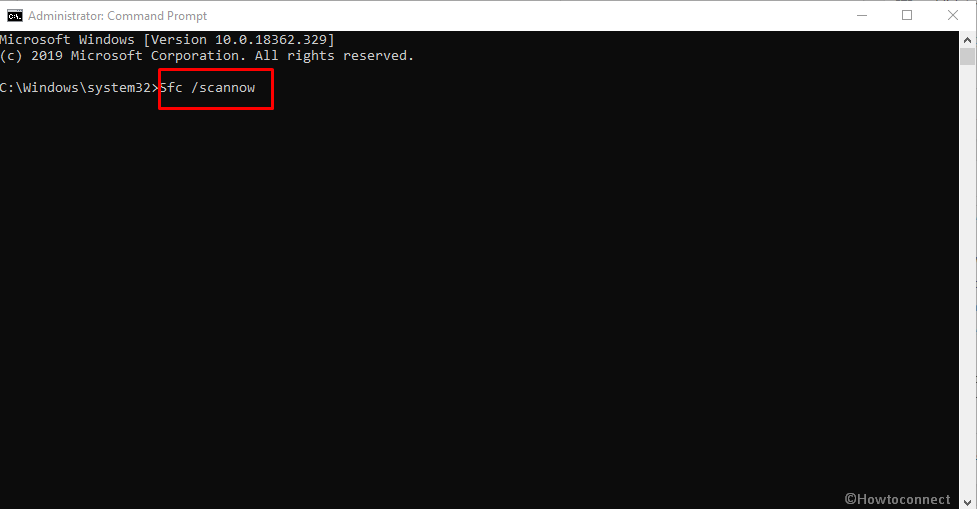
10] Run Windows System File Checker (“SFC /Scannow”).
Previously we have talked lots about how missing and corrupted system resources is causing UCMUCSI_FAILURE BSOD error codes. At this point, System File Checker utility can be much helpful to correct the corruption and recover including DLL files. The tool is executed in an Elevated Command Prompt and automatically fix any issue with aforesaid files. To access the utility, here are the guidelines –
- Open the Taskbar Search using the above instruction.
- When it opens, type cmd in the empty text area.
- Once you notice the Command Prompt in the result navigate to the right side and select Run as administrator.
- Choose Yes when UAC asks for permission.
- On the black window, type
sfc /scannowcommand and Hit Enter key. - System File Checker once started will identify the issues in files and fix them automatically.
- This process may take a bit time hence, wait for it until it gets finished.
- Restart Windows when it is over and prior to signing back in, check if the error has resolved already.
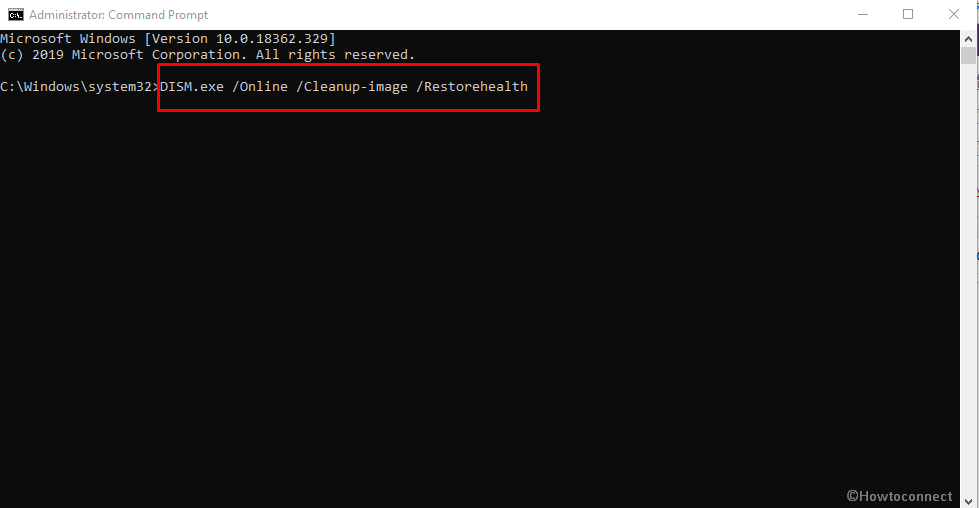
11] Use Deployment Image Servicing and Management (DISM) tool
When Windows Image Files gets corrupted, it can play a big role in causing UCMUCSI_FAILURE. Therefore, we need to rectify them and for that, the DISM comes as a helpful tool. However, this application executes only in an Elevated Command Prompt so follow the guidelines as stated –
- Press Win+S hotkey and invoke Taskbar search.
- Type cmd in the given bar.
- When the result flashes, right-click on it and then select Run as administrator from the context menu.
- If a UAC prompts up, click on Yes to give consent.
- Type the given code and hit Enter –
DISM.exe /Online /Cleanup-image /Restorehealth
Note – Usually the process gets stuck at 20%. If this happens with you too, don’t get stress as it normal phenomena.
- When the process gets over, Reboot your PC to make the changes effective.
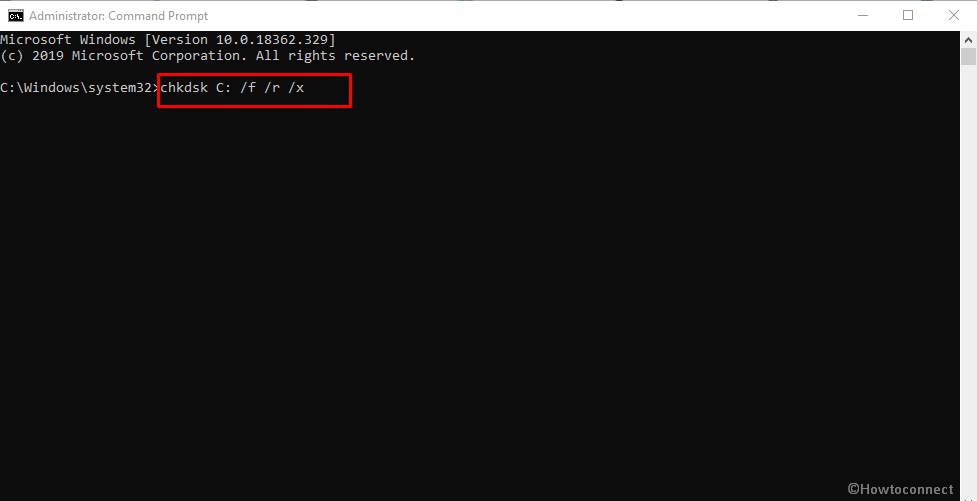
12] Run CHKDSK Utility to solve UCMUCSI_FAILURE
Due to prolonged use, bad sectors are formed in Hard Disk that eventually call up UCMUCSI_FAILURE error. You can improve things up this using an appropriate command in Elevated Command Prompt. The tool named Disk Checking Utility takes control when executed. Here is the guideline to follow through –
- Click on the Start button and type cmd.exe.
- When Command Prompt appears in the result, do a right-click on it.
- From the context menu, select Run as administrator.
- Once UAC prompts on your screen, click on the Yes button.
- Type the subsequent command similar to the shown format- chkdsk [Drive:] [parameters]
- With ‘CHKDSK’ syntax, System will only reveal the disk status but will not rectify any existing issues.
- Therefore, we need to specify the command in the following way- /f /r /x.
Here,
“f” will force the utility to fix up found issues from the volume.
Letter “r” will detect the poor sectors in the Hard Disk.
Here “x” will make the whole volume to dismount before initiating the process. Ultimately, the command will look like – chkdsk C: /f /r /x
Important – C: is the drive letter where the OS is installed. If you have used other drivers to do the same task, replace the letter with D:, E: and so on.
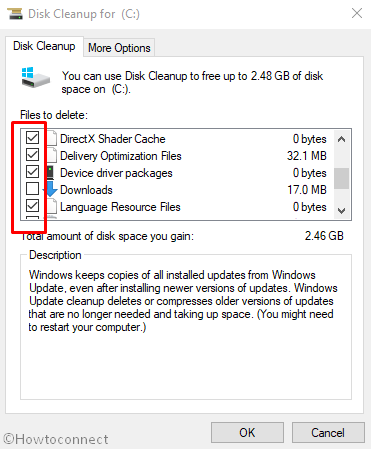
13] Clean Junk from the system using Disk Cleanup utility
The computer continuously keeps on creating junk files while the execution of tasks which gets stored in the disk storage. Since these data are useless, we cannot allow them to make unnecessarily space on the device. On the contrary, when they turn big in amount, take up large space in the drive. As a result, Hard disk runs in low space and affects the performance of the device which eventually causes UCMUCSI_FAILURE Error BSOD error. However, we are able to delete them altogether with the help of Disk Cleanup tool. Have a look at the instructions given below –
- Press the Windows key and enter text cleanmgr with the help of the keyboard.
- When the Disk Cleanup desktop app arrives, select it from results.
- Immediately, a wizard will show up asking to select a preferable drive.
- Choose C: by clicking on the dropdown menu and hit Enter key.
- The Disk Cleanup utility will start by figuring out the amount of space it can recover in drive C: and appear in a new window.
- Visit the bottom part of the current window and hit the Clean up system files button.
- A same small popup will show up once again asking to select the drive.
- Choose C: using the dropdown menu and press Enter key.
- When the Disk Cleanup for (C:) comes into the display, check all boxes except Downloads.
- Now, hit OK and let the cleanup begin in the system.
14] Install all possible Windows Updates
An outdated Operating System is extremely prone to get affected by issues like BSOD error. All the cumulative updates that Microsoft releases on a regular basis contain fixes for bugs and problems. Installing them will make the OS stronger and you can stay from UCMUCSI_FAILURE issue. Installation is done through Windows Settings app usually and it’s automatic. You just need to disable Metered Connection while using a Mobile Hotspot. We recommend using high-speed internet to reduce time consumption. Once ready, you can proceed with the below steps –
- Press Win+I simultaneously and let Windows Settings appear.
- Select Update & Security icon.
- On the following result, move along the right side of the Windows Update.
- Here, you may see ‘You’re up to date’ dialog, but, click on the Check for updates button.
- At this time, the system will start exploring available updates for your windows.
- After finishing the searching process, you will see the updates on the screen.
- Choose Download option under updates are ready to download.
Alternatively, get help from – 4 Ways to Update Windows 10
15] Resolve the issues associated with RAM
An unreliable memory, defective Random Access Memory, the wrong allocation may call up UCMUCSI_FAILURE BSOD in Windows 10. Therefore, a perfect solution is mandatory to rectify these issues. Scanning the stick is a bit complicated, but Memory Diagnostic tool works perfectly to resolve the problematic sectors. Move through the following steps –
- First of all, make sure that you have saved and closed all the in-progress apps on the device before proceeding.
- Press Win+S and allow Taskbar Search to appear.
- Type Windows Memory Diagnostic in the stipulated field and select it from the prompting list.
- Click on Restart now and check for problems (recommended) from the Pop-up menu.
- When the system starts, it will detect the memory issues.
- After the process reaches 100%, Windows will restart by itself.
- Once it starts up again, you can see the results in the notification area of the taskbar.
- Alternatively, if you find the above process nonfunctional, just navigate to the following path – Do a right-click on Start Menu => Event Viewer => Windows Log => System.
16] Use Previous System Restore Point
Whenever you make some changes on the computer, this directly affects the Windows Registry. If something happens wrong while installing or uninstalling, the registry will be little unstable and may result in UCMUCSI_FAILURE BSOD. One of the simplest ways to get rid of the error is to revert all these changes and this is possible through System Restore.
- Press Win+R keys and invoke Run dialog box.
- Type ‘rstrui’ and hit the Enter key.
- This action will call in System Restore wizard on the screen.
- Click on the Next option allowing the device to reveal your PC’s Restore points.
- To see further of date and time, hit the box Show more restore points option.
- Select the first row showing the latest point you have created on the device.
- Click on the Next option.
- Lastly, select the Finish button to initiate the full procedure of restoration.
17] Perform a clean install to fix UCMUCSI_FAILURE
Hope, using the above workaround, you could definitely fix the error UCMUCSI_FAILURE. In case, you couldn’t settle this BSOD, it would be really pathetic and also frustrating but we believe that no problems come without a solution. Yet we have one more resolution to apply for fixing error code 0x000001D8 which can also be called as the clean install of Windows 10. This workaround will definitely remove all the bugs and at last, there will be no issue would arise.
Furthermore, it would be wiser to save all the necessary files and data in a safe place as Backup. Since this is a professional resolution, you might need the help of skilled people to perform it.
Methods:
1] Disable Automatic Restart
2] Run Blue Screen Troubleshooter
3] Boot the operating system to Safe Mode
4] Eradicate the faulty Windows update files
5] Reconnect the External Hardware Devices
6] Update corrupted Drivers with Device Manager
7] Uninstall Program causing UCMUCSI_FAILURE
8] Scan your full system in Windows Security
9] Remove Third-Party Antivirus Program
10] Run Windows System File Checker (“SFC /Scannow”)
11] Run Deployment Image Servicing and Management (DISM) tool
12] Run CHKDSK Utility
13] Cleaning Junk from the system using Disk Cleanup utility
14] Install all possible Windows Updates
15] Resolve the issues associated with RAM
16] Use Previous System Restore Point
17] Perform a clean install
That’s all!!