Microsoft Windows developers work hard relentlessly in order to deliver a more efficient and improved and errorless version to us. Generally, the releases work fine but sometimes you might encounter updates fail to install and you get stuck. The error message might be something like “PSFX_E_MATCHING_BINARY_MISSING (Matching component directory exists but binary missing). Error 0x800f0984”
This issue comes under the Corruption errors document of Microsoft that occurs mainly when system files are damaged. Such messes arise due to some conflict between the Windows internal and external components and demands DISM tool for the fix. If the method is unable to rectify, you can download the same update file directly from the Microsoft update catalog for manual installation. Furthermore, you can try performing a clean boot, SFC scan, and as a last resort, a windows reset.
Update error 0x800f0984
Here is how to fix Update error 0x800f0984 in Windows 11 or 10 –
1] Run Inbox Deployment Image Servicing and Management (DISM) tool
DISM is a built-in utility for Windows from the tech giant efficient to service and mount Windows images before starting the deployment. Further, the tool is capable to capture, split, and otherwise manage .wim files. Error 0x800f0984 might occur due to malfunction in the Windows image so run the Deployment Image Servicing and Management using the below steps –
- Click search icon present in the taskbar.
- Write – cmd.
- Press the – Ctrl + Shift + Enter.
- When a User Account Control shows up, click – Yes.
- Type in the following command line and hit Enter –
DISM /online /cleanup-image /Restorehealth
After the process ends close the command prompt, restart your PC and try reinstalling the windows updates and check if the error 0x800f0984 still comes up.
2] Install Cumulative Windows Updates Manually
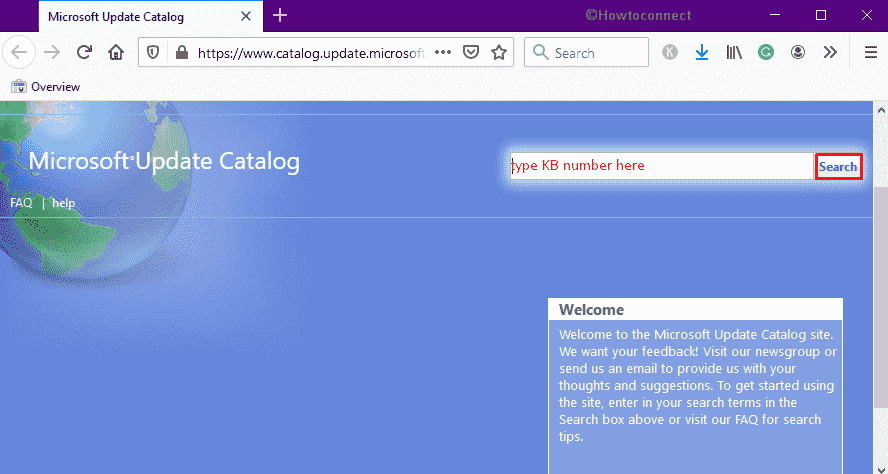
Microsoft update catalog is a storehouse of the updates rolled out from time to time for Windows and other components. When you encounter failed to install issue you have an alternative of doing it manually after taking from this site. So with the error 0x800f0984, download the MSU file from the catalog and install it manually after you encounter this issue.
- Open a web browser.
- Navigate to the official update catalog page.
- Click on the search bar and insert the KB number you wish to download.
- Select the – Search.
- Choose the update that goes with your PC configuration.
- Click the – Download.
- Go to the the directory where system saves downloaded items.
- Double-click the setup file you got.
- For appearing User Account Control, select – Yes.
- Follow the on-screen instructions to allow the installation process
3] Use Windows Update Troubleshooter
Windows inbuilt troubleshooter comes quite handy to fix some basic issues in PC and before you take any harsh measures you must always give it a try. Apart from running a series of scans, the utility executes three necessary actions to resolve this update error. First of all, the tool will clear update cache stored in memory, secondly, rename software distribution folder, and lastly, restart Windows update. Utilize the Windows update troubleshooter by following step by step guidelines –
For Windows 10
- Press the – Windows + S.
- Type in – troubleshoot.
- Hit the – Enter.
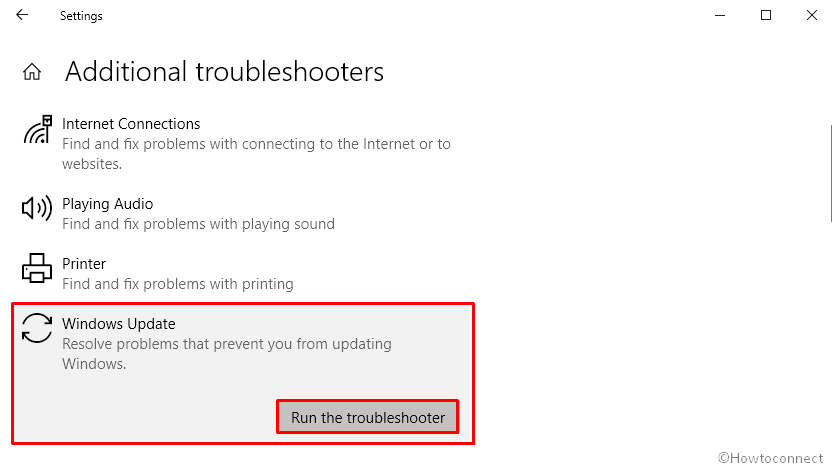
- From the right-pane, click – Additional troubleshooters.
- Select – Windows update.
- Click – Run the troubleshooter.
- If the troubleshooter comes up with an automatic fix, click – Apply this fix.
- Otherwise, do what the utility suggests.
- Close the troubleshooter and thereafter reboot Windows 10.
For Windows 11
- Press – Windows + I.
- Move to the right of appearing Settings page.
- Scroll down and select – Troubleshoot.
- From next page, click – Other troubleshooters.
- Hit – Run set beside Windows update.
If there were some minor issues the troubleshooter would have diagnosed it and prompted you to apply the respective solutions for it. You can now go back and try installing the pending updates if the error still occurs try the other methods.
4] Reset Windows update component
Main reason for most of the Windows update errors is supposed to be broken update cache. This cache is the store where the update files congregate to help in the installation of cumulative patches and builds. Corruption in the folder may deregister the DLL associated with Windows update leading to failed Windows update problem. Reset of the cache will bring the folder to the default state and after then you will be able to install it successfully.
- Press the Windows key and type in – cmd.
- Hit the – Ctrl + Shift + Enter.
- When a User Account Control comes up, click – Yes.
- Copy and paste the following lines on the cmd and hit Enter after each –
Note – If the system fails to register a specific item, skip that one and move to the next.
net stop bits

net stop wuauserv

Del “%ALLUSERSPROFILE%\Application Data\Microsoft\Network\Downloader\qmgr*.dat”

cd /d %windir%\system32

regsvr32.exe atl.dll

regsvr32.exe urlmon.dll

regsvr32.exe mshtml.dll

regsvr32.exe shdocvw.dll

regsvr32.exe browseui.dll

regsvr32.exe jscript.dll

regsvr32.exe vbscript.dll

regsvr32.exe scrrun.dll

regsvr32.exe msxml.dll

regsvr32.exe msxml3.dll

regsvr32.exe msxml6.dll

regsvr32.exe actxprxy.dll

regsvr32.exe softpub.dll

regsvr32.exe wintrust.dll

regsvr32.exe dssenh.dll

regsvr32.exe rsaenh.dll

regsvr32.exe gpkcsp.dll

regsvr32.exe sccbase.dll

regsvr32.exe slbcsp.dll

regsvr32.exe cryptdlg.dll

regsvr32.exe oleaut32.dll

regsvr32.exe ole32.dll

regsvr32.exe shell32.dll

regsvr32.exe initpki.dll

regsvr32.exe wuapi.dll

regsvr32.exe wuaueng.dll

regsvr32.exe wuaueng1.dll

regsvr32.exe wucltui.dll

regsvr32.exe wups.dll

regsvr32.exe wups2.dll

regsvr32.exe wuweb.dll

regsvr32.exe qmgr.dll

regsvr32.exe qmgrprxy.dll

regsvr32.exe wucltux.dll

regsvr32.exe muweb.dll

regsvr32.exe wuwebv.dll

netsh winsock reset

net start bits

net start wuauserv
- Close the Command Prompt.
- Restart the PC and check if the update error still exists.
5] Check relevant Windows update services
Services in Windows OS provides you a way to run an exe file for a long time. This works automatically and continuously for all users to manage associates tasks on your computer. Same with Windows update service that automatically runs in the background and silently installs the updates. Furthermore, some other services such as BITS also help in this functionality. To install the update without having any error it is a prerequisite condition that the services are in running state and have automatic startup type. So follow the method and check as well as set the same –
- Click the search icon from the taskbar.
- Insert – services.
- Press – Enter.
- From Services window, double-click – Windows Update.
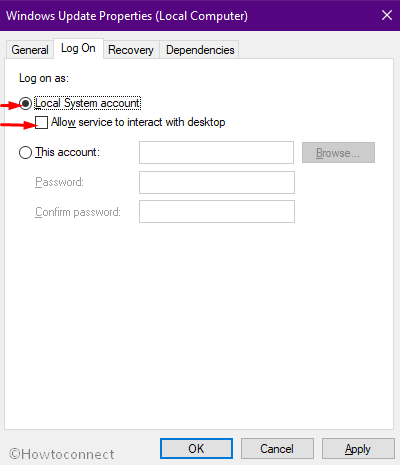
- Go to – Log on tab.
- Make sure the radio button of Local System account is selected.
- Uncheck the box set for Allow service to interact with desktop.
- Shift to General tab.
- Set the Startup type to Automatic or Manual.
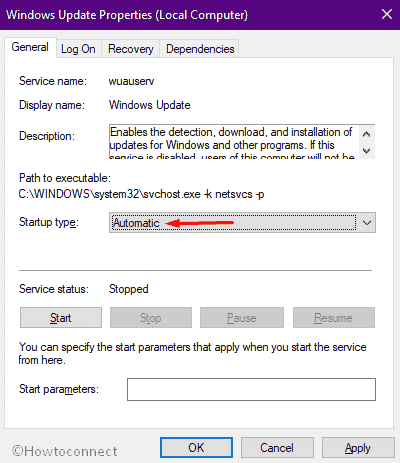
- If not grayed out, click – Stop.
- To start the service again, hit – Start.
- Click Apply and then – OK.
- Repeat the same procedure for Background Intelligent Transfer Service, Event Log as well as, Remote Procedure Call (RPC).
6] Run SFC scan to fix Windows Error Code 0x800f0984
Sometimes such errors can also rise up due to a corrupted or a broken kernel file in the system and even reflect a missing binary. So a system file checker scan is necessary in order to repair the resources to resolve this update error 0x800f0984. SFC scan tool will look for the components to find the files if corrupted and replace the same with the cache. Follow the instructions –
- Press the – Windows + S.
- Type in – cmd.
- Select the – Run as administrator.
- To give your consent, click – Yes.
- Type in sfc /scannow and hit – Enter.
Wait till the command runs and the scan completes then reboot the device. After powering up, try installing the updates and check if the issue still persists.
7] Clean Boot Windows
Sometimes this error 0x800f0984 might occur because of some software conflicts on your PC. When you Perform a clean boot with all the services stopped this would remove all the persisting collisions most certainly fix the issue. Here’s how we can perform a clean boot –
- Press the – Windows logo.
- Type in – msconfig.
- Hit the – Enter.
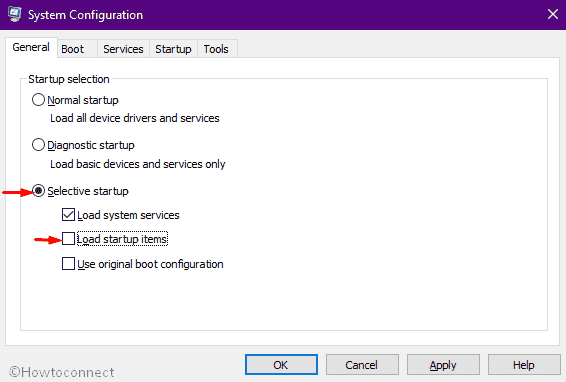
- Select the radio button present before Selective startup.
- Uncheck – Load startup items.
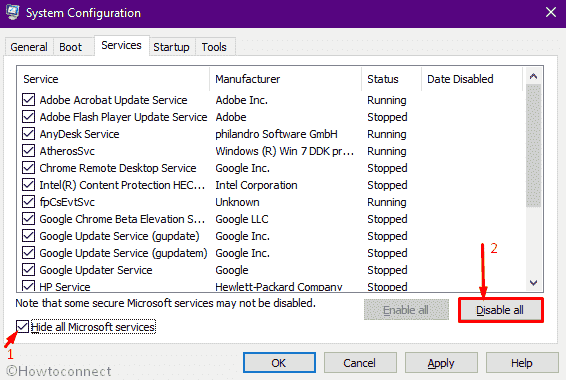
- Go to – Services tab
- Click the checkbox set for – Hide all Microsoft services.
- Select the – Disable all.
- Go to Startup tab.
- Click the – Open Task Manager.
- Right-click on each program listed there and select – Disable.
- Close Task Manager and go back to the System Configuration window.
- Click Apply first and then OK.
- Select the – Restart now.
How to Clean Start Windows 10 PC
8] Try Cloud Reset to solve Windows Error 0x800f0984
Microsoft added a modern feature using which you can reset your Windows device from taking the files Cloud. After using this function you have the minimum chance to find any error while installing Windows 11 or 10. So do according to the below guidelines –
- Click – Start button.
- Type – reset.
- Hit – Enter.
- From the right-pane, click – Get started or Reset PC.
- Choose – Keep my files.
- From the next window, select – Cloud download.
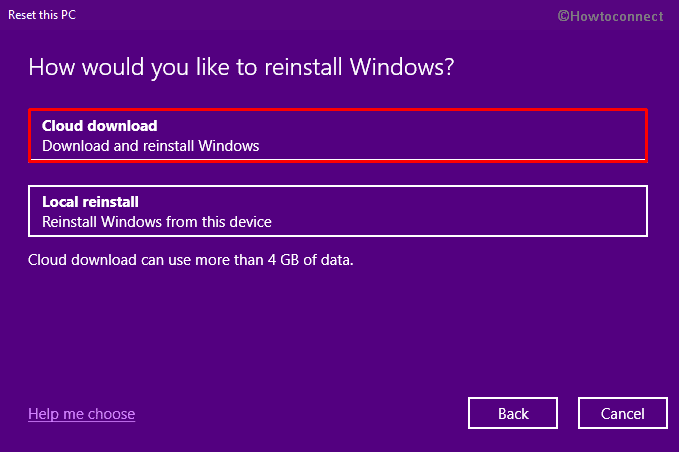
- Lastly, click – Reset.
See the ways in detail – How To Reset This PC Via Cloud Download in Windows 10.
9] Go back to an earlier restore point
If all of the above solutions don’t seem to help you then your last resort is to restore your PC to an earlier point in time when your system was working sound and good. Resetting your PC doesn’t harm your personal files it just alters the c drive and uninstalls all those programs and applications installed within this period of time.
Here’s how you can reset your PC in few simple steps –
- Press – Windows + S.
- Insert – reset.
- Move to the right of the appearing page.
- Hit – Get Started.
- Select – Keep my files.
- Follow the on screen instructions and finally click on – Reset.
- Your PC will now be restored to an earlier restore point
10] Perform Clean install to fix Windows update 0x800f0984
Suppose you have tried all the methods to fix Update error 0x800f0984 in Windows OS and didn’t find any relief then lastly you can perform clean install. This process will install the OS from scratch where there will be no space for any issues remain. Moreover, the clean install will include the update showing the error code.
- Navigate to – Microsoft website.
- Click – Download tool now.
- Double-click the downloaded setup file.
- When a UAC arrives, hit – Yes.
- Once the setup window is ready, click – Accept.
- Select the radio button allocated for – Create installation media (USB flash drive, DVD, or ISO file) for another PC.
- Hit – Next.
- Check the Language, Edition, and Architecture and make sure they are correct.
- After that, click – Next.
- Click the radio button set beside ISO file.
- Hit – Next.
- Choose a location where you want to save the file.
- Click – Save.
- In the end, hit – Finish.
- Visit the directory where you saved the file.
- Double-click the downloaded item to start the installation process.
- Comply with on-screen guidelines to finish.
You can also find the ways here – How to Install Windows 10 2009 October 2020 update.
Methods list
1] Run Inbox Deployment Image Servicing and Management (DISM) tool
2] Install Cumulative Windows Updates Manually
3] Use Windows Update Troubleshooter
4] Reset Windows update component
5] Check relevant Windows update services
6] Run SFC scan
7] Clean Boot Windows
8] Try Cloud Reset
9] Go back to an earlier restore point
10] Perform Clean install
That’s all!!