Procedures to Use ShadowCopyView in Windows 10 with steps. – ShadowCopyView is a small program, specially designed for Windows OS that lets you access the snapshots of the disk drive. These snapshots include files, folders, and directories of older days.
When you Use ShadowCopyView in Windows 10 you retrieve the files or other items before modifications. ShadowCopyView is the lightweight tool that is compatible with both 32, 64- bit systems and runs perfectly on all editions of Windows. It displays backup copies or snapshot using Volume Shadow Copy service or VSS.
All the snapshots that you see in ShadowCopyView program incorporate previous versions of folders and files since the date it was generated. In addition, the tool also includes an option to copy the files and save them on the hard disk. An interesting thing about ShadowCopyView is that it is also available in a few other languages.
Let us now move towards the guide for its complete details.
Use ShadowCopyView in Windows 10
Download and Install ShadowCopyView
Step 1 – Download ShadowCopyView freeware tool from its creator’s website and the file will be in a zip format.
Step 2 – Now, you have to extract the items of the zip file and save them into another folder. Hence, right-click the downloaded file and from the list of options, click on Extract Files.
Step 3 – After you successfully extract the files, locate and double-click the file ShadowCopyView.exe.
Step 4 – UAC will evoke showing the publishers details, click Yes.
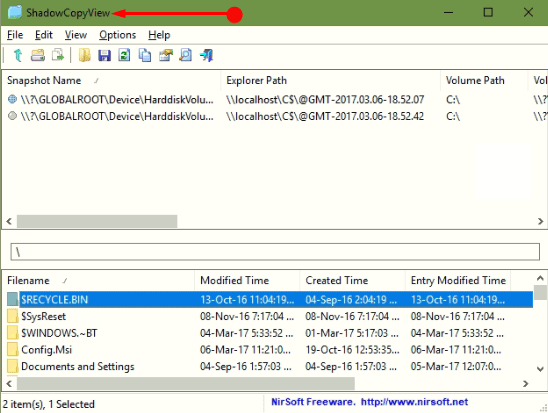
Now, ShadowCopyView window will open up on your PC screen. If you see carefully, it has two panes – upper and lower.
The upper pane of ShadowCopyView shows all snapshots that are generated by Volume Shadow Copy service, shortly referred as VSS.
And the lower pane of ShadowCopyView presents all the files and folders of the selected snapshot. Moreover, you can also browse the subfolders in the lower pane either by double-clicking the folder or by pressing Enter key.
Extract Shadow Copy Files
Now, let us go through the below steps to extract Shadow Copy files in Windows 10.
Step 1 – Select a snapshot on the upper pane.
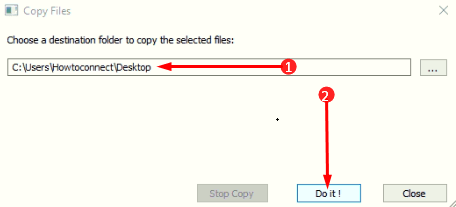
Step 2 – Now, in the lower pane, find the file or folder you wish to extract and make a right-click on it. From the list of few options that pop-up, click Copy selected files to.

Step 3 – Finally, choose the location where you wish to keep the extracted Shadow Copy files and click Do it.
Open Snapshot in File Explorer
Step 1– You can also open and view the selected snapshot in File Explorer and to do so, first, right-click on it.
Step 2 – The menu will display few options, select Open in Windows Explorer. Alternatively, press F2 for opening the selected snapshot in File Explorer.
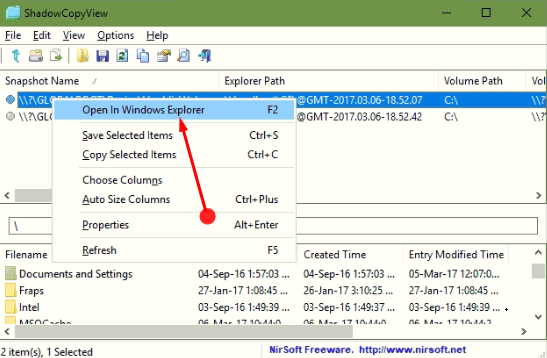
Note – Make sure that this option will only function if the Previous Version feature of Windows 10 supports the selected snapshot, otherwise you will receive an error message.
Change the Language of ShadowCopyView
Step 1 – go to ShadowCopyView page using the link on the 1st step above and download the needed language zip file.
Step 2 – Then extract shadowcopyview_lng.ini and place it into the same folder where you have installed ShadowCopyView tool.
Conclusion
You can easily use ShadowCopyView in Windows 10 and get access to the right file. The tiny utility is very handy and is in a very small size. In addition, the tool also provides you an option to extract the Shadow Copy files and save it on your favorable location.