Methods to Use shellNewSettings in Windows 10 with steps. – shellNewSettings is a tiny utility developed to disable or enable items from the New right-click menu in Windows 10. When you do a right-click in File Explorer, a list opens up with various options, including New. This New option lets you create a new folder, shortcut, etc at any point of time. Many users feel that New context submenu is cluttered with unwanted items and so wants to remove them. shellNewSettings helps you in removing the items. You can see another guide in this prospect How to Customize Desktop Context Menu on Windows 10.
So, with shellNewSettings you can easily get rid of the unnecessary entries from the New menu. In this guide, we will describe the instructions to Use shellNewSettings on Windows 10.
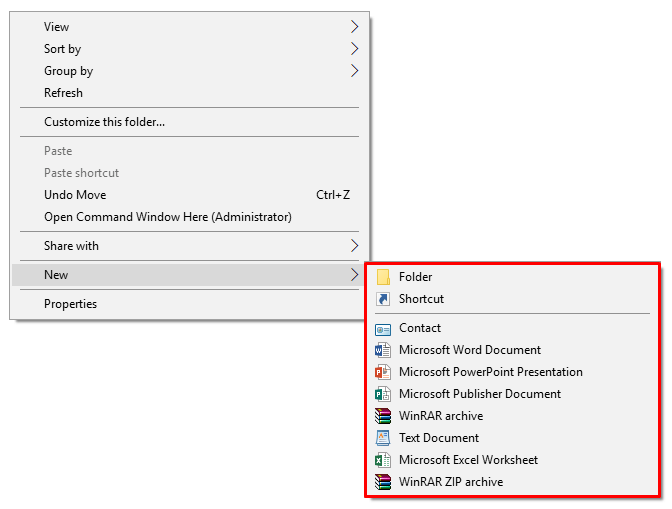
When Windows 10 is first installed on the PC, the New option on the context menu of File Explorer incorporates few entries such as Folder, Shortcut and so on. But as you install any specific software, that software might include its items to the New submenu. For example – After installing MS Office, the application might add its entries to the menu.
For reference, in the below screenshot, the New context menu of File Explorer is showing up so many entries. You can remove the unnecessary entries using Registry but the tampering is quite risky for a common user. Hence, Use shellNewSettings on Windows 10 and disable all the entries that you don’t need.
Way to Use shellNewSettings on Windows 10
Download and Install shellNewSettings
Step 1 – Download shellNewSettings tool from its creator’s website.
Step 2 – The file will be in a .zip format whose contents you have to extract. To do so, right-click on the file and from the list of options that pop-up, select Extract files.
Step 3 – Pick up the location as per your preference and save the contents.
Step 4 – Moving on, locate the file shellNewSettings.exe and double-click on it.
Use shellNewSettings on Windows 10
Step 5 – The shellNewSettings window will come up on your PC screen. It will display all the items present in the New right-click menu.
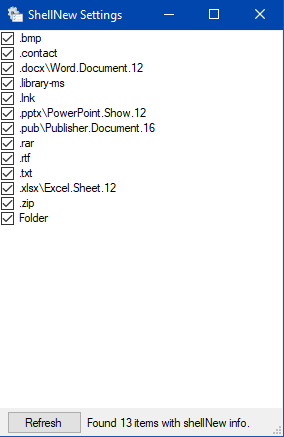
Step 6 – Go through all the items on the shellNewSettings window. Deselect the entries that you prefer to remove from the New submenu on the box.
Step 7 – Once you uncheck the items, click Refresh button on the window.
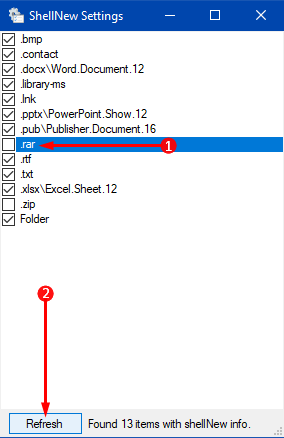
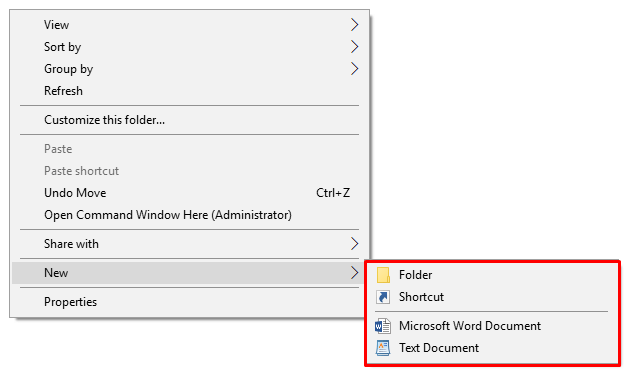
Step 8 – This will immediately remove the selected items from the New submenu in File Explorer.
Note – In case, if you wish to show those items again, launch shellNewSettings, select the items, and finally click the Refresh button.
Conclusion
So, you have seen that is very easy and simple to Use shellNewSettings on Windows 10. Well, shellNewSettings works best when you have cluttered items in the New right-click menu. Give a shot to this tiny free software and share your views using the comments form.