Method to Use UninstallView v1.00 in Windows. – Many users like to gather information about all the applications that are installed on their Windows PC. But manually checking them is a tiresome task for anyone. But, there is a utility UninstallView v1.00 that can help you collect all the data about the installed programs. Moreover, this tool displays all the details in one table.
You can freely use UninstallView v1.00 on Windows versions to identify installed program’s details for your local system, for a remote desktop on your network, and for outsider hard-drive connected to your PC. In addition, it also lets you easily uninstall software on your local computer and a remote computer. Let us walk through the entire procedure and learn about this new program.
Use UninstallView v1.00 on Windows
System Requirements
UninstallView v1.00 is perfect on any version of Windows, beginning from Windows XP and up to Windows 10. The application from Nirsoft also works with both 32-bit and 64-bit systems.
The below sections explain to you with steps to Use UninstallView v1.00 on Windows.
Download UninstallView v1.00
Step 1 – When your computer meets the system requirements, download UninstallView v1.00 from its web page.
Step 2 – Here, you will find separate download links for both 32 and 64- bit system. So, download the one accordingly to Use UninstallView v1.00 on Windows.
Start Using UninstallView v1.00
Step 1 – UninstallView v1.00 does not need any special installation process. Simply, head to the download folder and double-click the file UninstallView.exe.
Step 2 – After running UninstallView, it scans your local system and collects all information about the programs of your system.
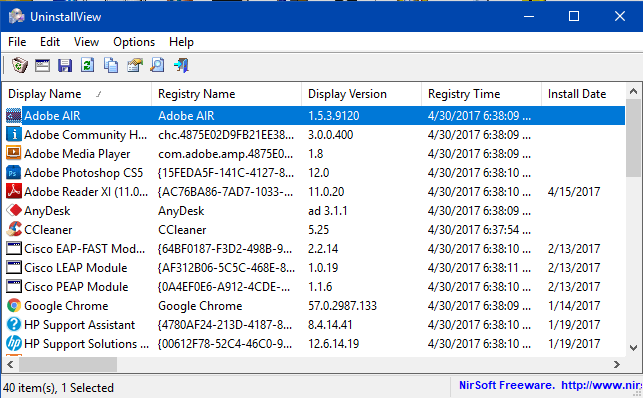
Step 3 – When you Use UninstallView v1.00 on Windows, the main window displays about all the installed programs.
Important: UninstallView initially takes the official uninstall information from the Registry given by the software itself and then tries to complete any missing info from other places.
Loading uninstall information from other sources
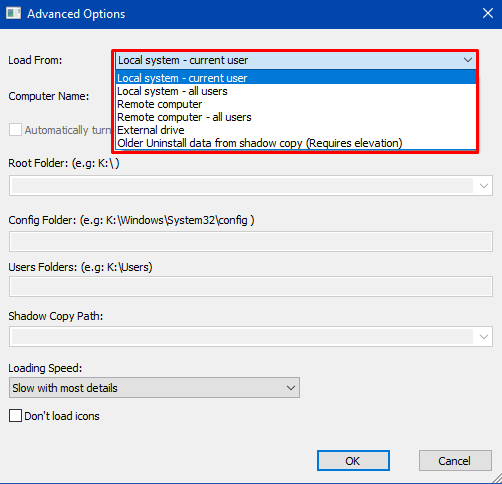
In order to load uninstall information from other sources (instead of your current system), press F9 (Advanced Options) and pick up the desired option in the Load From combo-box.
1. Local system – current user: This is the default option, the uninstall information is loaded from your local system and current user.
2. Local system – all users: UninstallView loads the uninstall information from your local system and current user, and also from all other users on this system. The scanning of other users works only if you have read access to the profile of other users and their Registry file is not locked. It’s strongly suggested to use this option with elevation (Ctrl+F11).
3. Remote computer: UninstallView loads the uninstall information from a remote computer on your network. You need admin access to the remote machine in order to use this option. Furthermore, if the Remote Registry service on the remote machine is turned off, you should turn on the Automatically turn on the remote Registry service option.
4. Remote computer – all users: Similar to the Remote computer option, but in this option. UninstallView also thoroughly check the Registry of all user profiles on the remote system. The checking of other users works only if you have read access to the profile of other users and their Registry file is not locked.
5. External drive: UninstallView loads the uninstall information from external hard drive plugged into your computer. You may require using UninstallView as administrator (Ctrl+F11) to check the Registry files on the external drive.
6. Older Uninstall data from shadow copy (Requires elevation): When you keep shadow copies on your computer, you can find the installed programs list from the day that the shadow copy was created.
Loading Speed
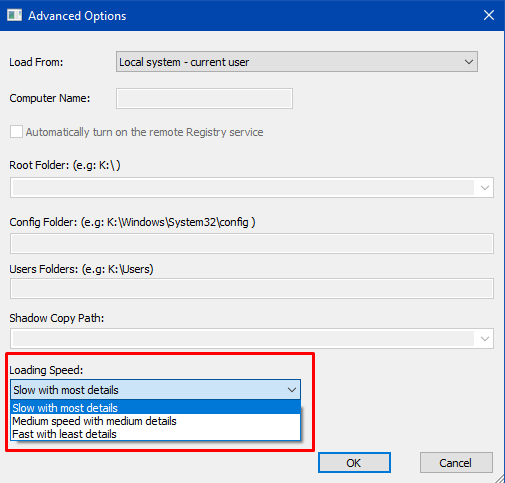
When you Use UninstallView v1.00 on Windows, you can choose 3 sperate loading speeds – (In Advanced Options window).
1. Slow with most details (The default).
2. Medium speed with medium details.
3. Fast with least details.
Either medium or fast speed might be working if you connect a remote computer and the loading process is very slow. However, you should know that some of the uninstall details will be missing when using the Medium or Fast mode. There is also Don’t load icons option that might increase the loading speed by avoiding loading the icons of installed programs.
Uninstall a software with UninstallView
You can also Use UninstallView v1.00 on Windows to uninstall a software. And UninstallView provides 3 option for the same.
1. Uninstall Selected Software: This choice uses the standard uninstall command of the software, as in the Programs and Features module in Control Panel of Windows.
2. Change Install Of Selected Software: This option runs the standard change install command of the software (Only if it’s available).
3. Quietly Uninstall Selected Software: This option runs the uninstall of the software without displaying any user interface. Only if quiet/silent uninstall is available for this software. You can watch whether UninstallView can start a silent uninstall by looking at the Quiet Uninstall String column. If it’s not vacant, it means that there is quiet uninstall support.
Uninstall a software on remote network computer with UninstallView
UninstallView permits you to uninstall an application on a remote computer with the help of the PsExec utility from SysInternals/Microsoft. You need to leave PsExec.exe in the same folder of UninstallView.exe and then the uninstall options will be viewable while etablishing a remote connection. The most useful option for
Step 1 – Place PsExec.exe in the same folder of UninstallView.exe tool and then the uninstall options will be visible when connecting a remote computer.
Step 2 – The most useful option for a remote computer is Quiet Uninstall because the software is uninstalled without displaying anything on the screen of the remote computer. Be aware that the uninstall on the remote machine is executed with a SYSTEM user, and some uninstallers might work improperly when running them remotely.
The Options Menu
To Use UninstallView v1.00 on Windows, you need to know all the options menu.
1. Uninstall Run Mode: In this option, you choose how UninstallView runs the uninstall command when using the a) Uninstall Selected Software, b) Change Install Of Selected Software and c) Quietly Uninstall Selected Software actions.
2. Show System Component Items: By built-in nature, UninstallView doesn’t show the uninstall items marked with System Component attribute (The standard uninstall tool of Windows also hides them). You can turn on this option in order to view these System Component items as well. Be aware that when this option is turned on, you might see multiple uninstall items with the identical display name.
3. Show Items With Parent Uninstall Entry: With the inbuilt feature, UninstallView doesn’t provides uninstall software with parent uninstall entry (ParentKeyName Registry value). The standard uninstall tool of Windows also hides them. You can also enable this option to view uninstall items with parent entry.
4. Show Items Without Uninstall String: Using the default character, UninstallView is unable to display uninstall items that don’t keep uninstall command string. You can also turn on this option in order to view these items, but be aware that UninstallView cannot uninstall these items.
5. Show Items Without Display Name: By default, UninstallView doesn’t show uninstall items that don’t have a display name. Moreover, you can turn on this option if you want to view these items.
6. Allow Uninstall Of Multiple Items: If you enable this option, UninstallView will let you uninstall various programs at the same time. In addition, it’s very effective, but it also might be fatal if you use it in accurately (For example: running quiet uninstall for all software on your system). However, enabling this option is at your own risk.
Command-Line Options
| /uninstall <Name> | Uninstall the determined software. You can choose the Display Name or Registry Name. For example: UninstallView.exe /uninstall “Google Chrome” |
| /quninstall <Name> | Quietly uninstall the chosen software (Without displaying user interface). You can mention the Display Name or Registry Name. |
| /changeinstall <Name> | Change the installation of the selected software. You can specify the ‘Display Name’ or ‘Registry Name’. |
| /stext <Filename> | This will Save the installed programs list into a simple text file. |
| /stab <Filename> | Use it to store the installed programs list into a tab-delimited text file. |
| /scomma <Filename> | Execute this command to Save the installed programs list into a comma-delimited text file (CSV). |
| /stabular <Filename> | To store the installed software list into a tabular text file. |
| /shtml <Filename> | Use this to store the installed software list into HTML file (Horizontal). |
| /sverhtml <Filename> | Assists in saving the installed programs list into HTML file (Vertical). |
| /sxml <Filename> | This Command works to Save the installed software list into XML file. |
| /sort <column> | The command-line will be helpful with other save options for arranging by the desired column. <column> parameter can determine the column index (0 for the first column, 1 for the second column, and so on) or the name of the column, like “Display Name” and “Display Version”. You can use the ‘~’ prefix character (e.g: “~Publisher”) if you like to arrange in descending order. You can put multiple /sort in the command-line if you want to arrange by various columns. |
| /ShowItemsWithoutUninstallStr [0 | 1] /ShowItemsWithoutDisplayName [0 | 1] /ShowSystemComponents [0 | 1] /ShowItemsWithParent [0 | 1] /LoadFrom [1 – 6] /ComputerName [Computer Name] /LoadingSpeed [1 – 3] . . . | You can use any variable inside the .cfg file to set the configuration from the command line, here are some examples: Load uninstall data of all users on the remote computer with IP address 192.168.0.55 and also display ‘System Component’ entries: UninstallView.exe /LoadFrom 4 /ComputerName “192.168.0.55” /ShowSystemComponents 1Load uninstall entries of all users on this system including items with parent entry, and export them to csv file: UninstallView.exe /LoadFrom 2 /ShowItemsWithParent 1 /scomma “c:\temp\uninstall1.csv”Load uninstall data of current user on remote computer 192.168.0.101 in ‘Fast’ loading speed and export to html file: UninstallView.exe /LoadFrom 3 /ComputerName “192.168.0.101” /LoadingSpeed 3 /shtml “c:\temp\uninstall1.html” |
Conclusion
You can freely Use UninstallView v1.00 on Windows or distribute this program via floppy disk, CD-ROM, the Internet, or in any other way. So, Use UninstallView v1.00 on Windows without paying any cost for the application and also get to know about all the installed programs in one frame.