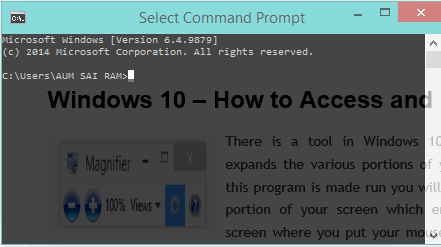
Our every time rescuer, Command Prompt as we all know is a command line interpreter. It is famously called as cmd.exe or sometimes only cmd. You all might have liked the look of Windows 10 and its’ easy user interface.
Well, like others I also like bright colors, beautiful images, interesting interface, and lots of nice things that Windows 10 is providing. But the only thing that upsets me and many users is the Command Prompt. Don’t you think that it is very dull and looks lifeless? Though I will admit that in many situations it provides life to the computer but it is very dull. Well, my dear readers and friends, there is good news regarding the boring Command Prompt on Windows 10. You can customize it, fill it with colors, and change its fonts, cursor size, and many more things to do.
What is Command Prompt on Windows 10?
The main definition of Command Prompt has already been explained above. It is a line interpreter on Windows 10 and also of the previous versions of Windows. When you open Command Prompt, you type the commands to execute certain functions or work on your computer. And it carries out the task without making you use any graphical interface. The Command Prompt window is an access point for entering the computer commands. But if you have taken a trip to the Windows 10 Command Prompt you may have found out the new features that were never seen before in any versions of the Windows.
How to Launch and Use Command Prompt on Windows 10
1. Launching Processes
The different methods to launch the Command Prompt on Windows 10 screen are mentioned below –
a. Through Taskbar Search
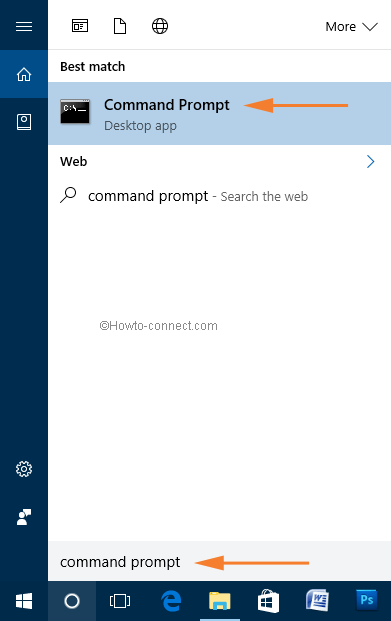
- Open the Search field of Start Menu and type Command Prompt. You will see it being displayed in the results list.
b. Through Start Menu
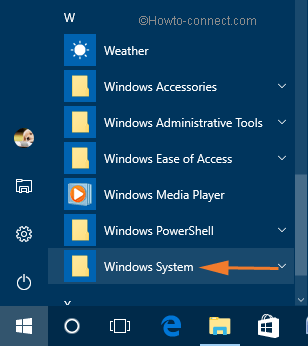
- Open your Windows 10 Start Menu. Scroll down till your reach Windows System.
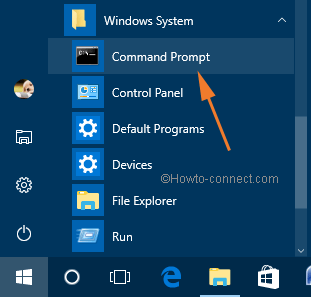
- Open it and see Command Prompt under Windows System.
c. Via Run
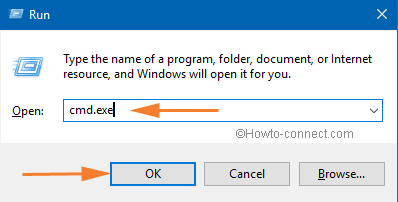
- Bring the Run window by pressing Windows and R keys on your keyboard. Type the command cmd or cmd.exe in the area provided. Click Ok to see Command Prompt on Windows 10 screen.
d. Via Power User Menu
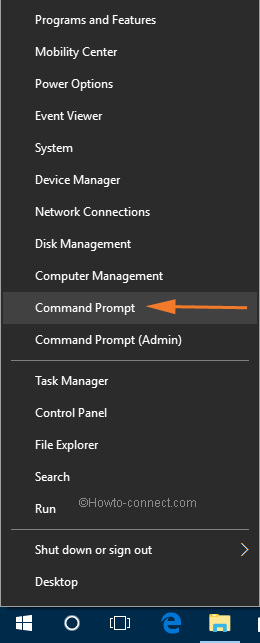
- When you right click on the Start Menu icon of your Taskbar, the options available are called Power User Menu. Command Prompt is listed in them. Click on it to make it appear on your screen. Note – To enable this feature, go to Settings > Personalization > Taskbar and use switch toggle turn on “Replace Command prompt With Windows PowerShell in the menu when I right click the Start button or press Windows + X”.
You Might also like to read:
- How to Access Elevated Command Prompt on Windows 10
- How to Launch Command Prompt at Boot in Windows 10
- 4 Ways To Launch Command Prompt with Administrator Privileges In Windows 8
2. Getting Windows 10 Command Prompt Properties
To make changes in the Command Prompt window, you have to first access its Properties section from where you can carry out the customization process.
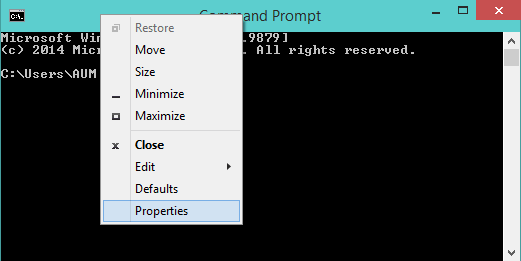
- You have learned to launch the Command Prompt window on your screen. So first of all, make it appear on your screen. Now, on top of the Command Prompt window, make a right click and choose the Properties option.
- The Command Prompt Properties window will now appear on the screen exhibiting you four different tabs for your customization – Options, Font, Layout, Colors, and Experimental.

The details of all the four tabs are explained below:
3. Customizing Cursor Size, Command History and Edit Option in Command Prompt on Windows 10
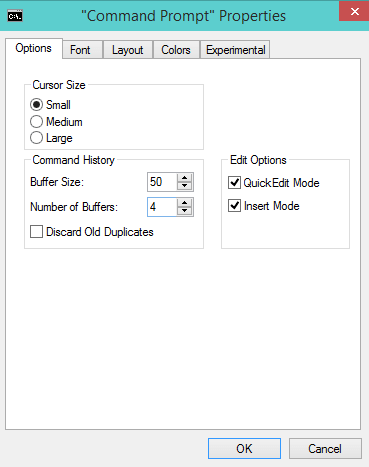
As you can see the first tab of the Command Properties window is of the Options. The Options tab has three sections into it – Cursor Size, Command History, and Edit Options.
a. Cursor Size
The Cursor Size options provide you three sizes for the cursor. The Small is selected by default which is used by almost all the users. When you wish to change the size of the cursor select either Medium or Large size as per your requirement.
b. Command History
The Command History has three options listed in it. The first one is the Buffer Size. The number seen beside the Buffer Size option represents you the track record of the commands been carried by you. You can use the drop-down menu of it and change the number of records. By default, the number is set to 50. You can take it up to 999 also.
The second option of Command History is the Number of Buffers. The number displayed with this option says the number of simultaneous occurrence of the Command Prompt being used by you, each with distinct buffers. Suppose, after changing its value to 5, you can open up five Command Prompts simultaneously, all with its own buffers, different from each other.
The third option is of Discard Old Duplicates. If you select this option, Windows will delete the duplicate command records from the buffer.
c. Edit Options
The Edit Options section also holds two options in it – QuickEdit Mode and Insert Mode.
The QuickEdit Mode permits you to copy content from Command Prompt window and paste it in the same using a mouse.
The next option Insert Mode gives you a permission to insert content at the position of the cursor. If this option is unchecked, you will notice the characters striking to each other.
4. Modifying Fonts on Command Prompt on Windows 10
The Font tab holds the second position in the Command Prompt Properties window. This tab gives you opportunities to change the size of the characters and also to change the font of the characters.
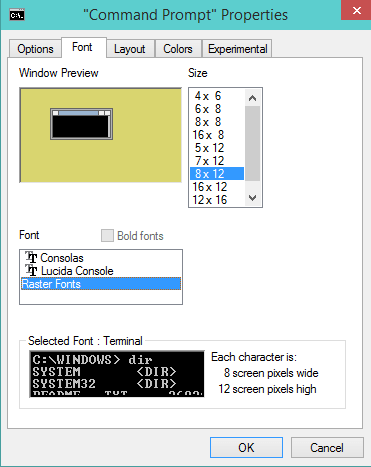
If seen carefully, the Size option provides you many sizes and its preview can be seen in the Window Preview. Choose the size which suits you.
Then on the middle part of the Font tab, you will see Font option. The Size option changes according to the selection of the Font. If you choose Consolas as your Font, you will see that the size list will display you different options. The look of the selected Font is displayed on the Selected Font section.
5. Changing the Layout of Command Prompt on Windows 10
The Layout is the third tab in the Command Prompt Properties window. This tab gives you three options in three different sections to work out – Screen Buffer Size, Window Size, and Window Position.
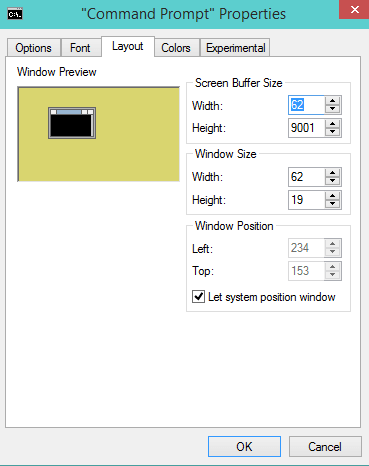
a. Screen Buffer Size
By changing the Width value, you can change the number of characters to be displayed on a line in the Command Prompt. And the numbers of lines saved in the memory are modified by utilizing the Height value.
b. Window Size
You can adjust the Width and Height of the Command Prompt window.
c. Window Position
You can set the distance of Command Prompt’s window from the upper and left corners of your screen. But to set the Width and Height, you need to select the Let system position window option.
Let system position window: if you select this option, you will be enabled to modify the Window Position. In case, it is not selected, using the mouse you can drag and drop and also can change the size of the Command Prompt window.
6. Setting Colors in Command Prompt on Windows 10
The fourth tab represents the Color section for editing. You will be provided with four different options: Screen Text, Screen Background, Popup Text, Popup Background. Let us know see what does the option gives you.
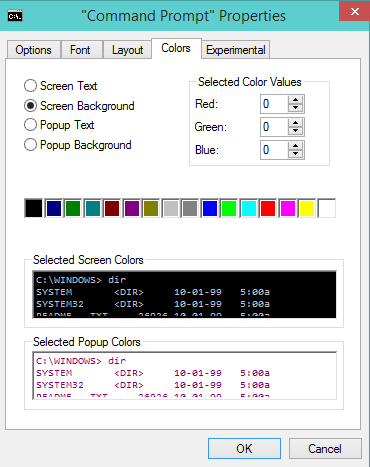
Screen Text: Select this option to choose the color for your text that will be displayed in the Command Prompt window.
Screen Background: You can even use your favorite color as the background. This option serves background color.
Popup Text: Utilize this option to adjust the color of the text that will be exhibited in the pop-up windows provoked by the Command Prompt.
Popup Background: The color for the background of the popup windows will be set that are provoked by the Command Prompt.
7. Using Experimental Tab of Command Prompt Properties on Windows 10
This tab is an addition to the Windows 10. It was not there previously in any versions of Windows. This Experimental tab has some options which will make work easier. There are seven different items to experiment with. Let us see them in detail.
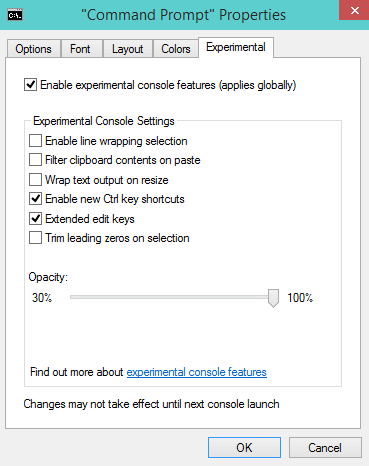
The first option is Enable experimental console features (applies globally). You will see that by default this box is been selected. If you uncheck this option you will not be able to use the rest of the options of the Experimental tab, they all will be grayed out. So in order to do the experiment, keep the checkbox selected.
The next half of the tab is of Experimental Console Settings. And under this section, you will have seven options.
Enable line wrapping selection: This option upgrades how you choose and copy the text to the text editor. Here you don’t have to perfect the course of the text after you pasted the copied items to another application.
Filter clipboard contents on paste: This option eliminates the tabs and converts the smart quotes into the regular of that text which is copied from the clipboard and pasted into the Command Prompt.
Wrap text output on resize: The contents of the Command Prompt will be resized with the resizing the Command Prompt window by automatically fitting the width of the window.
Enable new Ctrl key shortcuts: It allows you to use the shortcuts which include the following –
- Ctrl + C: This will copy the selected text to the clipboard
- Ctrl + V: Use it to paste the text into the command line.
- Ctrl + Home: Will takes the cursor to the beginning of the buffer.
- Ctrl + End: Will take the cursor to the end of the buffer.
- Ctrl + M: Mark Mode to move the cursor within the window.
- Ctrl + F: This will open the Find dialog.
- Ctrl + Up Arrow: Moves the cursor upwards.
- Ctrl + Down Arrow: Moves the cursor downwards.
- Ctrl + Page Up: It will move up one page in the output history.
- Ctrl + Page Down: It will move down one page in the output history.
- Alt +F4: Closes the Command Prompt
Extended Edit keys: This enables the enhanced keyboard editing on the command line.
Trim leading zeros on selection: When you double click to choose a text, ignore leading zeros unless text begins with 0x or 0n.
Opacity: The Command Prompt window can be semi-transparent now. Use the slider and give the window a glassy look. You can bring down the transparency level to 30% also. These are keyboard shortcuts to adjust the opacity –
- Ctrl + Shit + Plus (+): This combination will increase the transparency.
- Ctrl + Shift + Minus (-): It will reduce the transparency level.
- Ctrl + Shift + Scroll up (Mouse): Increase the opacity level.
- Ctrl + Shift + Scroll down (Mouse): This will decrease the transparency level of the Command Prompt
