We have already discussed some of the features of Windows Firewall. It basically acts as a wall between your system and the internet. It filters the incoming and outgoing traffic to your system and protects it from the outside malware attacks. Today we will take you through the steps which will show you how to import and export Firewall Settings in Windows 10.
You can take a backup of the advanced settings, notification settings, and many more settings of Windows Firewall in Windows 10. But before going to the steps just make sure that you are logged into the system as an Administrator. There are two methods through which you can perform the backup and restore act. One can be done by getting into the Windows Firewall window and the other method can be through the Command Prompt.
How to Import and Export Firewall Settings in Windows 10
- First, you need to expand Control Panel on your screen and make its icons view either in small or large and click Windows Firewall.
![]()
- Windows Firewall window will become visible on the screen. Click Advanced Settings link on the left sidebar of the window.

- If a User Account Control (UAC) prompts up, respond to it positively by clicking Yes.
- Click the Action option on the menu bar.
- Click on the Export Policy option from the sub-menu.

- Navigate the location where you want to store the backup of Windows Firewall Settings.
- Give a name and save it in the .wfw file type.
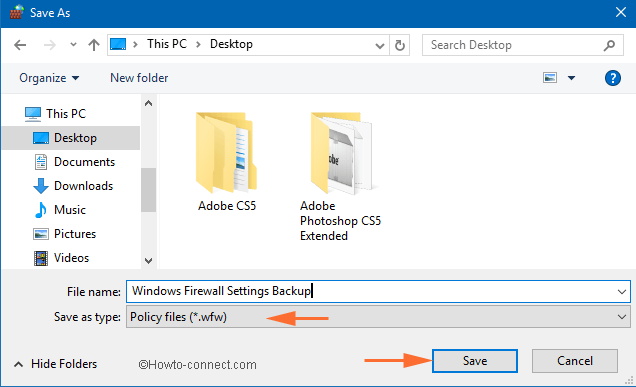
- Click on the Save option to save the exported settings.
- You will get a notification in a small window displaying the success of the backup.

Import Windows Firewall Settings on Windows 10
- Go to the Advanced Settings window of Windows Firewall by repeating the above steps.
- Click Action on the menu bar.
- Choose Import Policy.

- You will get one confirmation window seeking your permission to proceed further.

- Click Yes and confirm the process.
- Take yourself to the location where you have saved the .wfw file and click Open.

- Again you will get the confirmation message in a little window.

- Take yourself out of the Windows Firewall Settings window.
Export Firewall Settings on Windows 10 through Command Prompt (Admin)
- Right click on the Power Menu and select the Command Prompt (Admin).

- Administrator Command Prompt window will occur on your screen.
- Now type the following command to export the Windows Firewall settings.
netsh advfirewall export “%userprofile%\Desktop\WindowsFirewallSettingsBackup.wfw”

- Now save the WindowsFirewallSettings Backup.wfw file will be saved to your desktop. Change it to the other folder later on if you wish to.
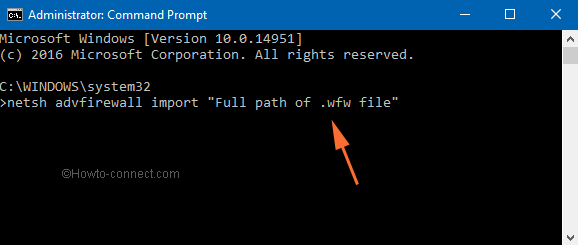
Import Firewall Settings on Windows 10 through Command Prompt
- Open the Command Prompt (Admin).
- Type the below command –
netsh advfirewall import "Full path of .wfw file"
- Instead of typing “full path of .wfw file” enter the original full path of where you have stored it. For instance, my command is –
netsh advfirewall import "%userprofile%\Desktop\WindowsFirewallSettingsBackup.wfw"
- Close the Command Prompt window once you are done.
Final Thought
Windows Firewall works as the armor for the Windows 10 PC and users should set it with the highest priority. Importing the settings of Firewall on your System will be the practices for maintaining the security level of your PC. So I always recommend import your Windows 10 Firewall settings.