How to Flush DNS Cache in Windows 10 Using CMD – When you can’t get at a web page in spite of the page exists on the internet and is not in outage state it is certainly a matter of annoyance. The situation indicates DNS Cache on the local server may be broken.
Way to Flush DNS in Windows 10 Using CMD
Step 1 – Press the shortcut Win & X buttons jointly and hit the choice Command prompt (admin) located at the approximately middle portion of Power user menu.
Step 2 – On UAC Confirmation pop up click Yes.
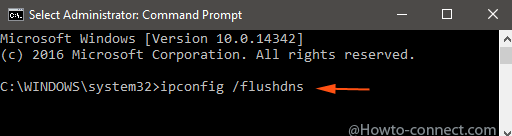
Step 3 – Copy ipconfig /flushdns paste into the command prompt and hit Enter button.
Flush DNS Cache Using Batch File
Step 1 – If you want to avoid bothering with the lengthy steps a single click is sufficient to download the batch file to flush DNS Cache in Windows 10.
Step 2 – When the download of the batch file ends up, open it and nothing else to do.
To see the DNS
If you like to see the DNS Record on your local network or computer simply copy ipconfig /displaydns paste into the command prompt and press Enter.
You will see a huge list of DNS records under Windows IP Configuration.
What is DNS Cache?
DNS Cache is a little size file includes the list of IP Addresses you repeatedly visit on a network. If the Cache gets corrupted and you try to open the web page you find it unavailable with certain errors. But the method to come out of this issue is Flush DNS Cache. One thing that deserves to mention is the process to Flush DNS in Windows 10 is the same as in the previous versions.
What Purges the DNS Resolver cache does?
When you run the code ipconfig /flushdns it eradicates all the longstanding records and supersedes it with a fresh one. The result is in the case, IP address of any web page is switched and accessing it is resulting in errors repeatedly then the freshly created DNS cache renders the changed IP Address to reach the web page. Apart from this, if the DNS Cache is corrupted or broken then a reset cache becomes ready to work after you Flush DNS Cache in Windows 10.