Sometimes you may notice that the disk space of your drive cuts short when you install the new Windows 10 operating system. It is the default behavior of the modern version of the OS. When you upgrade your Windows the setup saves a lot of files and replenishes your hard drive with the files which your PC doesn’t require. But after the end, you can remove all those permanently to Retain Free Disk Space After Installing Windows 10 OS.
If you are also encountering the same issue then you can use Disk Cleanup manually to remove those files and Retain Free Disk Space After Installing. So, you can see further –
How to Retain Free Disk Space After Installing Windows 10
1. Press Windows with R key simultaneously.
2. Write the following text in that box and select OK.
cleanmgr

3. Choose Disk Drive like C (where the OS is installed) and press OK.

4. Hit Clean up system files option to get the tool in extended mode.

5. Again you will get the small disk cleanup pop up and select the drive where your system files are lying. Then after Click OK.

6. After a few moments, you will see the full disk cleanup wizard. Check the box facing Previous Windows installation item and hit OK.
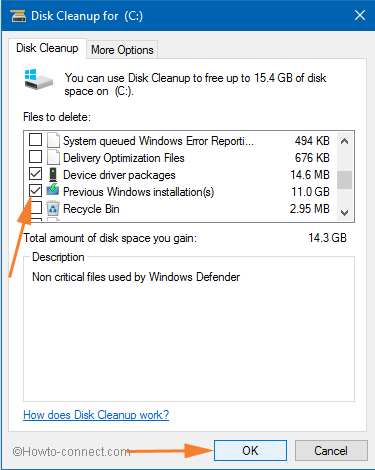
7. A confirmation pop up will appear. Click Yes to confirm and wait until the Previous Windows installation(s) are deleted. It may again ask for your confirmation in the middle. Select Yes at that time.
8. Restart your system to check the space on Local Disk C. Hope, the above way is useful to Retain Free Disk Space After Installing Windows 10 and make your PC clutter-free and fast.
Enjoy Free Disk Space!
sunita
says:Thanks Jim.
jm swallow
says:the real issue is that when the win10 upgrade happens it renames ENTIRE old Windows directory as windows.old, AND still keeps it protected as though they are System files. Getting rid of the “Trusted Installer” protection that BillG imposes is a nightmare.