Sometimes a strange error occurs While uninstalling a store app or game. As you try to remove the app 0x80073cfa appears. In such a situation, neither you can uninstall the application nor open it on Windows 10. Furthermore, the same error code might also display when you update the app via Microsoft Store.
0x80073cfa removal failed error commonly appears due to incorrect settings or connectivity issues. However, you can easily uninstall the app with the correct Windows PowerShell cmdlet. In some cases, a simple restart does wonders and fix the problem forever.
0x80073cfa Removal failed error for Microsoft Store apps
Here is how to Fix 0x80073cfa Removal failed error Microsoft Store apps in Windows 10 –
1] Uninstall Windows 10 apps using PowerShell
Sometimes, when you cannot uninstall an app or game downloaded from the store, PowerShell might come up as a rescuer. Although, in the previous versions, Microsoft disabled this feature now it is working perfectly with some modifications. So follow the steps
- Press – Windows + S.
- Type in – powershell.
- Select – Run as administrator.
- On User Account Control, click – Yes.
- In the elevated PowerShell, type – Get-Appxpackage -Allusers.
- Hit – Enter.
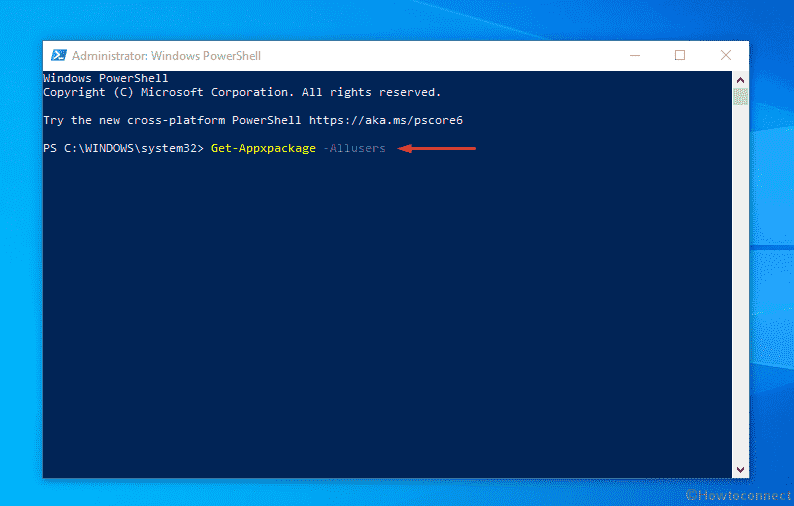
- Once you see the list of all store apps, find the one that you want to uninstall.
- Copy its “PackageFullName”.
- In the following command replace PackageFullName with your copied value. Now, paste in PowerShell and hit Enter –
Remove-AppxPackage -Package PackageFullName
2] Run Windows Update troubleshooter
For many users, the Windows Update troubleshooter has fixed 0x80073cfa error code in addition to solving the update problem and connectivity. So run this using the below instructions –
- Click search icon from the taskbar.
- Type – troubleshoot.
- Press – Enter.
- From the right-hand side, click – Additional troubleshooters.
- Select – Windows update.
- Click – Run the troubleshooter.
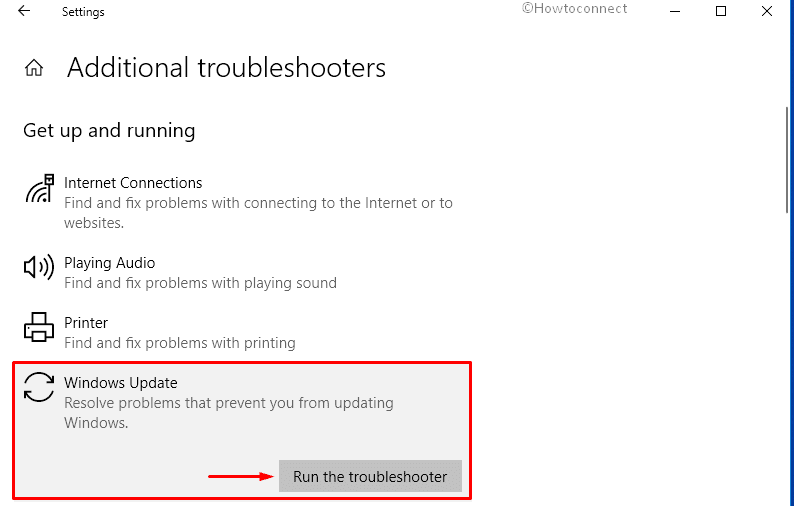
- Keep following on-screen instructions if any.
- If the troubleshooter provides a solution, click – Apply this fix.
- Or else, do what the utility suggests.
- Close the troubleshooter and restart Windows 10.
3] Reset Microsoft Store cache
Corrupted store cache oftentimes generates error codes like 0x80073cfa. But, you can easily reset the same that will work like a tweak to fix removal failed issue in Windows 10.
- Press – Windows + R.
- In the text field, type – wsreset.exe.
- Click – OK.
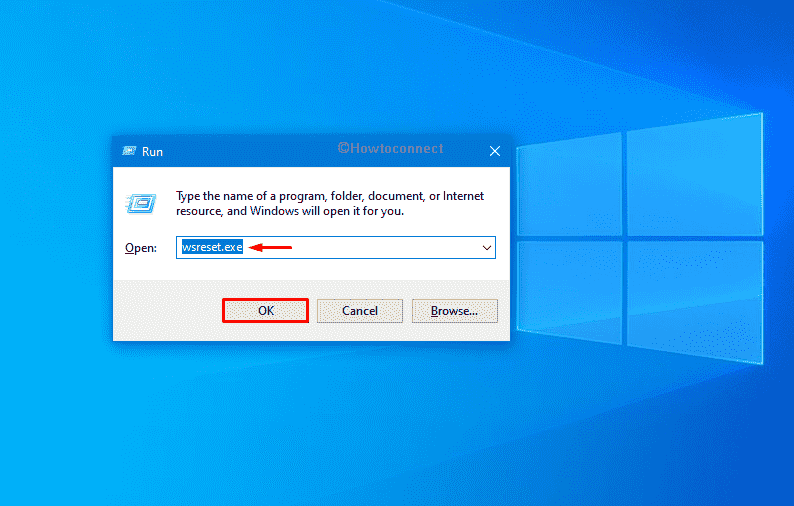
- Wait until Microsoft Store shows up.
- Try uninstalling the app now.
4] Use Windows apps troubleshooter
Incorrect settings can bring forth error 0x80073cfa in Windows 10 PC. Store apps troubleshooter helps to detect the associated issue in such a scenario and fix most of the improper settings automatically.
- Click Start button and type – troubleshoot.
- Press the – Enter.
- From the right pane, click – Additional troubleshooters.
- Scroll down and select – Windows Store Apps.
- Click – Run the troubleshooter.
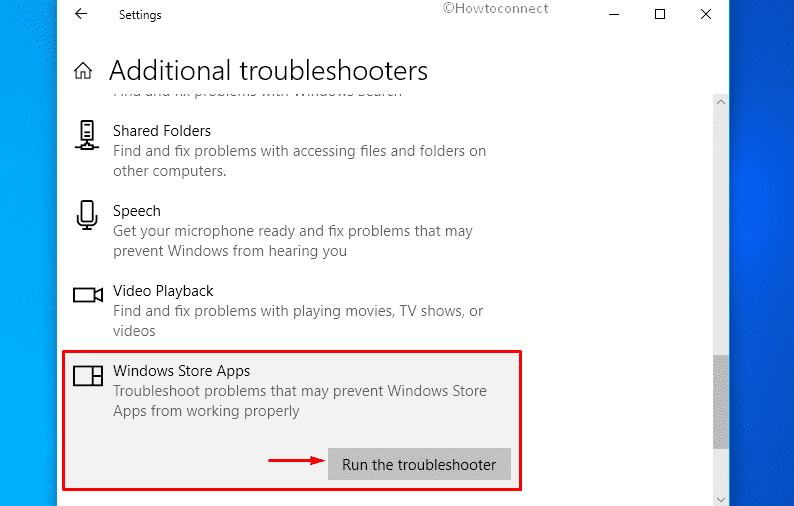
- Follow on-screen instructions.
- When the tool comes up with a fix, click – Apply this fix.
- Close the troubleshooter and restart the system.
- Once the system powers up, try uninstalling the app that was causing the issue.
5] Fix system corruption to fix 0x80073cfa error
When essential system components related to the Microsoft store go missing or become corrupted, error 0x80073cfa may evolve. To fix the faulty files as well as recover the misplaced one, imitate the below steps precisely –
- Press – Windows key.
- Type – cmd.exe.
- Hit – Ctrl + Shift + Enter.
- When User Account Control appears for your consent, click – Yes.
- Type in –
SFC /Scannow. - Press – Enter.
- Once the scanning process hits 100%, corruption should be fixed.
- If the diagnosis result shows some complications, execute
DISM /Online /Cleanup-Image /RestoreHealthcommand in the same console. - After completion, reboot Windows 10 device.
6] Install Windows 10 update
Many times, store error 0x80073cfa shows up because of some bugs from Microsoft itself. After getting reports about the same, they provide an automatic resolution in their latest update. So, update the OS –
- Press – Windows + S.
- Type – updates.
- Hit – Enter.
- From the right side of the settings page, click – Check for updates.
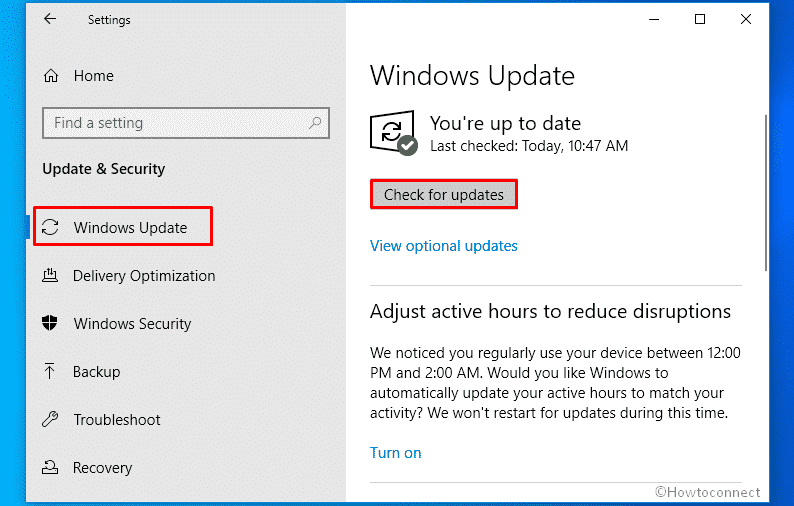
- If any update is available, hit – Download.
- Once the scanning and downloading ends, click – Restart now.
7] Reset the problematic app to fix 0x80073cfa removal failed error
Suppose you are getting error 0x80073cfa while uninstalling a specific app, then repair it first, and then try to remove the same. Windows 10 provides a very handy and easily accessible repairing tool, use this one and done –
- Click the search icon present on the taskbar.
- Type – apps & features.
- Press – Enter.
- From the right pane, look for the app you want to reset.
- Once found, select the same and click – Advanced options.
- Scroll down a bit and hit – “Reset”.
- When a new pop-up appears, again click – Reset.
8] Reset the PC
Any recent change such as installing a low trust software, incorrect registry changes, etc might also cause 0x80073cfa removal failed error. Fortunately, Windows contains a built-in tool that will undo all the modifications moreover, set Windows 10 to the default state. As a result, there is no chance for the error to occur –
- Click – Start icon.
- Type – reset this PC.
- Hit – Enter.
- From the right-pane, click – Get started.
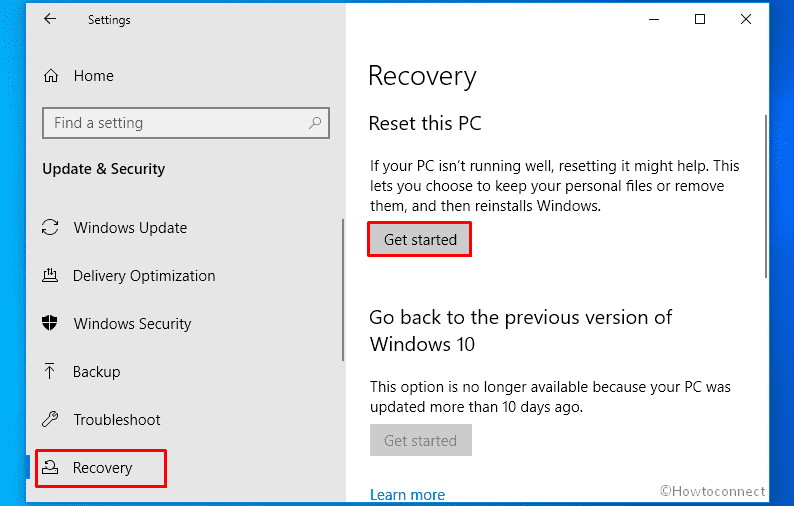
- Select – Keep my files.
- Either choose Cloud download or Local reinstall.
- Click – Next.
- Hit – Reset.
Methods list
1] Uninstall Windows 10 apps using PowerShell
2] Run Windows Update troubleshooter
3] Reset Microsoft Store cache
4] Use Windows apps troubleshooter
5] Fix system corruption
6] Install Windows 10 update
7] Reset the problematic app
8] Reset the PC
That’s all!!