To run certain applications on Windows 10 based devices, you may frequently require .NET Framework 3.5. However, when you try to install this feature, it throws 0x800F0906, 0x800F081F, 0x800F0907 Error Codes on the PC screen. The problem especially occurs during its offline installation method. Along with the codes, they display messages like “The source files could not be downloaded” or “The source files could not be found”.
To be more precise, you are likely to confront these issues while using installation media, ‘Windows PowerShell’ or ‘DISM‘ tool (viz Deployment Image Servicing and Management) to enable “.NET Framework 3.5”. When you make an attempt to turn on the feature, the operating system tries to contact Windows Update to download the missing information as well as to install the same. Therefore if you are facing 0x800F0906, 0x800F081F, 0x800F0907 Error Codes on your computer, then keep reading this article and try to apply the fixes mentioned. When you try to turn on the feature, Windows update will automatically grab .NET binaries along with other necessary files.
0x800F0906, 0x800F081F, 0x800F0907 Error Codes Windows 10 1803 Solutions
Here is how to fix 0x800F0906, 0x800F081F, 0x800F0907 Error Codes Windows 10 1803 –
Step-1: Visit this page and click the Download tool now button. You will see this button just under the section Create Windows 10 installation media.
Step-2: After downloading the tool, make a double-click the file namely ‘MediaCreationTool.exe‘.
Step-3: If you come across a UAC prompt, select Yes to continue.
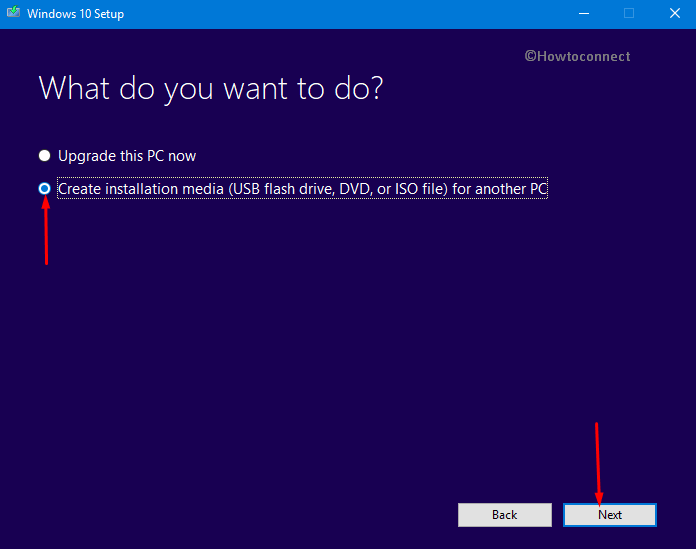
Step-4: When the setup wizard appears on the PC, Accept the license terms. On the following screen, select the dot “Create installation media (USB flash drive, DVD, or ISO file) for another PC“.
Step-5: Moving ahead, choose the Language, Architecture as well as Edition, click Next.
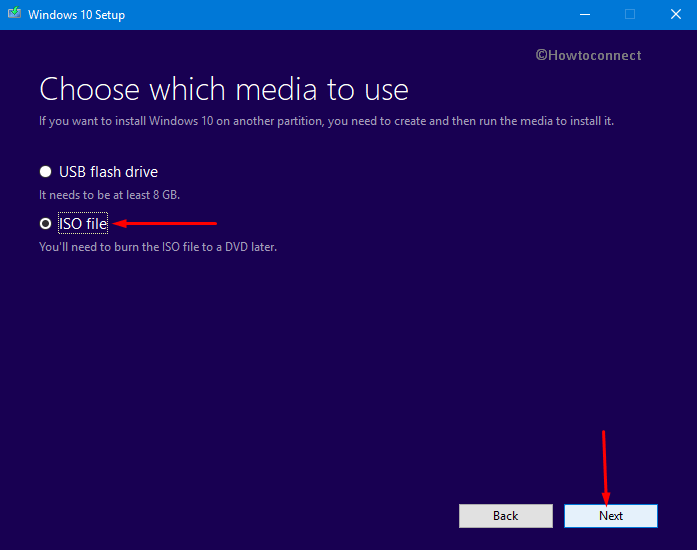
Step-6: Select ISO file dot on the subsequent screen. Hit Next.
Step-7: Finally, choose the path to save the ISO file and the download will begin. Once it finishes, Make Pendrive Bootable for Windows 10 and get ready to install.
Read How to Download Latest Windows 10 April 2018 Update ISO File.
Step-8: Now, you have to configure the Group Policy setting. So, type gpedit.msc on Cortana and hit Enter. This will immediately Open Group Policy Editor.
Step-9: Navigate to the following path on the left sidebar of the Group Policy.
Computer Configuration/Administrative Templates/System
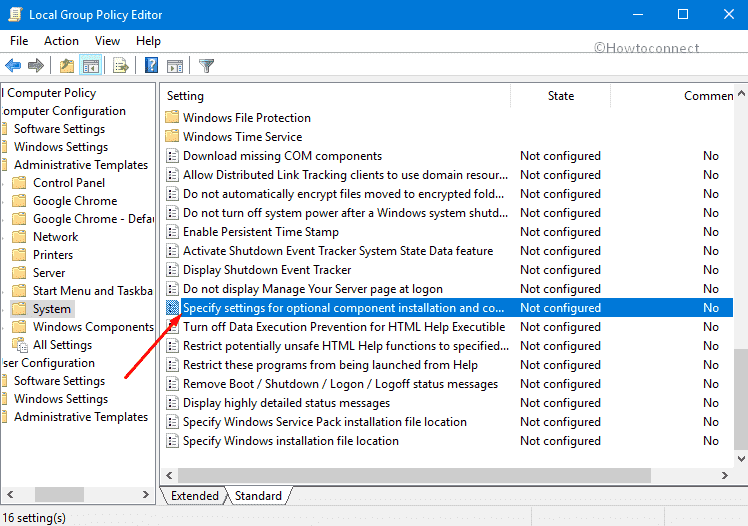
Step-10: Switch to the right pane of System, locate and double-click the policy “Specify settings for optional component installation and component repair“.
Step-11: Choose Enabled and then go to the Alternate source file path option. Here, mention a fully qualified path of a shared folder that includes the contents of the “ISO\sources\sxs” folder from the installation media.
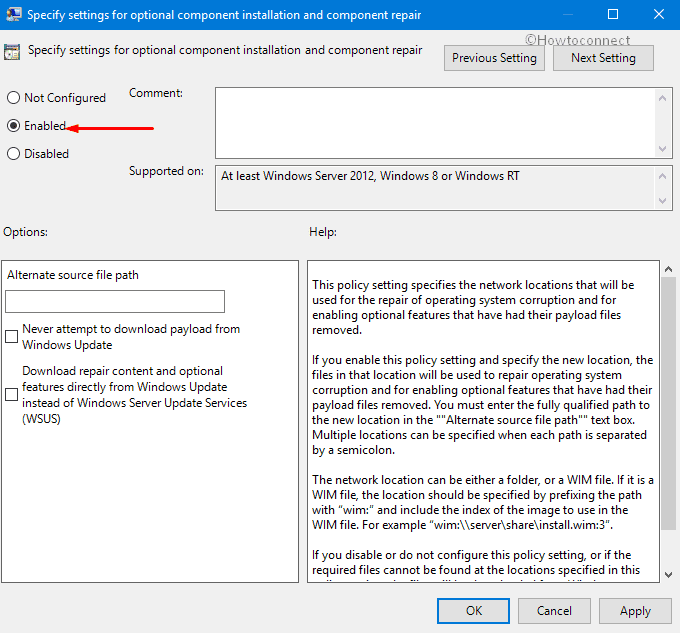
For example: \\server_name\share\Win10sxs
Note: You can also specify a WIM file. In order to specify a WIM file as an “Alternative source file path”, add the prefix WIM: to the path. Henceforth, add the index of the image that you want to use in the WIM file as a suffix.
For instance: WIM:\\server_name\share\install.wim:3
Here, the number 3 indicates the index of the image in which the feature files are present.
Step-12: Finally, click Apply and OK buttons to implement the group policy changes. Next, launch an elevated Command Prompt and execute the given below command to instantly apply the policy.
gpupdate /force
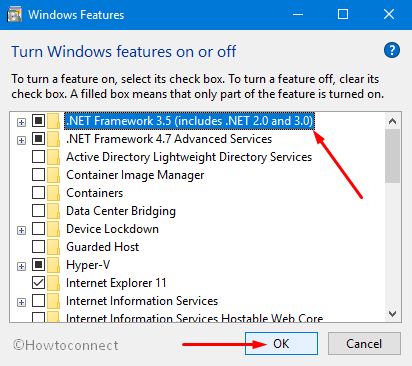
Step-13: Now, you have to add the .NET Framework feature and to do so, type windows features on taskbar search and hit Enter.
Step-14: In the Windows Features dialog, locate and select .NET Framework 3.5 (includes .NET 2.0 and 3.0) and click OK. Finally, restart Windows 10 PC.
Following the above sequence of steps will eventually help you in getting rid of 0x800F0906, 0x800F081F, 0x800F0907 Error Codes in Windows 10 based devices.
0x800F0906, 0x800F081F, 0x800F0907 Error Codes Windows 8.1
In addition to these codes, you may confront some other error codes during an attempt to install the .NET Framework 3.5. However, you will be able to bypass 0x800F0906, 0x800F081F, 0x800F0907 Error Codes using the below-mentioned workarounds.
Error Code 0x800F0906
This specific .NET framework installation “error code 0x800F0906” generally occurs when the computer fails to download the required files from Windows Update.
1. Check your internet connection
This specific error may occur due to the failure of a firewall, proxy or network configuration. So first check the internet connectivity and try to connect the Microsoft Update web page to resolve this issue.
If you fail to access the above web page, then check the Internet connection or reach out to the network administrator. This will eventually help you to determine whether there is a configuration that blocks access to the website.
2. Configure the Group Policy Settings
This issue can also be due to the wrong configuration of Group Policy Settings. It is observed that this behavior mostly encounters when the system administrator configures his PC to use “Windows Server Update Services” (viz. WSUS) rather than using “Microsoft Windows Update Server”.
Open Run dialog box, type ‘gpedit.msc‘ in the void and click OK. Now navigate to the following path –
Computer Configuration => Administrative Templates => System
On the right-hand side, find out and double-click the policy “Specify settings for optional component installation and component repair“.
When the new window appears, select Enabled and ensure to uncheck the option namely “Never attempt to download payload from Windows Update“.
If you wish to use another installation source, mention the fully qualified path of a shared folder which includes the contents of “C:\sources\sxs” folder. Insert the path in the Alternative source file path field.
If you wish, you can also use a WIM file. To apply a WIM file as an alternative source file location just add the prefix i.e. WIM: to the path. Afterward, add the index of the image which you want to use in the WIM file as the suffix.
If it is available, ensure to checkmark the option namely the “Contact Windows Update directly to download repair content instead of Windows Server Update Services (WSUS)” and click OK.
Lastly, access Command Prompt and execute this syntax to apply the policy. However, to perform this policy, ensure to access Command Prompt with the administrative rights.
gpupdate /force
3. Use DISM to Enable the .NET Framework 3.5
If the error still persists on your PC then use the DISM command method to fix this bug. However, to make it possible, take help of ‘Windows Installation media’ as the file source which will enable the framework feature.
Initially, insert Windows installation media in your machine or mount the “ISO image”.
Now go to the Cortana search box and type cmd. Here right-click on Command Prompt and choose “Run as administrator” option. When the UAC prompts up, hit Yes.
Under Command Prompt copy/paste or type the following command and hit Enter.
Dism /online/enable-feature /featurename:NetFx3 /All /Source:<DRIVE>:\sources\sxs /LimitAccess
Note – Here you need to replace the <DRIVE> with the actual drive letter for the installation media drive or the ISO drive. In addition to this make sure that the drive has proper storage left for its installation.
Lastly, try to install .NET Framework 3.5 in PC through Windows Features dialog.
4. Alternative steps for Windows Server 2012 and for Windows Server 2012 R2
You can also bring “Windows PowerShell” or “Add Roles and Features Wizard” into action to mention an alternative source to “Windows Server 2012” moreover for “Windows Server 2012 R2” also. To configure Windows Server follow the guidelines mentioned below.
4.1. Using Windows PowerShell
First and foremost, insert the Windows bootable media.
Jointly press Win & X and click “Windows PowerShell (Admin)” from the list that comes into view.
Explore more ways to Open Elevated PowerShell on Windows 10 After Creators Update.
When the blue panel shows up, copy/paste or type in the given command and hit Enter to execute.
Install-Windows Feature name NET-Framework-Core source <drive>:\sources\sxs
Here <drive> is a place where the DVD drive or the Windows installation media is connected. For example –
Install-Windows Feature name NET-Framework-Core source C:\sources\sxs
4.2. Through Add Roles and Features Wizard
Make sure to connect Windows installation media to the PC.
In the Server Manager, navigate to the “Manage” menu and perform a click on “Add Roles and Features“.
Here choose a destination server which is running Windows Server 2012 R2.
Thereafter on the Select features page of the “Add Roles and Features Wizard“, execute a click on .NET Framework 3.5 checkbox followed by a hit on Next.
Moving ahead, on the ‘Confirm installation selections‘ page, conduct a hit on “Specify an Alternate Source Path”.
Underneath “Specify Alternate Source Path” screen, mention the path of the “SxS” folder as a local or as a network share path as shown in the snapshot below.
Finally, click OK after inserting the path and hit Install to finish the wizard.
Error code 0x800F081F
The error code 0x800F081F may also happen on the PC when an alternative installation source is specified and any of the following conditions is true.
- The location defined by the path doesn’t contain the files necessary for the installation of that particular feature.
- When user trying to install the feature do not have access to that location and its files.
- If the installation media itself is corrupted, invalid or incomplete for the current version of Windows that you are running on the computer.
This issue can be easily solved by just avoiding the necessary conditions mentioned above. This implies that if you have the READ access to the location, installation media is accurate and the full path of the source is exact i.e. “C:\sources\sxs“, then give an attempt to access the source directly from the computer displaying the error. Try different installation source if the problem continues to exist.
Error Code 0x800F0907
This specific error code 0x800F0907 shows up on the screen if the installation media is invalid or its path is not specified. This issue can also prompt if the “Specify Settings for optional component installation and component repair” Group Policy settings is set to “Never attempt to download payload from Windows Update”. This problem can be rectified easily by configuring the right settings under the Group Policy Editor.
Launch Group Policy Editor by running “gpedit.msc” command on Run.
Next, go to the below-mentioned path –
Computer Configuration/Administrative Templates/System
Locate and double-click the policy “Specify settings for optional component installation and component repair” and set it as Enabled.
Proceeding forward, determine whether the “Never attempt to download payload from Windows Update setting” is selected. Next, also look at the desired setting for your environment.
In the “Alternate source file path” box, define a completely qualified path of a shared folder that carries the contents of the “\sources\sxs” folder from the installation media.
Or, specify a WIM file. In order to mention a WIM file as an “Alternative source file location”, add the prefix ‘WIM:‘ to the path. Henceforth, add the index of the image that you want to use in the WIM file as a suffix. The following are examples of values that you can specify:
| Description | Example |
| Path of a shared folder | \\server_name\share\Win8sxs |
| Path of a WIM file | WIM: \\server_name\share\install.wim:3 |
If you prefer, choose the checkbox namely “Contact Windows Update directly to download repair content instead of Windows Server Update Services (WSUS)“. Click OK.
Finally, on an elevated Command Prompt, execute the below syntax. Press Enter to apply the policy right away.
gpupdate /force
Conclusion
Windows 10 keeps on bringing the new updates to enhance the performance of the computer and make it safe and secure. Despite its continuous effort, there are some bugs which are left out and they are simply cumbersome to solve.
Hopefully, 0x800F0906, 0x800F081F, 0x800F0907 Error Codes will not come into existence after you correctly apply the above workarounds. However, these solutions are not restricted to these three codes only. In fact, you can give a shot them if you are experiencing any other error messages while installing the .NET Framework 3.5.
If you have some more solutions to solve 0x800F0906, 0x800F081F, 0x800F0907 Error Codes on Windows 10 or 8.1, kindly drop them in the comments form below. In case, you experience some other issues during enabling the .NET Framework 3.5, let us know. We will be extremely happy to help you out!!