41. Prevent an App from showing the recently used list
You can also prevent certain apps from showing in the recently used app list without turning the feature off completely. To achieve this:
- Right-click the app,
- Click “Don’t show in this list” option from the menu.
This eliminates the unnecessary battery consumption and the load on the CPU.
42. Bring back the old battery display
To bring back the old traditional battery display to the taskbar, navigate to:
HKEY_LOCAL_MACHINE \Software \Microsoft \Windows \CurrentVersion \ImmersiveShell key
in your registry editor. Go to the right pane and right click there. Now select NEW and then “DWORD 32 bit value” to create a DWORD entry. Name it UseWin32BatteryFlyout and set its value to 1.
That’s it; you can now see the old battery display in the taskbar.
Find the step by step guide from here – How to Restore Old Battery Flyout on windows 10.
43. Customize the Power user menu
To customize your power user menu navigate to the following path:
C:\Users\AppData\Local\Microsoft\Windows\WinX
Here, you’ll find three folders containing entries for the Power user menu. You can reorganize them or simply remove them as per your choice. Customizing the Power user menu can even make your workflow smooth.
44. Bring in new Quick Access
This feature lets you quickly access recently used files, folders and applications. You can easily customize it from the View Tab in Explorer. Simply visit this View tab and you’ll find options to customize the Quick Access feature. Also, at the bottom of the General tab, you’ll find certain extra options to show or hide information.
So take advantage of this all new customizable Quick Access feature in Windows 10.
Head to the instructions for detail – How to Customize Quick Access in Windows 10 File Explorer.
45. Restoring the previous Volume Control UI
You can also bring back the vertical volume lever in the system tray after tweaking a few system settings. Simply go to the Registry Editor (Click Start and type “regedit”). Then navigate to the following path:
HKEY_LOCAL_MACHINE\Software\Microsoft\Windows NT\CurrentVersion\key
- Now, right click in the adjacent right-pane to create a new key. Name it “MTCUVC”.
- Also, create a new DWORD (32-bit value) named “EnableMtcUvc” and set it to 0. This will restore the Volume control UI.
46. Streamline the Navigation pane
To Expunge OneDrive link from File Explorer:
- Get access at the Registry editor and navigate to the underneath key
HKEY_CLASSES_ROOT\CLSID\{018D5C66-4533-4307-9B53-224DE2ED1FE6}
- Now search for an entry named “System.IsPinnedToNameSpaceTree” in the right pane.
- Set its value to 0.
This will remove that OneDrive link with ease.
47. Customize Effects
In a resource strapped machine, you can extract more performance out of your Windows 10 version by customizing effects in the same. How?
- First, navigate to the following path:
Control Panel => System and Security => System.
- Then click “Advanced system settings”.
Here you’ll find the entire list of settings under the “Performance” section from where you can easily change effects and bring important changes into effect.
48. The Original Control Panel
The new Control panel is simpler to discover and operate than the previous one for settings. The latter, however, has not completely turned into a scrap and thus you can find it anytime to execute certain advanced options.
- Press Windows key + X,
- The “Power-User menu” will prompt a pop-up on your screen where you’ll view the classic settings panel.
You can, however, work with the new control panel if you wish to. There are no restrictions to that.
49. Remove Cortana’s search box
If you feel that Cortana takes a lot of space in the Taskbar, you can reduce its size to free some space. How?
- Right Click on the unoccupied area of the taskbar and opt for “Cortana”.
- Select “Hidden” to change it to a pop-up.
You can also retain Cortana as a standard icon by selecting “Show Cortana” option.
You can also take help of this write up – How to Turn off Cortana in Windows 10 PC.
50. Hide the Task view option in case you don’t use Virtual Desktops
If you don’t have interest in virtual desktops or use keyboard to chop and change among them, you can simply hide Task view option.
To do this:
- Right-click the taskbar and deselect “Show task view button” option to execute the needful.
You can anytime revert this by simply selecting the “Show task view button” option.
Windows 10 tips, Secret tricks and hacks using Cortana
51. Use Cortana to Browse
Cortana can also be used to browse Internet in Windows 10. You can enable this in Microsoft Edge browser as follows:
- Navigate to Settings => Advanced Settings => Privacy and Services.
- Enable “Have Cortana Assist Me in Microsoft Edge” choice to activate Cortana support in web browsing things that you want.
This will save the typing time as you can simply command Cortana to execute anything or to search.
You can give an attempt a very interesting and useful guide – How to make Google search from Windows 10 Taskbar.
52. Send Email Using Cortana
You can even use Cortana to send email without using fingers to type or to send. How?
- Say “Send an email to (Name)” followed by the message.
- The Cortana will fetch Recipient’s name from the People app and will type the message using the words you speak.
- If you don’t need any changes, say “Send”.
This will send your emails in no time.
One more cool trick in this concern – How to Send Email Via Sticky Notes in Windows 10.
53. Sharing preferences with Cortana
Tell Cortana your preferences and it will recommend the best thing for you. To enable this,
- Open Cortana’s Notebook and go to Eat & Drink section.
- Define your price range and the item you wish to be on your preference list.
- Also, decide other sections as well.
Cortana would record all this and would recommend you things that you like from time to time.
Follow a guide in respect to this How to Share An App From Start Menu on Windows 10.
54. Natural language of Cortana
You can also use Cortana’s natural language recognition ability to perform complex tasks.
For example, ask Cortana to find documents from August and it will list all the documents that were received or sent in the month of August.
See how super-cool this automated technology can be.
Step by step instructions – How to Enable and Disable Cortana Speech Services on Windows 10.
55. Make Cortana Completely Yours
You can even define Cortana to listen to you only. Go to the Cortana’s Notebook and press the “learn my Voice” button. Speak the displayed phrases to teach Cortana how you sound. This will make it familiar with your voice and thus it’ll listen to your voice command only.
56. Make Cortana efficient to respond to voice commands
Obviously, manual work is always tiring. But Windows 10 has such an amazing automated voice recognition feature/technology named “Cortana” that you can easily switch to hand-free operations. How?
- Click on the search bar (Cortana), Select Notebook => Settings and finally Enable “Let Cortana respond to Hey Cortana” option.
This will activate Cortana to listen to the Voice commands and take action accordingly.
Windows 10 tips, secret tricks and hacks for Files and Folders
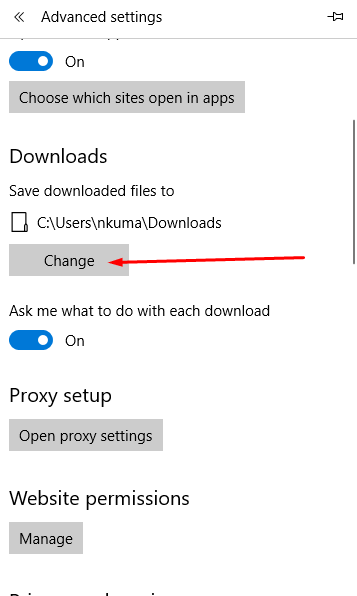
57. Change the location of Downloads folder of Microsoft Edge
You can easily modify the Downloads folder of Microsoft edge to download items to the place of your choice.
- Move to Settings and more => Settings => View Advanced Settings => Downloads => Change.
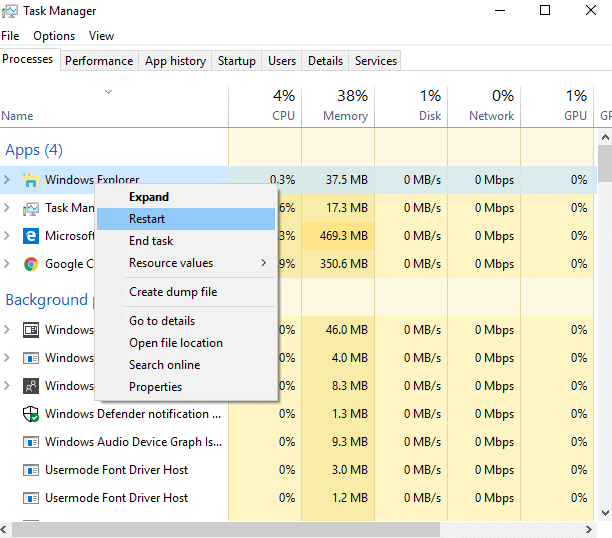
58. Restart Explorer
To quickly apply change which requires a system restart otherwise:
- Right-click the Taskbar to launch Task manager after that Click “More Details” option and jump to the Processes tab.
- Now search for an entry named “Windows Explorer” Right click on it and choose Restart.
This will apply all the changes at once. So you’ll have an improved interface and functionality the next time you visit your Operating system.
Simply follow this guide and learn detail instructions – How to Restart File Explorer Using Task Manager in Windows 10.
59. Accessing past revisions to the file
You can easily find out if any file saved by either Windows system restore points or File History is subjected to any past revisions or not. For this:
- Set the File History preference first,
- Right-click on any file and select Properties,
- Now open the “Previous Version” tab to see all the previous versions and the past revision history related to that particular file.
60. Automatic Back up files
To backup your system files and other important data, go to:
- Start => Settings => Update & Security= > Backup.
- Now click “Add a drive” and select the connected drive (do it first and then follow).
- Enable the option under File History to automatically back up all the relevant data to the external drive.