Almost after six long years, Microsoft has introduced their most surprising Windows 11. The operating system has enhanced productivity to a greater margin, provide more ease of access and creativity, will establish a whole new era of connecting people. Gamers have obvious reasons to get excited since the Windows 11 will redefine the gaming experience on the computer. You will get all the information you need easily, an open-source ecosystem for providing a new dimension to the developers, and of course a revamped Microsoft Store. Here, you will see 42 Hidden Windows 11 Tips and Tricks You must know.
Microsoft announced that Windows 11 will have a simpler design different from any other operating system released before. The User Interference is more touch-friendly since touchscreen devices have become so common these days. Microsoft has given collective efforts in order to enhance the multitasking experience for the power users. Whereas everyone is waiting to grab this super exciting OS ahead of all, we are here to explain some must-know Windows 11 Tips and Tricks from here on.
Hidden Windows 11 Tips and Tricks
Here are 42 Hidden Windows 11 Tips and Tricks you must know –
1] Left Align Start menu
Windows 11 presents center-aligned Search, Start, and pinned icons providing an exclusive experience but some users like the conventional location of these functionalities. They want a left-aligned start menu in Windows 11. If you are among them then follow –
- Press – Winkey + I.
- Select – Personalization.
- Click on – Taskbar.
- Go To Taskbar behavior section.
- Click on the drop-down for Taskbar alignment and select Left.
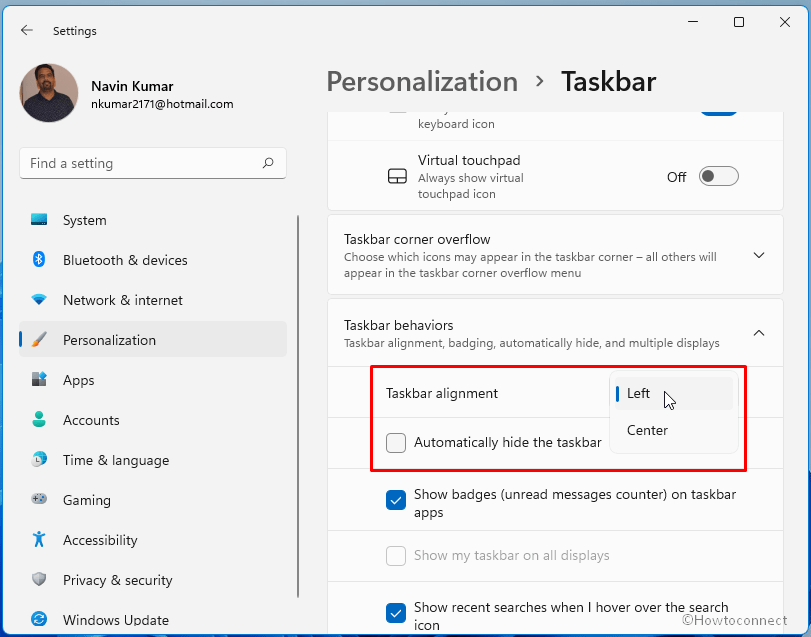
- This will show the Start menu on the left side.
2] Take Screenshot
Way-1: Using hotkeys
Windows 11 allows to take screenshot in various ways; let’s see the shortcut keys first –
1] PrintScreen (or PrtScr) – Capture a screenshot and let you paste it into Paint or another picture app.
2] Alt +PrintScreen – Copy a screenshot into the clipboard.
3] Windows + PrintScreen – Take the screenshot and save into C:\Users\username\Pictures\Screenshots folder
Way-2: Using Snipping Tool
- Click the – Start.
- Type – snipping tool.
- Press – Enter.
- Next, click the – New.
- Select the area which you’re trying to capture and done.
- Go to the Screenshots folder of the Picture library to see.
4 Best Ways to take screenshot in Windows 11
3] Minimize a Window on Shaking Title bar
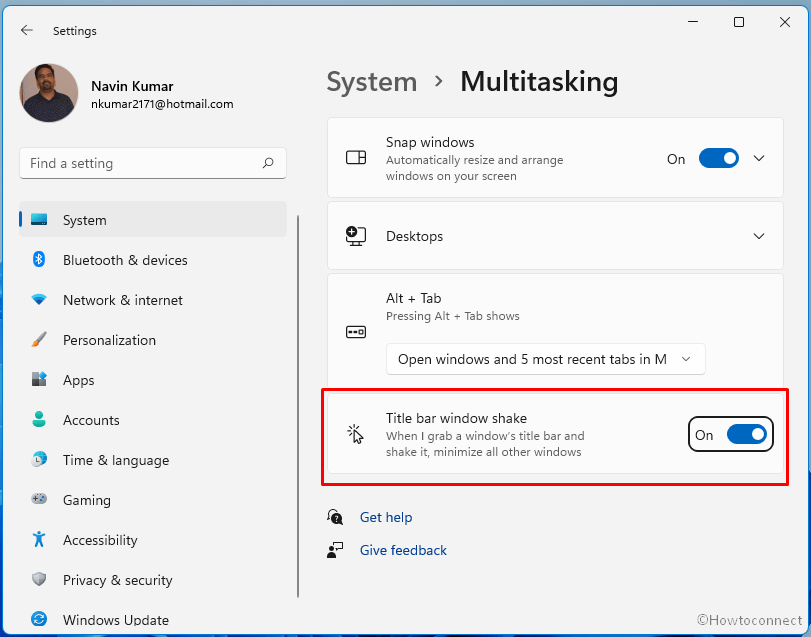
Windows 11 brings amazing functionality in the multitasking section; you are able to minimize a window on shaking title bar. This is one of the super exciting features in Windows 11 by Microsoft has kept it disabled by default in order to offer freedom to the users. To enable this, simply access the Settings app and go to System. Toggle the slider to On from Multitasking group.
Once the feature is enabled, you can minimize all opened windows just by left-clicking and shaking a particular one. Re-shake to restore all the windows in the old state to access them.
- Click the – Start.
- Type – Settings.
- Press – Enter.
- Go to the right pane and click on Multitasking.
- Scroll down to the next page and enable the toggle switch for Title bar window shake.
4] Snap Windows is more simple using maximize and minimize icon
From the collection of Windows 11 Tips and Tricks, Snapping is most seamless and easy. As you hover on the Minimize/Maximize icon and the Snap; layouts drops. All you need is to take your mouse cursor over the icon on any window and select the desirable Snap suitable for multitasking. For Example;
- Click File Explorer from the Taskbar or press Win+E and hover over the Minimize or Maximize icon.
- You can see a snaps layouts dropdown.
- Select the one you want.
5] Sync clipboard across devices
Windows 10 introduced Clipboard feature in Windows 10 and now the functionality is available for some refinements on Windows 11, you are able to sync the clipboard data across devices using the following steps –
- Open Settings app (Win+I).
- Click on Clipboard.
- On the next page, click on the toggle switch for Sync across your devices.
- Now click Windows key + V to access clipboard history.
6] Get to your files easily
File Explorer is acrylic and allows to access folders and files in a pretty easier manner in Windows 11. To experience, follow the method –
- Press Windows and E keys.
- Browse and file and folder of your choice.
7] Manage Sound from Settings
In Windows 11, the Settings app homes all the options to manage Sound, for example, change volume, enable or disable Mono audio, configure output audio device. Furthermore, you can turn off and on Spatial sound, choose to play a headphone or speaker.
- Press Windows key and I simultaneously.
- by default, system settings will appear.
- Go to the right pane and click on Sound.
- From the next page, play with the settings and options shown there.
8] New Settings app experience
Windows 11 put forward a more sleek and modern Settings app to handle the options on your PC.
- Click on the Start and select Settings cog.
See – How to open Settings in Windows 11 – 16 Ways.
9] Use focus assist for less disturbance from notifications
To avoid losing concentration from a task on your PC you are able to use focus assist Settings that allow setting a time and priority when you don’t want to be disturbed. You can create rules, for when you want to notifications or not.
- Right-click on Start.
- Select – Settings.from the Win+X menu.
- Once the application is open, go to the right pane and click on – Focus assist.
- From the next page, choose one option from Priority only and Alarm only.
- If you have selected Priority only then click on customize a list; click on Customize priority list.
- Select the options from which apps you want to receive notifications on your desktop.
- Set automatic rules that suit you best for less disturbance.
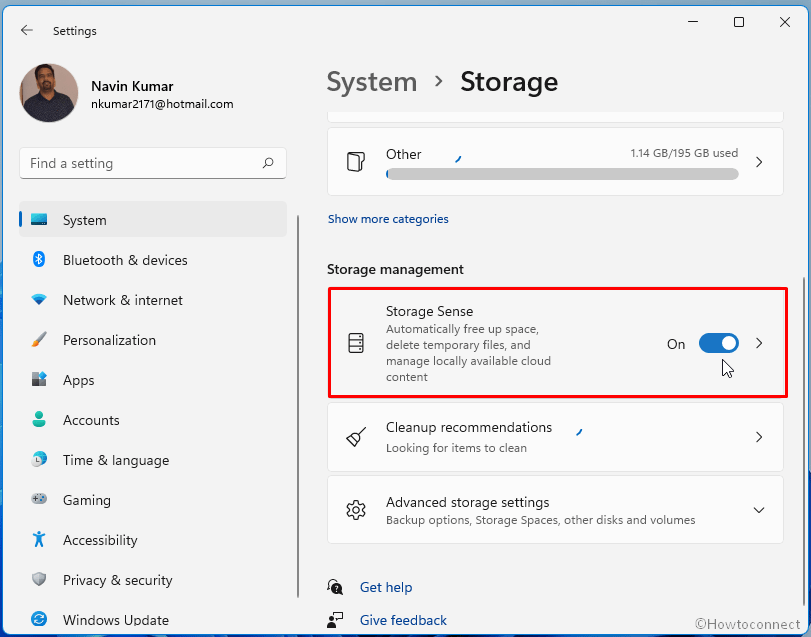
10] Automatically free up space delete temporary and unwanted files
This is one of the most useful Windows 11 Tips and Tricks. You are not needed to manually delete temporary files to evacuate your disk or recover space on your system. Windows 11 provides settings named Storage sense that will take care of all these things after you enable it –
- Press – Winkey+I.
- Click – Storage.
- From the next Settings page, turn on Storage sense using the toggle switch there.
- Now, click on the Section of Storage sense.
- Customize the options according to your preferences.
- You can use Run storage sense now to delete unwanted items at that time.
Follow –
How to disable Windows Defender Permanently in Windows 11
How to disable OneDrive in Windows 11 (5 Best ways)
11] Share files and folders with the devices nearby
Windows 11 allows to share and download files, photos, and links with nearby windows devices using the following way –
- Press – Windows logo key and I together.
- Click – Nearby Sharing from the right side.
- Select – My devices only or Everyone nearby.
12] Custom Scaling
Windows 11 allows using custom scaling size that’s between 500 percent to 100 percent. In Windows 10 you get a few options in a drop-down for the same. But in this version, you are free to input the percentage of your choice.
- Press Winkey + I.
- Select Display from the right pane.
- Under Scale & layout, click on Scale.
- In the Custom scaling field type a percentage.
- Press Enter.
13] Change Text size
The latest version is successful in the simplification of changing text size in Windows 11. From the Display section of the Settings app, it is now easier to change text size. Follow the steps –
- Click the Start.
- Select – Settings cog.
- Choose – Display.
- Next, select – Scale.
- Click on Text size on the coming page.
- Use the slider as a control to increase or decrease the size and click on Apply.
14] Use Multiple displays
Windows 11 provides to connect multiple monitors and cast your device to other displays. You might be a professional who wants to demonstrate your presentation on multiple screens. Then this version is for you –
- Click the Search icon on the taskbar.
- Type – Settings.
- Hit – Enter.
- Once the Settings app opens, navigate to the right.
- Choose – Display.
- Now, click on Multiple displays.
- After the expansion of the block, click – Detect.
- To connect to a wireless display, click on Connect.
15] Use the priceless bounty from Windows 11 – Multitasking
Windows 11 will be known as the version which has taken multitasking to a new level. You might notice the Snap layouts when hovering on the maximize button of a window. These sizes automatically snap a window to different parts of the screen. The window automatically becomes fit size to the space. Apart from this, hovering over a shortcut on the taskbar will show the snap of the window. This is yet an old feature but very useful.
- Right-click on the – Start.
- Select – Settings.
- When the app opens, click Multitasking from the right pane.
- Turn on the setting for Snap windows.
- Enable all the options under this setting by checking boxes there. You might follow your choice to use these options.
16] Connect with anyone from Taskbar
Chat icon located on the taskbar looks very small but its role is oppositely big as you can connect with anyone using this. Furthermore, this feature allows calling to your near one staying on the Windows 11 PC.
- Click Chat from the taskbar.
- Select – Meet.
- Copy meeting link.
- Send to the ones who are one android iOS, or Mac to join.
17] Quickly change settings from the Action center with modern design
Action Center in Windows 11 has a cozy design which has more cleaner interface. From here you are able to change several settings –
- Press – Winkey + A.
- Use – Volume control to increase or decrease it.
- Use – Brightness slider to change the brightness
- Enable or disable settings using quick actions
18] Quickly find notifications
From the right edge of your screen, swipe in with one finger to show the notification center. Read – How to turn off Notifications on Windows 11 – 12 Ways.
19] Talk instead of type
Windows 11 permits to type handsfree following the voice of users. Using shortcut combination, the Speech recognition pop up appears on the screen, listens to your voice, and types where you have placed the cursor. If you often use voice typing the setting allows you to launch the pop-up whenever the cursor is in a text box.
- Press – Win + H.
- Speak and the tool will start typing.
- Click on the Settings cog from the launcher.
- Toggle the setting for Voice typing launcher.
- to use speech recognition to convert spoken words into text anywhere on your PC.
20] Experience virtual desktop and use Shortcut keys to Quickly switch tasks
Virtual desktop was initially launched in Windows 10 and this had been one of the most acknowledged features in the Operating System. However, the feature has been revamped in Windows 11 in order to increase a lot more productivity. In the past, users couldn’t access the virtual desktop easily, they needed to use key combinations to open. In some devices, users needed to access the Windows Timeline first in order to open and use the Virtual Desktop. Coming to Windows 11, you can easily open the feature right from the Taskbar, so simple.
Shortcut keys combination in Windows 11 similar to the previous version is enough to switch between tasks. Furthermore, you can navigate to the same tasks using the Task View icon on the taskbar.
- Press Win key + Tab to display and switch between open windows, apps, and virtual desktop.
21] Snap windows side by side using shortcut keys
Windows 11 comes in with a new snapping experience in programs and it is pretty convenient if you are used to the settings. You can snap to left, right, up, and down using keyboard shortcuts i.e. by pressing Win+ Arrow keys. Microsoft has made this setting very much convenient for the users particularly for people who use it rarely.
You can just put the cursor to resize button of an opened window to check out this feature. This will display some snapping layouts and mini templates from where choose what you like. You will feel this feature is a lot more comfortable than dragging used to be in Windows 10. The super exciting fact is that the setting will not lose if you expand a snapped window once done.
This is again one of the handy Windows 11 tips for those who use to run multiple tasks at a time. You don’t need to manually resize or snap a window when trying to snap it. Instead, use shortcut keys such as arrow keys in the combination of Windows key to position them –
- Press Windows + Right, left, up, or down arrow to perfectly snap windows to the sides of your screen automatically.
22] Change the Touch keyboard theme
On Windows 11, the On-Screen Keyboard allows changing its theme to choose a cool and stylish one. Additionally, you can customize the touch keyboard theme with the color of your choice.
- Click on – Start.
- Select – Settings.
- Choose – Personalization.
- Click – Touch keyboard.
- Go to the Keyboard theme section and select one.
23] Pin apps to your Pen menu
Now the Windows Ink pen menu provides you to pin apps –
- Tap the tip of pen to disclose the pen menu in the system tray.
- Open it and select Edit pen menu.
- Select maximum 4 apps to add as shortcuts.
24] Take screenshot with pen
- Bring the pen near the screen to reveal the pen menu in the System tray.
- Unfold the pen menu and select the Snipping tool.
- Drag the pen across your screen to select the needed area.
25] Turn on Touch keyboard
To turn on your touch keyboard, select Start > Settings > Personalization > Taskbar > Taskbar corner icons. Find Touch keyboard in the list and switch it to on.
26] Move the Touch Keyboard anywhere on the screen
For a better experience, you are able to place the touch keyboard anywhere on your screen. You need to only tap Dock to shrink the keyboard and then move it around.
27] Save battery power
Battery saver, as usual, available in Windows 11, is useful when the laptop charging is running down. The functionality will turn down the screen brightness until you plug the cable into the charging point.
28] Increase the text size
You are able to increase and decrease the text size onWindows 11 pretty easily from accessibly (the changed name of Ease of access) in Settings. Follow –
- Press Winkey + I.
- When the Settings app appears, click on Accessibility.
- Go to the right pane and select Text size.
- Move the slider forward or backward to increase or decrease the text size in Windows 11.
29] Change the size and color of mouse pointer and text cursor
If you want to have experience of different colors of Mouse Pointer and text cursor then there is an easy method in Windows 11 –
- Click the – Start.
- Select the Settings cog.
- Click on – Accessibility.
- Choose Mouse pointer and touch from the right side.
- Select another style according to your liking and use the slider to increase the size of Mouse pointer.
- Now click on Text cursor.
- Select one from Recommended colors or custom that pleases you.
![29] Change the size and color of mouse pointer and text cursor](http://howto-connect.com/wp-content/uploads/Change-the-size-and-color-of-mouse-pointer-and-text-cursor.png)
30] Use voice typing for fast writing following your spoken words
If you need to write on your computer on daily basis then Windows 11 provides awesome functionality. You are able to use voice typing instead of the classic typing by hand which will convert spoken words into text.
- Press the Win+H and start speaking.
31] Keep your files protected and backed up
As in the previous version, Windows 11 also incorporates OneDrive for Cloud storage to keep your files safe. If some problems occur in your system you don’t need to bother about it because your data is safe in OneDrive.
32] Drag file or folder icon to system tray
This is one of the unique and hidden Windows 11 Tips and Tricks. You can drag a file or folder icon to the System tray on the taskbar to open it from there only.
- Press Windows key and E.
- Click on an icon of a folder or file.
- Drag it to the system tray and leave.
- Click on this icon to open the file from only system tray.
33] Use Optional update
The optional update feature is extended in Windows 11 and you are able to update drivers, download language, and several built-in tools from there.
- Press – Windows key+I.
- Select – Apps.
- Click on Optional updates from the right pane.
- Click on – Add new.
- Type the name in the pop up and press Enter.
- When the tool is showing, select that and click on Download.
34] Use Storage Sense to clean junk automatically a regular intervals
Storage sense is an awesome functionality in Windows 11 that allows you to wipe out garbage automatically on certain days which you have selected. Furthermore, you can also choose what you want to delete or which folder you need to evacuate.
- Press Winkey and I together.
- From the Settings app, click on Storage.
- Click on the toggle switch for Storage sense.
- Now, click on the Storage sense section to enter the other options.
- Enable the setting for Automatic user content cleanup.
- Customize the options under this option.
35] Experience slightly transparent background
Windows 11 features transparency effects for some backgrounds and includes an option in settings for this. Enable the effect using the following tips –
- Press – Winkey and I at the same time.
- Select Accessibility from the right pane.
- On the left pane, click on – Visual effects.
- From the next page of settings, Turn on the toggle switch for Transparency effects.
36] Enjoy Animation effects
This is one of the interesting Windows 11 Tips and Tricks. In addition to the transparency effects, you can also enjoy animation effects on Windows 11. Again the Settings has this functionality in. the Settings app.
- Open Settings app (Win+I).
- Go to – Accessibility.
- Select – Visual effects.
- Turn on the toggle switch for Animation effects.
37] See the Battery level of Bluetooth device connected to your PC
Connecting the headphones and speakers are now an old thing. you are able to know the charging level of the devices connected through Bluetooth in Windows 11.
- Press – Win + I.
- Click on – Bluetooth & devices.
- Go to the right side and see the paired device.
- You can find the battery level under the device details.
Follow – How to Connect Bluetooth Device to PC in Windows 11.
38] Personalize your background with custom color
Windows 11 allows you to personalize your desktop background and shows you a set of 24 different color palettes to choose from. Furthermore, this offers an option to create a custom background where you are free to choose a color.
- Right-click on – Start.
- Select – Settings.
- Once the app opens up, click – Personalization.
- Shift the cursor to the right pane click on – Background.
- Select View colors in front of Custom Colors.
- Use the sliders and controls on the Pick a background color pop up and find out a cozy color for you.
- Click Done.
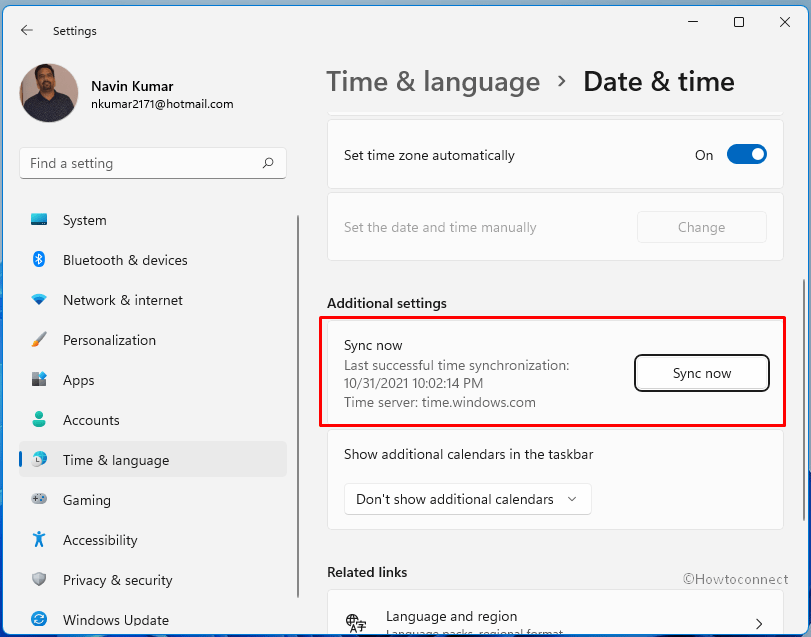
39] Sync time to time server
If you want your system to set the time automatically then Window 11 provides to synchronize it to the time server. Follow –
- Click Start.
- Select Settings.
- Now click on Time & language from the right-hand side.
- Switch to the right and click Date & time.
- Click on Sync now from Additional settings.
40] Keep your device protected with Windows Security app
From Windows 10, Windows security has been a robust application to protect the device with multiple tools and options. Windows Defender ensures the safety of the system from malware and virus threats and attacks whereas browser and app control can safeguard you on Microsoft Edge.
- Click on the – Search.
- Type – Security.
- Press – Enter.
- Windows Security app opens up; click on Virus & threat protection.
- Click on Real-time protection on the Windows Defender.
See – How to disable Firewall in Windows 11 (Best 5 ways).
41] Use Super impressive Widgets
Windows 11 has a good number of super impressive widgets to make your user experience better. Widgets are the things you need to monitor frequently in Windows. In Windows 11, you can easily track the share market, Calendar, Weather update, To-Do list, Sticky notes, and many more.
The Widgets service is still entirely dependent on Microsoft and the number is quite limited. As per the announcement, a lot of new wizards are to be added in short time with the operating system.
- Click the Widget icon on the taskbar.
- See the weather report and news of your choice.
42] Auto punctuation mode in Windows 11
The dictation tool in Windows 11 has added a new dimension since it can understand punctuation. Simply press Windows key and H to open up the Speech service. Click the Settings icon and activate the Auto punctuation by toggling the slider. Once activated, the dictation tool will be applicable to wherever you like it i.e. MS Word, Note pad, Google docs, and others.
This is the collection of all hidden Windows 11 Tips and Tricks.
That’s all!!