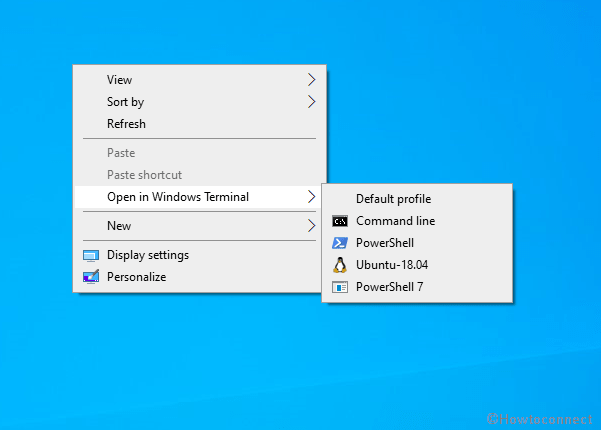
A few days back, we covered a registry tweak to remove Open in Windows Terminal right click Menu. Main reason for the deletion was to keep the pop-up menu clean. Now, here is a trick that can add Windows Terminal Profiles to context menu. This will show only one option Open in Windows Terminal there which includes Default profile, Command line, PowerShell, Ubuntu, and PowerShell 7 in a submenu. Hovering on “Open in Windows Terminal” from context menu will reveal the options in drop-down.
You are able to show the Windows Terminal Profiles anytime with a registry modification. From here, you can directly access Command-line, PowerShell, WSL, or PowerShell 7 from your desktop or any folder in File Explorer.
Add Windows Terminal Profiles to Context menu in Windows 10 and 11
Here is How to Add Windows Terminal Profiles to Context menu in Windows 11/10 –
- Download this zip file and unzip it.
- You will find 4 files in the folder named add_windows_terminal_profiles_to_context_menu.
- Right click on the following 3 files one by one and select Merge – Open in PowerShell 7.reg, Open in Terminal.reg, and Open in WLS.reg.
- Either restart Windows Explorer or reboot your PC.
- You will find the Windows Terminal Profiles on context menu as in the following screenshot –
- If you want to remove the contextual options then simply right click on Delete menu.reg. Choose – Merge.
- Restart your Windows 10 or 11 computer and you will notice that all the profiles including Open in Windows Terminal are removed. How easy it is! You can see here – Complete list of Windows Terminal Shortcut keys.
Sometimes you may feel that the as stuck when opening Windows Terminal from Profile list in the first instance. Don’t worry, check the below things before using the option in context menu –
- Open WLS.reg file and replace Ubuntu with the Current version name of Ubuntu. Then Merge the .reg file.
- Open Windows Terminal, the down arrow of Open a new tab, and select Settings. Reshuffle the default profile options and then try to open the tool.
Credit – Sergey Tkachenko from Winreview.
Thar’s all!