Battery Saver mode is a very convenient tool introduced in Windows 10 which extends the battery life of the computer. This feature starts working by itself when your PC’s battery becomes low. Various features of the OS pause their functionality in this mode including OneDrive. This file hosting service all by itself pauses the sync when the device gets into the battery saver mode. So, in this article, we will tell you two procedures to control this Auto-Pause OneDrive Sync When in Battery Saver Mode in Windows 11 or 10.
Basically, OneDrive is a cloud storage service that is designed by the Microsoft team to store your documents and other data online. Its auto-pause service remains active by default which eventually preserves your battery power. You can manage this feature either by using the OneDrive settings or via tweaking Registry Editor. So, let’s see how to disable and enable this feature when needed.
Ways to Auto-Pause OneDrive Sync When in Battery Saver Mode in Windows 11 and 10
Here is how to Auto-Pause OneDrive Sync When in Battery Saver Mode in Windows 11 or 10 –
1] Through OneDrive Settings
Note – Before proceeding ahead, ensure to sign in to your OneDrive using valid credentials.
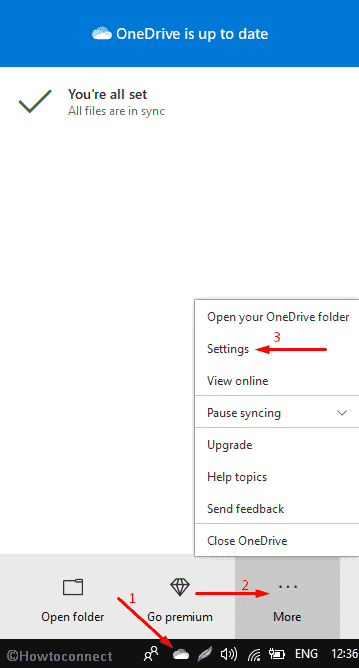
Step-1: Go to the Taskbar and click on the OneDrive icon in the system tray.
Step-2: On the following screen, click on the More option.
Step-3: From the options list, select Settings.
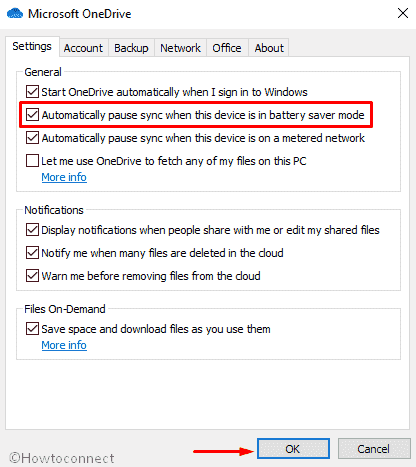
Step-4: This will open the Microsoft OneDrive wizard.
Step-5: Switch to the Settings tab and tick in the checkbox ahead of ‘Automatically pause sync when this device is in battery saver mode‘. Doing so will enable this auto-pause feature. If you prefer to disable it, simply uncheck the option.
Step-6: Finally, hit the OK button to save the changes.
2] Perform Registry Tweak to Auto-Pause OneDrive Sync
- First of all, press “Win logo+R” hotkey and open the Run dialog box.
- In the void, type ‘regedit’ and press the Enter key.
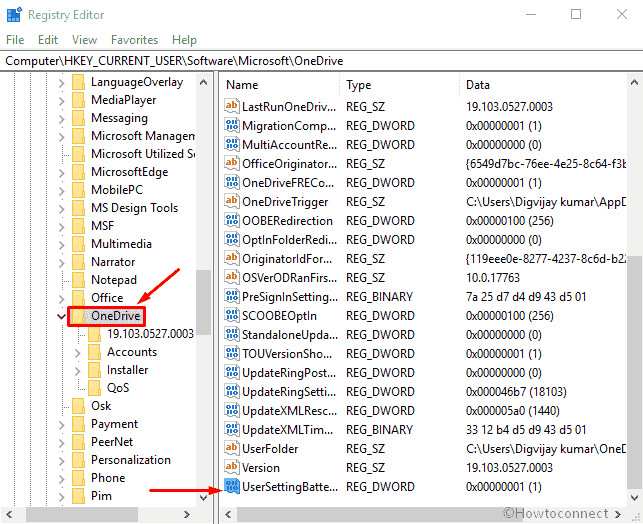
- When you access Registry Editor, navigate to the following path –
HKEY_CURRENT_USER\Software\Microsoft\OneDrive
- In the right side of the resulted screen, create a new 32-Bit DWORD. (You must have to create the 32-bit DWORD value, even if you are running 64-bit Windows).
- For this, do a right-click on the right pane of OneDrive key.
- Select the New option and then click on the DWORD (32-bit) Value.
- Name it as a UserSettingBatterySaverEnabled.
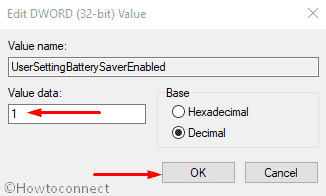
- Now, double click on the same and set the Value data 1(one). To disable the Auto-Pause OneDrive Sync, set the value as 0 (zero).
- Switch the Base to Decimal from Hexadecimal and click on the OK button.
- As a final step, restart Windows 10 PC.
That’s all!!