BUGCODE_NDIS_DRIVER Error ends up with the sudden crash of the Windows, commonly during initialization. This particular error had the bug check of 0x0000007C which signifies issues in a networking driver. Some other general causes can be certain RAM issues, overloaded disc, bugs in an update or even malware or virus attacks.
When the system gets affected with BUGCODE_NDIS_DRIVER, you might come across several complications like auto-shutdown of PC, desktop freezing, irregular flashing and more. Out there are various effective solutions which can help you to disembroil and get rid of this BSOD. So, follow the quick links of the workarounds mentioned below to resolve the problem –
BUGCODE_NDIS_DRIVER Error in Windows 10 Solutions
Here is how to fix BUGCODE_NDIS_DRIVER Error in Windows 10 –
1] Prevent automatic shutdown
Something about blue screen errors that indisputably annoys just every user is the force shut down or crash. Though the PC crashes to ensure the least harm while confronting technical problems, it really can render users helpless. If you too are on the victim list, you can use the below steps to stop your PC from shutting down automatically. Here is what you need to do –
Step-1: If your PC crashed during initialization, restart it and in the desktop, right-click on This PC icon => Properties.
Step-2: When the System window appears on the screen, execute a click on Advanced system settings.
Step-3: Now, the System Properties wizard will come up. Find Startup and recovery in the lower section of this window and hit Settings under this heading.
Step-4: Thereafter, beneath the System Failure, you’ll have to uncheck the box corresponding to Automatically Restart.
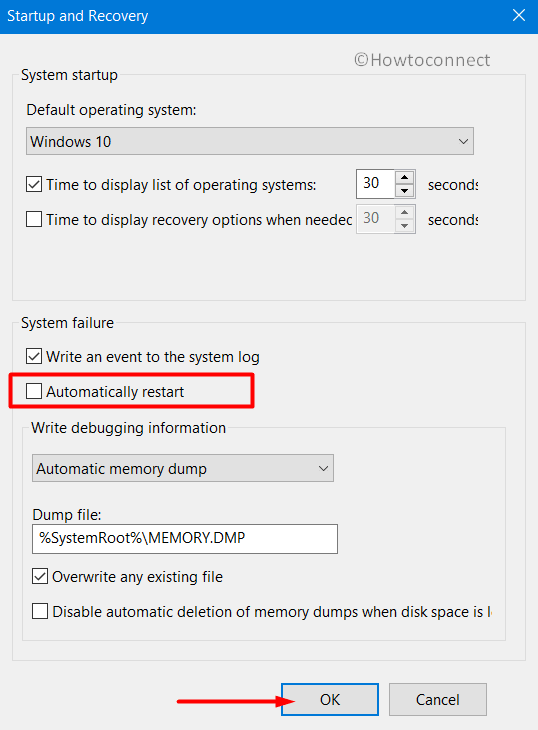
Step-5: Finally, click on OK.
With this, any attempts of automatic restart will be blocked. Now, this is not a fix to the blue screen errors, but just for preventing the auto-reboot situation.
2] Fix issues with the hardware accessories
In some cases, certain new hardware components can interrupt the PC’s function due to the lack of compatibility between the two. It could be even due to the specific device driver’s error or obsoleteness. Notice whether you started getting the BUGCODE_NDIS_DRIVER error immediately or shortly after adding or installing new hardware or device on the computer.
- To confirm this, you can simply disconnect or uninstall any recently added device temporarily.
- Keep the hardware elements somewhere safely.
- See whether this bypasses the BSOD. If it does, the hardware component was causing the error.
- If that’s the case, you should update the hardware driver from the respective manufacturer’s site.
3] Boot the device in Safe Mode to resolve BUGCODE_NDIS_DRIVER
You might have seen “working in safe mode” as a workaround to many, many types of errors. The reason is that when you boot your system in this mode, the PC will run only and only the most integral components, programs, and drivers. This means that whatever non-core element had been causing the trouble would no more interrupt and cause the issue. Once in Safe mode, you can easily run the troubleshoot or try other fixes thereby attempting to fix the whole BSOD situation. Below, you can see the steps you need to follow in order to start the safe mode –
- First of all, click on the Start icon and then the Power button.
- Further, choose the Restart option from the menu while simultaneously pressing the Shift key.
- Upon restarting of the Windows, you will be seeing a plain blue or black screen showing a bunch of options. There, you need to hit the Troubleshoot and then Advanced Options.
- The next step is choosing the Startup Settings.
- Now you will find a screen with multiple modes/options of restarting. One of them would be ‘Safe mode’. Also, you will see a Restart icon located at the bottom right corner. Click on the same and let the device to reboot again.
- Thereafter, all you need to do is press F4 to initiate Safe mode. Now that your PC is probably working error-free, go for a full security scan and troubleshooting to fix any discrepancy in the system or its components.
4] Check whether your system drivers are up to date
Device drivers play a critical role in the prompt functioning of the computer and its components. Well, ensuring that they are up to date and well-functioning is important. Besides, as you read in the very beginning, driver related issues are the most common roots of BUGCODE_NDIS_DRIVER. Here is the sequence of steps to check and update device drivers –
- Start by typing devmgmt.msc in the taskbar search box.
- Once you do, you can see the Device Manager option appear in the result. Simply double-click on it to launch the same.
- When you see the console, find out whether any device there has an exclamation mark.
- If there indeed is any, expand it.
- Right-click on the drivers of the devices showing the yellow mark.
- Then, from the menu that flies out, select Update driver option. Afterward, go with the visible instructions available on the screen.
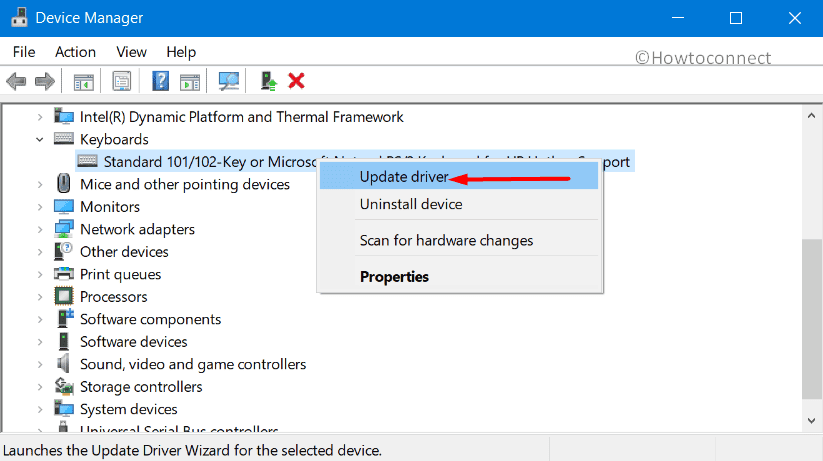
- Once updating completes successfully, simply reboot the system and see whether the BUGCODE NDIS DRIVER error still occurs.
5] Run Blue Screen troubleshooter
Up until recently, Windows just had one generic troubleshooter. However as more and more complaints, reports and user requests for a solution for Blue screen issues came in, Microsoft added a special troubleshooter section particularly to deal with BSOD errors. Introduction of these has been quite helpful to the users, particularly for novice users who are not good with the technical aspects of the operating system. This can be pretty effective in resolving various BSODs including BUGCODE_NDIS_DRIVER.
Blue screen troubleshooter would come handy especially when you have no idea as to what is causing an error. It’s also helpful when other fixes seem to fail. Here is how you can use Windows 10, blue screen troubleshooter –
- Press Windows + I. This is a shortcut that will take you to Settings.
- When in the UI of the Settings, click and navigate to Update & Security.
- Now, in the next screen that follows up in the interface, select Troubleshoot option from the left pane.
- Now, in the adjacent right and click Blue screen from the options in the lower section of the window.
- Finally, select Run the Troubleshooter to trigger the blue-screen troubleshooting process.
6] Get your Windows update to solve BUGCODE_NDIS_DRIVER
As you probably know, the periodic or cumulative updates that Microsoft releases come with certain updated features, fixes for bugs and problems as well as other important changes. These are very critical for a smoothly functioning PC amid the new kind of vulnerabilities, threats, and bugs that pops up now and then.
Usually, users have their PC updated automatically on a monthly or periodic basis every time Microsoft releases an update. However, this would work only if you have the automatic update settings untouched and uninterrupted. If you have disabled the same, you might not receive the latest updates automatically and you might have to do it manually. Also, a network issue while your device was getting updated could cause trouble. It may lead to a faulty update. So, here is how you can personally check and make sure that your PC is up to date. Steps to check for any pending updates –
- Repeat step 1 & 2 from the previous fix. As you go to the Update and security category, you will, by default, be in the Windows update.
- Simply hit Check for updates button and let the system scan for any and all new or pending updates.
- If nothing gets listed, it means no patches are due.
- Now, in case there are any due ones, simply download and let the system install them. You just have to hit the ‘Download’ button and follow any instructions on the screen. PC will ask permission for a restart to complete the procedure.
7] Uninstall faulty Updates
Now, there’s yet another thing. When your system receives a faulty or a buggy update, it too may lead to a blue screen and other kinds of errors like BUGCODE_NDIS_DRIVER. This can’t be true if you started facing the BSOD after installing and update recently. In this part, we will discuss how to uninstall faulty updates and check for new ones as well. Steps to uninstall faulty updates or patches –
- In the Windows Update section, select View Update History=> Uninstall updates.

- A new window will open up showing all the updates that your PC received. Try uninstalling the latest by selecting it and hitting the ‘Uninstall’ button on the top.
- Restart Windows 10 PC and see whether the issue is done with.
8] Avoid having conflicting applications
It is seen quite often that users install multiple application that performs somewhat similar or duplicate functions. While it may not look worse at the time, this thing has a tendency to cause conflicts in the system. For example, if you have a third party antivirus along with Windows Security (the built-in protection app) then there can be conflict. But, all you need to resolve this is by simply uninstalling the problematic applications.
Uninstall the extra apps and see whether this fixes your issue. If it doesn’t, you can sure reinstall if- that is, if you totally need to. It is generally good for the performance of the computer to not have duplicate applications.
9] Run a full scan for security breaches, vulnerabilities and malware attacks
Countless users have their PC in trouble way too often because of malware activities. Windows now come with its own security program, thankfully. You can use the same to check the entire system for any trace of malicious activities.
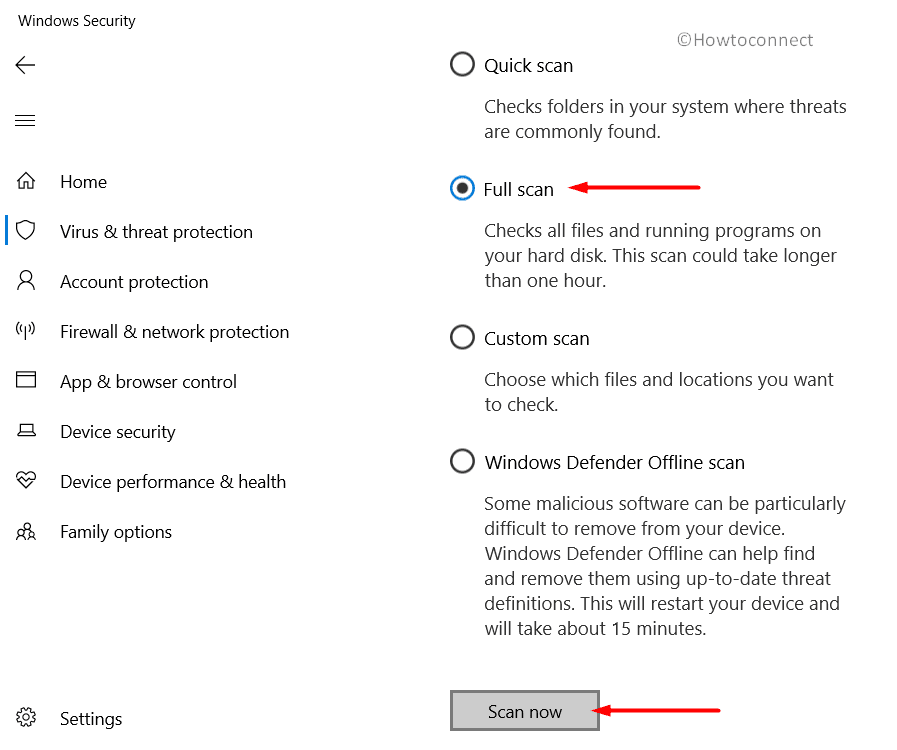
- You just need to open the Windows Security (the app with Shield icon on the taskbar or simply search it).
- Thereafter, just navigate to the Virus & Threat protection.
- Follow along with the on-screen options to complete the process. Note to select ‘Full scan’ when prompted. Also, the process may take a while. Don’t grow impatient and abandon the process in the middle.
10] Use SFC for any missing file or corrupted component
System File Checker is the function in Windows which, when run, detects an integral system file that is missing and restores it. Further, it looks for any corrupted system components and fixes them as well.
- To use this, all you need to do is open Command Prompt as an administrator.
- Go ahead with the UAC prompt by clicking the Yes button.
- Then, simply type the below command and press Enter.
Sfc /scannow
- After the scan gets over, check for the occurrence of the error code.
11] Free up your memory to avoid BUGCODE_NDIS_DRIVER
Almost all processes that go on in your OS result in a big amount of data being saved and this data is not always valuable. All of these files take up a big chunk of Hard Drive’s memory which can influence your OS’s processing capabilities. You can easily solve BUGCODE_NDIS_DRIVER with the help of Disk Cleanup tool.
- Put in cleanmgr in the search box.
- After Disk Cleanup option pop up in the results, select it.
- You will have to select the exact Disk that you want to delete the junk from. You can do so by choosing it from the newly appearing list and then pressing Enter.
- First, the application will scan Disk to provide you with possible amount of files for cleanup. Then, after it will finish scanning, you will encounter a new window, at the bottom of which you will have to press Clean up system files.
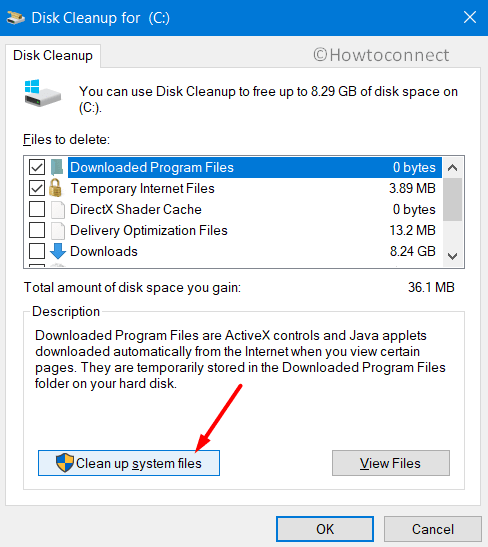
- You will encounter a window where you will have to select a disk you need to clean up. Press OK.
- Another wizard will pop up, and here you will have to select what data you need to clean up. You have to select all of them except for Downloads.
- Look through your Recycle Bin and recover all the important data back to its root.
- To start the cleanup press OK.
- After finishing this process check if the error is still present.
12] Prevent BUGCODE_NDIS_DRIVER by running DISM
Damaged Windows Image can cause a BUGCODE_NDIS_DRIVER to appear, and here is Microsoft’s ultimate tool for this kind of issues. Deployment Image Servicing and Management (DISM) – is an application that can recover images and solve issues that occur as a result of damaged files.
- Simultaneously press Win key and S to get access to a Search Box.
- Put in CMD and press the right mouse button on the appearing Command Prompt.
- From the pop-up menu select Run as Administrator and press Yes when the application will need your approval.
- In the following window type this exact command –
DISM.exe /Online /Cleanup-image /Restorehealth - Click Enter for application to start the recovering process. This procedure can go for as long as 10 minutes, so you will have to be patient.
- After it gets over, reboot the device and look for the presence of BUGCODE_NDIS_DRIVER.
13] Restore all System configurations
There is a pretty big chance that BUGCODE_NDIS_DRIVER can be a product of System’s configurations interference by the way of setting up new applications and/or getting rid of the old ones. You can dismiss all the interfering configurations with a System Restore option.
- Right-click on Windows icon and from the available menu choose Run.
- Put rstrui in the text field and press OK.
- Look through all the available restoration points by unveiling them with Show More Restore points option.
- Select the latest restore point and press Next button.
- On the newly appearing screen press Finish to begin the restoration procedure.
14] Restore Hard Drive’s Bad areas using CHKDSK
Different system’s errors can be caused by various components or configurations, and one of the most common issues for BUGCODE_NDIS_DRIVER error is Hard Drive’s bad areas. Actually you have an implemented tool – CHKDSK to help you solve it. And here is how to access it through the Elevated Command Prompt –
- Use any of the available ways, that are described thoroughly above, to access Elevated Command Prompt.
- In an appearing text bar input the following –
chkdsk [Drive:] [parameters] - Running this command will check Disk Status. But what we need is to find bad sectors and here is the additional syntax to get the desired result –
/f/r/x
f – represents restoring bad sectors that are present in the Hard Drive
r – stands for distinguishing those bad sectors
x – is used to dismiss all the ongoing processes so the application can begin its procedure
To get the result we need we have to use all of the symbols above and to connect them altogether in this form: chkdsk C: /f /r /x
Note – C: is the Hard Drive that we used as an example, so you can do this procedure with any hard drive you need.
- After finishing this procedure, reboot your PC and look for the error.
15] Solve memory issues to get rid of BUGCODE_NDIS_DRIVER
In case you saved some data in a wrong way or your device encountered some sudden power surge etc., as a result, you could experience the BSOD error. Do not worry, there is a way to cope with this issue, and here is how to do it –
- We have to start off from preparation. And the first step will be to finish all active procedures on your PC.
- Access the Search bar and type in Windows Memory.
- Press the “Windows Memory Diagnostic” option when it will be available.
- In the following window, you will have to select “Restart now and check for problems (recommended)“.
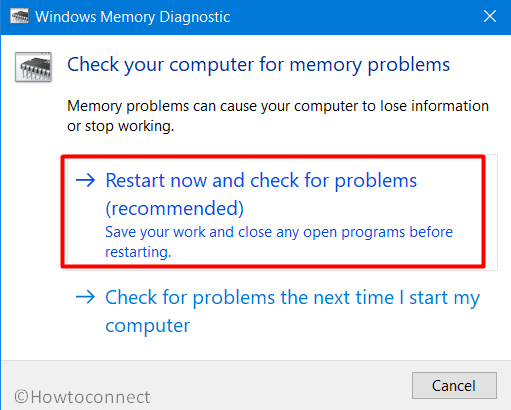
- The process will start with scanning that will reveal memory issues. Your device will reboot by itself after finishing this process.
- After booting the device you will find the results in the system tray.
Methods:
1] Prevent automatic shutdown
2] Fix issues with the hardware accessories
3] Boot the device in Safe Mode
4] Check whether your system drivers are up to date
5] Run Blue Screen troubleshooter
6] Get your Windows update to solve BUGCODE_NDIS_DRIVER
7] Uninstall faulty Updates
8] Avoid having conflicting applications
9] Run a full scan for security breaches, vulnerabilities and malware attacks
10] Use SFC for any missing file or corrupted component
11] Free up your memory
12] Prevent BUGCODE_NDIS_DRIVER by running DISM
13] Restore all System configurations
14] Restore Hard Drive’s Bad areas using CHKDSK
15] Solve Memory Issues
That’s all!!