Windows follows two prime strategies namely Quick Removal Policy and Better Performance for external drives. With these two, it actually controls the interaction of system with media devices attached to ports such as Thunderbolt enabled drives and USB. Previous Windows editions used to follow Better performance whereas, Starting with Windows 10 version 1809, built in policy is Quick removal.
You have the ability to Change Removal Policy for External Drives in Windows 11 or 10. Once set, it will be effective even after removing and connecting thereafter again with the same port of the device. Quick removal Policy is dedicated to manage the operation of Storage in such a way that, the device is well set to remove from network at any time. As a result, the device is removable even without making use of the Safely Remove Hardware process. However, there is an opposite side of the coin as well. System performance may result in degradation as Windows is unable to cache the writing operation for a Disk. Better performance Policy improves System functioning and manages the storage operation in that manner. Unlike the previous one, Windows can cache the Disk Writing when this policy is in use. But, while removing the Storage device, you must go through Safely Remove Hardware process. This will offer protection to data integrity on the device ensuring the successful end of all caching operations.
Way to Change Removal Policy for External Drives in Windows 11 and 10
Here is how to change Removal Policy for External Drives in Windows 11 or 10 –
Step-1: Keep the Storage device with you and connect it with computer using any of the ports.
Step-2: Press Win+E hotkey and open the File Explorer on screen.
Step-3: When in the Explorer, remember the device letter or label related to that storage drive (such as- USB Drive (D:)).
Step-4: Now, perform a right-click on Start from Taskbar and choose Disk Management.
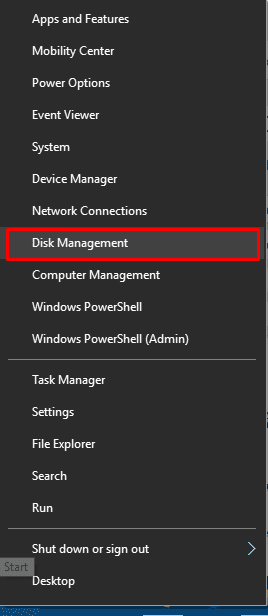
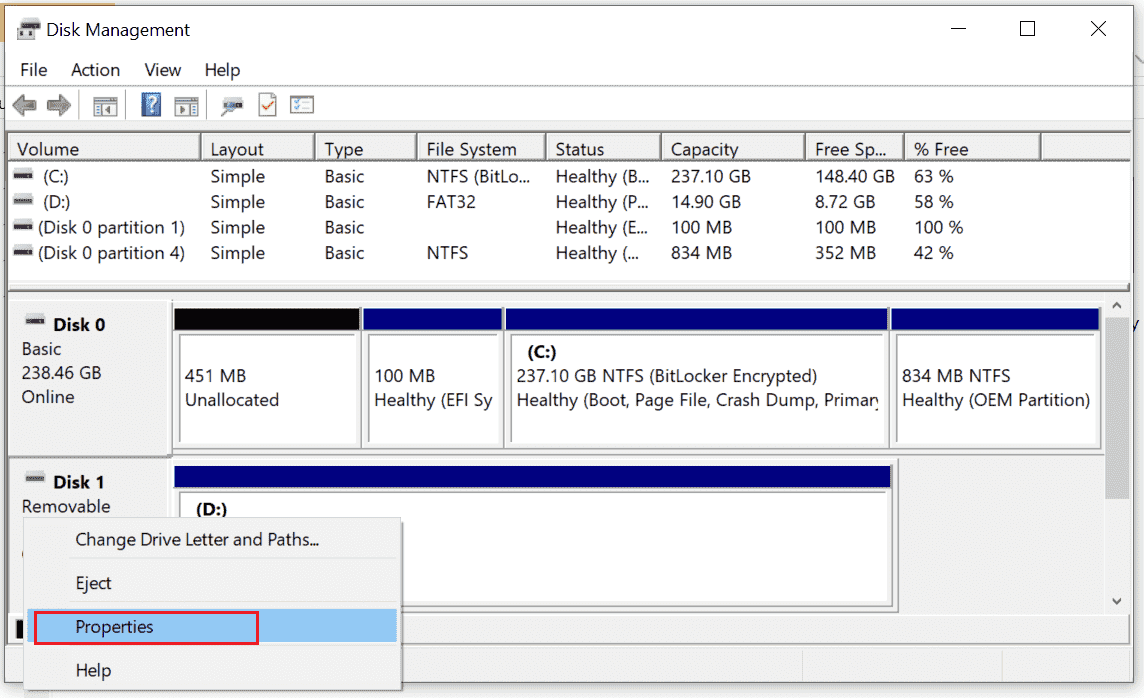
Step-5: Moving ahead to window, scroll down, and do a right-click on the device letter.
Step-6: Select Properties from menu and let a pop up wizard for the storage media appear on display.
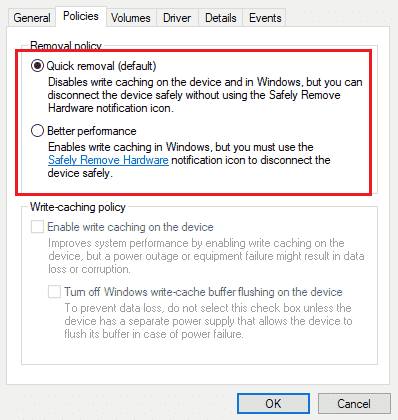
Step-7: Switch to Policies tab.
Step-8: Change Removal Policy for External Drives by checking between Quick removal (default) and Better performance.
Step-8: Lastly, hit the Ok button from bottom and save the change in system.
Important – In case of choosing the Better performance policy, it is better to select the Enable write caching on the device option from Write-caching policy segment.
If you have chosen, Better performance, use the Safely Remove Hardware process in order to remove the device from computer. Otherwise, there is a sharp risk of losing valuable data if you disconnect without following instructions for safe removal.
That’s all!!!