You are here means you have encountered your Windows 10 desktop screen turning blue with an error message Clock Watchdog Timeout? The issue leads to an unexpected restart loop and shows bugcheck value 0x00000101. Freezing and hanging are additional issues you may face during this Stop error.
Basically, CLOCK_WATCHDOG_TIMEOUT BSOD occurs when the specified processor is not working. Might be an outcome of the processor being deadlocked or nonresponsive meanwhile it has a problem with co-operation of threads and cores. Threads are those tasks executed by cores and to some extent, one core can have lots of threads simultaneously. The issue actually rises up when one thread is waiting for another thread for sufficient response or a kernel for another but responses are inadequate. A processor when unable to process the tasks as the resources are preoccupied and independent, we call it a Deadlock situation. In simpler form, the issue is explained as an interruption in the expected clock on a multi-processor system or in a second one has not received within an allocated time frame. Missing and corrupted system files, incorrect allocation of memory, poor areas in Hard Disk and RAM, the device running in low disk space, faulty Windows image files can join in the game. The most annoying issue you will face is an Automatic Restarting of Windows and freezing of Desktop. As the issue is a dominant one and causes a series of damages, we are here today to elaborate a good number of workarounds to resolve it.
Clock Watchdog Timeout BSOD in Windows 10 Solutions
Here is how to fix Clock Watchdog Timeout” BSOD in Windows 10 –
1: Halt the Windows 10 from Restarting Automatically
We have found out the proof that, once there is Clock Watchdog Timeout BSOD in Windows 10, it restarts automatically. Thus there is no enough room for a user to go through the causes and resolve it by any means. Therefore, we need to distract this rebooting first and here is the way to move –
First of all, save all the ongoing processes. You can also minimize them for the time being.
Step-1: Make together press of Win+D and head next to the Desktop area.
Step-2: From here, make a right click on This PC icon and choose Properties.
Step-3: After the System window comes ahead on display, choose “Advanced system settings” from the left pane.
Step-4: A new popup will become visible namely System Properties immediately.
Step-5: Coming down to the Startup and Recovery section, select the Settings button available here.
Step-6: There will be another wizard coming across sharply. Move ahead to its System failure part.
Step-7: Uncheck the box ahead of Automatically restart and finally, hit the Ok button at the bottom.
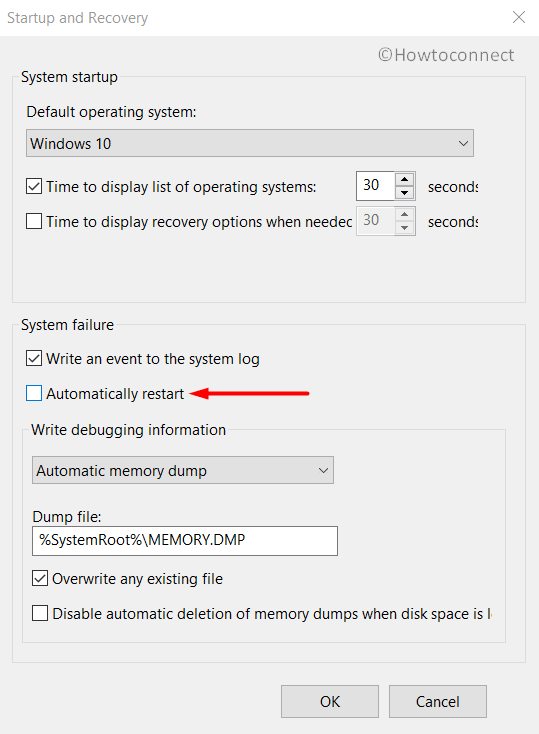
You can leave the wizard and continue working. Windows will not prompt to restart automatically from now on.
2: Making the BIOS up to date to Resolve Clock Watchdog Timeout
BIOS is indeed is a very sensitive component n outdated BIOS often end up in causing CLOCK_WATCHDOG_TIMEOUT BSOD error and we need to make it updated. Here is how to procein a computer. Despite being a software material, the operation of Hardware depends largely on it. Thus, we need to be extra cautious while doing any tweak in it. Aed –
- Move the pointer to Start menu and do a right click on it.
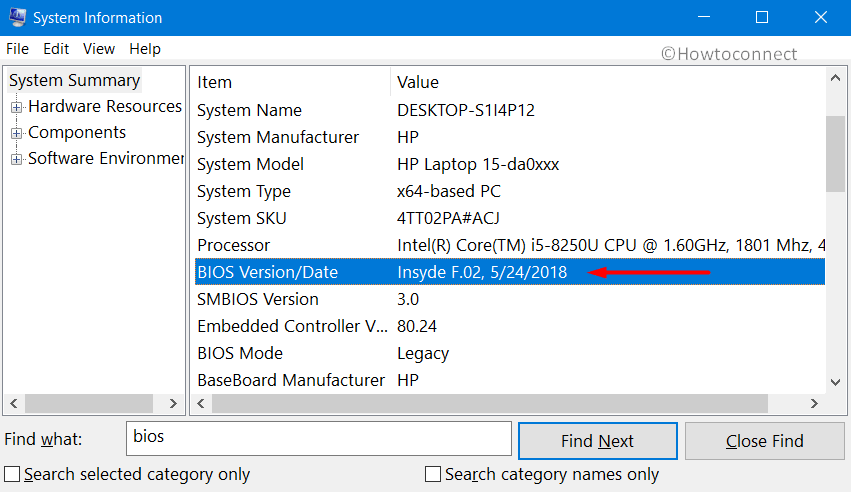
- When the options show up, choose Run in it.
- Upon opening the dialog, type msinfo32 in the blank search box.
- Now, press Enter key and let System Information comes into view.
- You will find a search field in the UI, write “BIOS Version” and also hit the Enter key.
- You can now see the Developer as well as the Version of BIOS installed in the PC.
- Leave that information page and launch the default browser.
- Following the information, you have got before, visit the manufacturer website for BIOS.
- In the process, Download the latest version of it from that page. In case of using a Laptop, keep the Charger plugged in until installation finishes completely.
- Install this latest version of BIOS and once the procedure ends successfully, restart the device and make these changes effective.
Important- The process we have come through will be little hectic while using an assembled CPU for running Windows 10. In case of being unable to find the Manufacturer’s name in System Information window, check the website of your motherboard’s manufacturer. Meanwhile, visit the web page, move on to the Downloads section in the site that has the latest version of BIOS compatible with PC. Generally, for assembling computers, American Megatrends’ are used. Alternatively, you can also check “Windows Updates” for any new edition of BIOS available for your computer.
3: Use Blue Screen Troubleshooter
Windows 10 is a self-sufficient Operating System and renowned for its default tools. The addition of Windows Blue Screen Troubleshooter added extra momentum with earlier reputation. Being introduced in Windows 10 Fall Creators Update edition the utility has the greater potentiality than all other workarounds to fix Clock Watchdog Timeout BSOD in Windows 10. This is a true blessing in this arena and we need to make the best use of it. This is how you should proceed –
- Make a combined press of Windows and I keys and let Windows Settings app to load.
- From app UI, turn ahead to Update & Security and eventually make a click on it.
- Once the next page appears, select Troubleshoot subsection lying at the left wing and immediately move on to adjacent pane.
- On the right, reach to Blue Screen option listed and do a click on it to expand.
- Hit Run the Troubleshooter from elongated pane to allow tool taking necessary measures.
When the troubleshooting process will end, hopefully, there will be no Clock Watchdog Timeout BSOD in Windows 10.
4: Boot Windows 10 in Safe Mode as the Most common resolution for all
BSOD error was dominant like many other critical issues happened to Windows 10. Luckily, in every situation like those, Booting in Safe Mode came out as savior. In this special Startup mode, Windows loads only basic processes and services. Thus, many errors take leave. To apply the workaround, follow the below instruction –
- Move the pointe to the left corner of Taskbar to do a click on the Start menu.
- Prior to opening it, perform a click on Power icon located here.
- While selecting the Restart option from the shown menu, press Shift key as well.
- Widows will prepare for rebooting initially and while booting up next, you will be guided to the Recovery screen.
- Select Troubleshoot from here and moving ahead to the next page, choose Advanced options.
- Now on the succeeding screen, click Startup Settings.
- Then perform a click on the Restart button and let your PC reboot for the second time.
- Upon completing the cycle, Startup Settings will come on screen.
- From here, Press F4 function key to “boot into Safe Mode“.
5: Dismiss All the Virus responsible for eating up System components in Windows Security
Nowadays, we are no longer safe from Malware. Either you visit a suspicious link on the web or do a click in Spam mail, there is a risk of getting affected. To eliminate this probability, only safeguard is to perform regular scanning for them and dismiss immediately after coming across. The default Windows Security app is offering a best-suited deal in this regard. Follow the below guidelines to clean threats in this app-
- Make a joint press of Win+S hotkeys using the keyboard.
- After Taskbar search in upfront, type “Windows Security” and select the app shown in the result.
- On the pp interface, hit the Virus & threat protection option from left overlay.
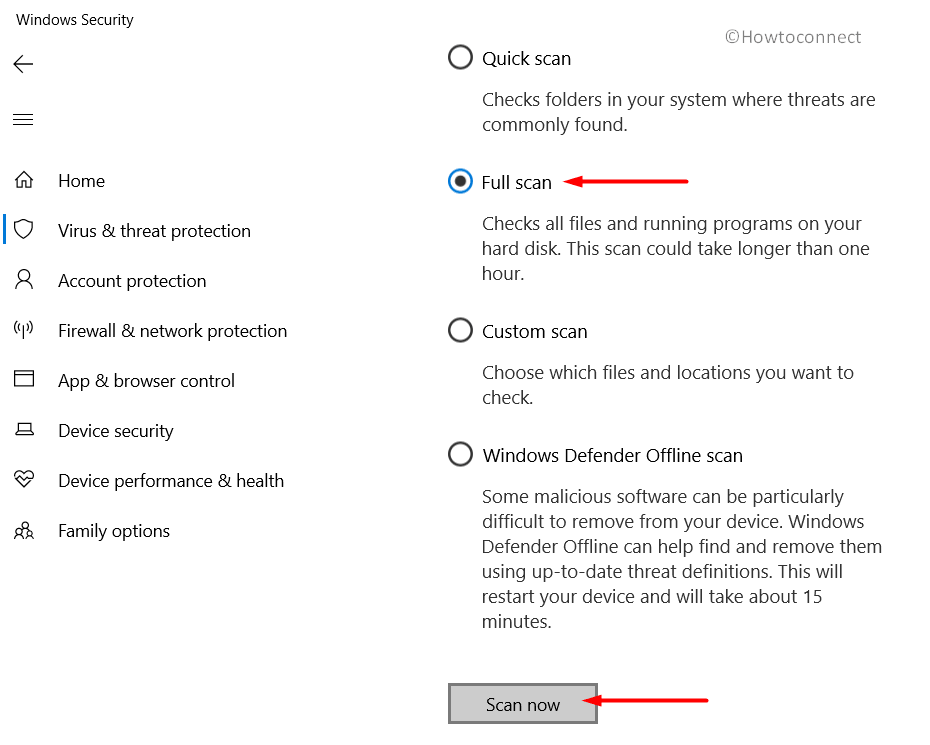
- Jumping ahead to the corresponding pane, select Scan options link and to preview all available methods.
- Moving ahead, do a click on the radio button before Full scan and in the process hit Scan now button to initiate the detection process.
- When the process ends, the result will be available on display and if there is any malware in it, choose Clean threats option to dismiss.
- Proceeding forward to the succeeding page, among three options, select Remove first and then Start actions.
All of the malware will disappear upon application of this workaround and there will be possibly no Clock Watchdog Timeout BSOD in Windows 10.
6: Don’t Spare the out Drivers, update using Device Manager
Outdated, old and problematic device drivers are rated as number one culprit in occurring Clock Watchdog Timeout BSOD in Windows 10. In fact, this is completely illogical to keep the drivers outdated for a long time. Device Manager will be handy to identify those old drivers easily as marked with Yellow indication which you can update in a single click. The detailed process is as follows –
- Perform a right click on Start menu taking pointer over there.
- Select Run and invite the dialog on display.
- When it is upfront, fill the empty text space with “devmgmt.msc” and also choose Ok button available under the box.
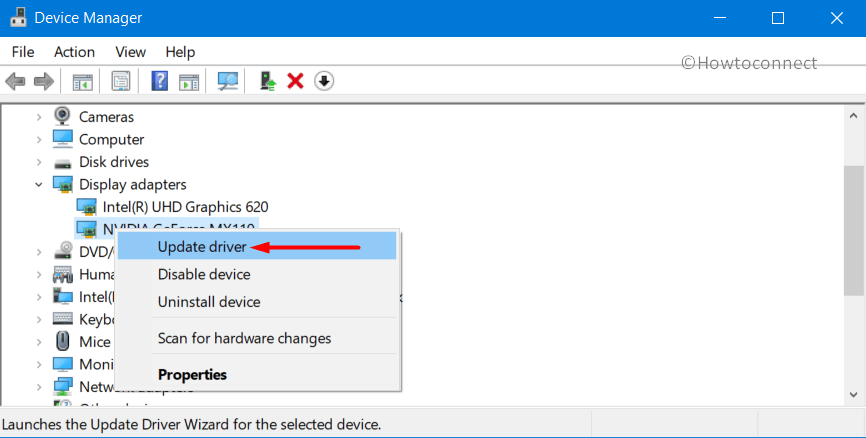
- When Device Manager will unroll on display, have a close look on the console. If you see any mark of exclamation on a device, expand the same by clicking.
- Moving next upon expansion, do a right click on the driver and from available options, select Update driver. Carry on with on-screen guidelines to finish up.
As rated number one culprit, when these drivers are up to date, these should not be any Clock Watchdog Timeout BSOD in Windows 10.
7: Install all available Windows Update Patches
Cumulative updates carry fixes for bugs and problems moreover also includes latest features as well. Leaving them ending for any reason will deteriorate the strength of the Operating System. Outdated OS is very much prone to get affected with Clock Watchdog Timeout BSOD in Windows 10. Since installing these patches are simple, this is not legit to keep them pending. Here are the steps to install them –
Important- Carry out this whole task in the presence of a high-speed internet connection preferably through Broadband or a wireless one. You can also use Mobile hotspot as well due to deficiency as well. In that case, ensure disabling the Metered Connection first to initiate Downloading.
- Do a click on Start menu and henceforth click the Settings icon.
- When the app interface shows up, move ahead to Update & Security area and eventually select the tile.
- After loading the succeeding page, make a click on Windows Update subsection in the left pane.
- Moving ahead to the adjacent pane, perform a click on Check for updates button visible here.
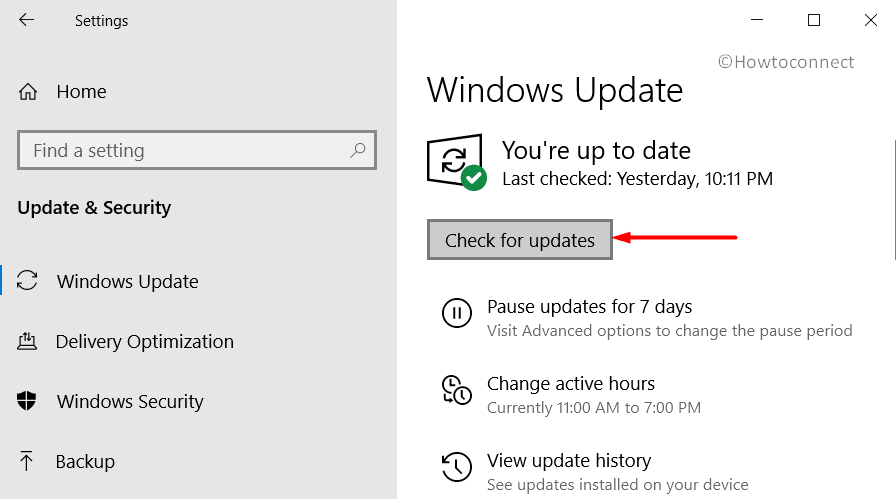
- Once all the patches unveil, hit Download option located under each patch.
- Downloading will be finished and immediately installation will begin.
- Restart the device when prompt to finish installing process.
8: Fix up Existing Memory problems in Windows Memory Diagnostic
Problems in RAM, incorrect allocating of Memory devices make the Clock Watchdog Timeout BSOD come up in Windows 10. Windows Memory Diagnostic provided in Windows 10 is a top-notch utility to make all these okay. Following instructions need to be followed to accomplish –
- Open the Windows Settings app by making a joint hit on “Win logo + I” hotkeys.
- When you will come across a search box in the UI, type “Memory” in it.
- When “Diagnose your computer’s memory problems” appear in the result, select it.
- The tool will show up on immediate effect and you have to do a click on “Restart now and check for problems (recommended)” from here.
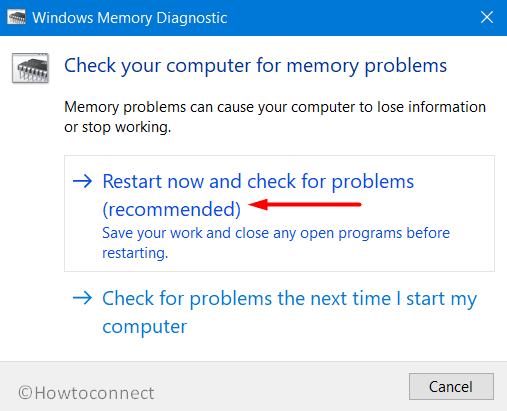
- In due course, Windows will restart initially and after desktop being visible, there will a blue screen detecting memory issues in the system.
- When the progress reaches 100%, windows will reboot again.
Report of the diagnosis will be available in the notification area of System tray when coming back to operation.
9: Clean Up unnecessary files staying as Junk and free up Space
Windows produces a lot of many unnecessary files to execute tasks. These files keep on saving in the storage. When accumulated in bigger amount, they occupy huge disk space and in the process, the Disk runs in lack of space. As in the long run, Clock Watchdog Timeout BSOD in Windows 10 is imminent. To make the space free, Disk Cleanup Utility will be the best treatment. To accomplish the task, follow the below proceedings –
- Invoke Taskbar Search by hitting Win logo + S keys.
- In the search box provided, type “disk cleanup” and press the Enter button from keyboard.
- Upon the appearance of small popup, choose preferable Drive to run a cleanup. Select C: by performing a click on the dropdown menu and press Enter.
- Disk Cleanup Utility will come ahead slowly after calculating the space it can make free from the drive.
- When the wizard is upfront, come down to the bottom and do a click on Clean up system files.
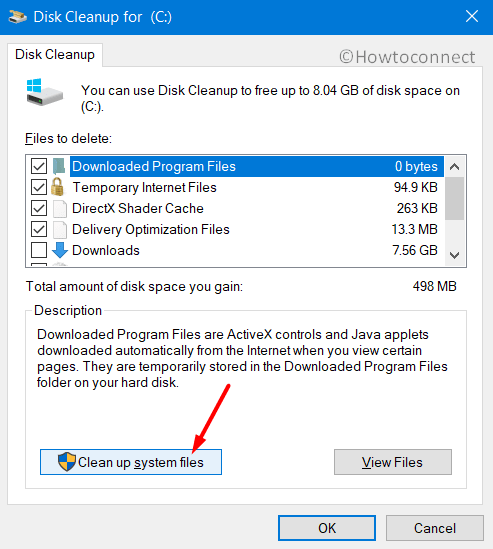
- Once again, that small popup will reappear asking for the desired drive. Choose C: like before and press Enter key.
- When Disk Cleanup for C: comes ahead after calculation retrievable space in System files, reach to its Files to delete area.
- Check all the boxes available here and keep Downloads as it was.
Note- At this point, before allowing the Utility to take action, do a check in Recycle Bin for necessary items. If have, restore immediately in the respective location.
- Hit the Ok button and let the Cleanup begin straightaway.
- Wait until this process ends automatically and it might take several minutes.
10: Execute “Deployment Image Servicing and Management” (DISM) tool and rectify Windows image files
Problematic Windows Image Files are found to play a role in causing Clock Watchdog Timeout BSOD in Windows 10. DISM tool is well famous to deal with this case being powered up in an Elevated Command Prompt. Here is how to move on to the utility –
- Launch Taskbar Search and type cmd.exe in the text field and let the results load.
- Do a right click on Command Prompt and select “Run as Administrator”.
- After the User Account Control comes in the view, hit Yes to give consent.
- Following ahead to the Elevated Command Prompt, type below command at the winking cursor-
DISM.exe /Online /Cleanup-image /Restorehealth
- Press Enter key and let the DISM tool to detect the troublesome windows image files. Once the process ends, fixing will get it way out immediately.
- Once the whole process comes to an end, restart Windows 10 PC.
- Upon coming back to the desktop, check if there is any BSOD error in the system.
11: Remove Problematic Windows Update Files immediately
Updating the patches using Windows Settings app is simple but it rarely falls into manipulation which eventually results in Clock Watchdog Timeout BSOD in Windows 10. Therefore, deleting those files on immediate effect is necessary. Removing installed updates will be easier in this way –
Step#1: Launch the built-in Settings app using a combination of Win+I keys.
Step#2: Click Update & Security category.
Step#3: When the consequent page loads, choose Windows Update lying in the left pane.
Step#4: Jump on alongside pane afterward and perform a click on View update history link visible in the page.
Step#5: Moving ahead to the succeeding window, hit the link saying “Uninstall updates”.
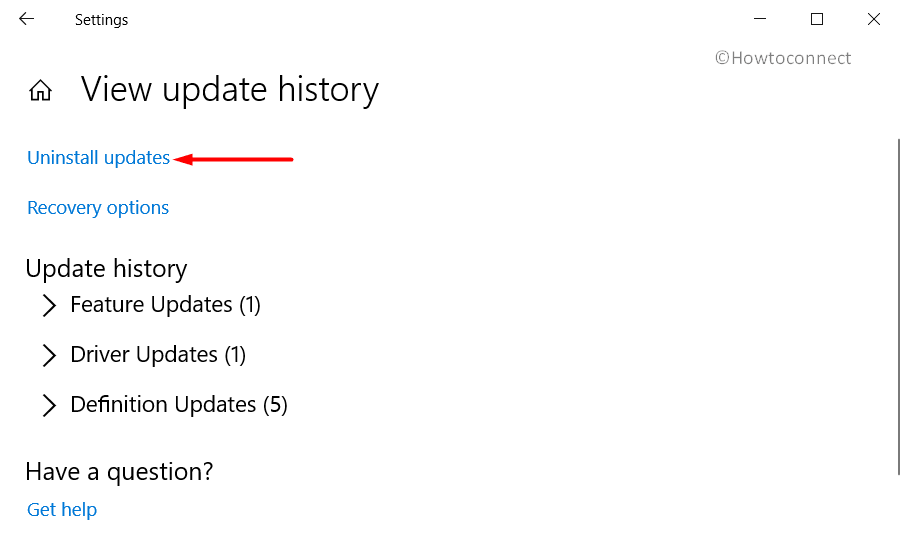
Step#6: After the new window peek in, make a move for lastly received patch.
Step#7: Do a right click on it and select Uninstall option.
Step#8: Keep following the upcoming instruction visible to delete them fully.
12: Uninstall similar apps from the system to avoid their collision
Similar applications in the system often collide with each other and ultimately become the cause to delete system resources. In the process Clock Watchdog Timeout BSOD in Windows 10 rises up. To stop this deadly consequence, we need to uninstall them using the below instructions –
- Open the Settings app using any of the above guidelines.
- From home page, move out to Apps tile and do a click on it in the process.
- Once additional settings page is upfront, select Apps & features located at the left side.
- Moving to the alternate pane on the right, find out programs colliding with each other after the list is loaded.
- Expand those by clicking and finally select Uninstall to start the removal.
- When UAC prompts, hit Yes to give consent.
- Keep following instructions coming until these get uninstalled.
13: Use sfc /scannow command to fix Clock Watchdog Timeout
Windows components sometimes fall into corruption and DLL files also go missing. This act leads to Clock Watchdog Timeout BSOD in Windows 10 very often. System File Checker can settle things up. See how to deploy the workaround –
- Manage the Entry to Elevated Command Prompt using the guidelines provided above.
- In the black appearing window, type
sfc /scannowat the place of blinking cursor. - Hit Enter key and let the System File Checker begin action. The utility will detect missing DLL file and corrupted system resources eventually fix them automatically.
- This process might take a while, wait until it gets over normally.
- When it is finished, restart the device and upon signing back in, check for Clock Watchdog Timeout BSOD in Windows 10.
Hope it will resolve the BSDO error from the device.
14: Perform System Restore to welcome the previous state
Changes in Windows mean installing a program or removing it from the system. Either way, they make tweaking in the Windows Registry. Clock Watchdog Timeout BSOD in Windows 10 is a must when there is something goes wrong in the registry. If you have faced the error after doing something like this, can perform System Restore and undo the changes. Description of the process is as following –
Note- This workaround is possible only in the presence of previously created Restore Point. If you don’t have that, ignore this process and better concentrate on the others. Luckily, if you have such points, follow the below proceedings –
- Open Run dialog box by pressing “Win+R” combined.
- Type rstrui in the command box and hit Enter.
- Once System Restore wizard shows up, select Next to proceed ahead.
- After moving to the consequent page, do a click on Show more restore points.
- Hit the latest one present in the list and also select the Next button located at the bottom.
- From the following page, hit Finish to start the process to undo changes and head back to the previous stage.
15: Uninstall the Third Party Anti Malware Tool present in the system
Before Microsoft developed Windows Security, we used to deal with Malware issues using a bunch of Free Anti-virus software. After Windows Security was introduced, no one could beat it in respect to performance. Alongside, using a third party tool unnecessarily will cause Clock Watchdog Timeout BSOD in Windows 10 as well. Therefore, if you are still using these, can uninstall straightway using the below guidelines –
- Invoke Run dialog.
- Type appwiz.cpl in the text box provided.
- Hit Enter key to open up Programs and Features window.
- Reach out to Third Party Malware Tool in the list.
- Select the app from there once found.
- Hit Uninstall option located at the top ribbon.
- Move with on display guidelines until it is removed successfully.
16: Adjust the Defective areas in Hard Disk Volume using Disk Checking Tool
Hard Disk Volume might experience Bad sectors in it being used for a long time. You have a high risk of getting Clock Watchdog Timeout BSOD in Windows 10 if have the same poor areas in your HDD. Disk Checking Utility is the best tool to rectify this mess. Using the simple command in elevated Command Prompt does the rest. See how to do it –
- Hover the cursor and reach to Taskbar area.
- Do a right-click in an empty space and select Task Manager from the appearing list.
- When in the app UI, select File located at the top left the corner in this page.
- Choose Run new task to proceed.
- When a dialog shows up, type cmd in the blank text area.
- Check the box saying “Run this task with administrative privileges”
- Now, hit Enter key and reach to Elevated Command Prompt window directly.
- In the dark window, type following command at the base of a winking cursor –
chkdsk C: /f /r /x
When you press Enter key, Disk Checking Utility will start checking for bad areas in the Hard Disk and eventually fix them. In the command, the additional characters represent –
- C:- Disk Drive where we are running the Disk Checking and location where Windows are installed.
- f- Fixes the bad areas found in the volume.
- r- Detects the worst sectors in the disk volume.
- x- Unmount the elements in the volume before the process starts.
This process will take a little longer and we request you to hold the patience till the end.
Once it gets over, restart the windows and upon returning to operation, check for Clock Watchdog Timeout BSOD in Windows 10.
Hope, it will heal the notorious issue.
17: Disconnect Additional Dard Disk connected temporarily
Some people have experienced Clock Watchdog Timeout BSOD in Windows 10 just after using an extra HDD with the device. The cure is simple as well as only disconnecting will be enough. Here is how to proceed –
- Detach the external Hard Drive from the device first.
- Leave it safely in an accessible location and reboot the device.
- Windows after performing the complete cycle of rebooting, check whether there is any Clock Watchdog Timeout BSOD in Windows 10.
- If not, connect the Hard Drive once again with Computer.
- Now, launch the browser and make a visit to its maker’s website.
- Download the latest driver from here in the presence of an active internet connection.
- Install this in windows to use the drive smoothly.
By this far, we have already discussed few effective resolutions those can be powerful while fixing Clock Watchdog Timeout BSOD in Windows 10. Expected that, you have already come out successful using these accurately. If alternative happens and you couldn’t really succeed, we need to look for the last resort. The lifeline here is a Clean Installation which thereafter will cure all the issues.
After coming to a decision to perform the workaround, ensure you have the speedy internet connection. Save a backup for necessary files in a folder and take it out in USB or an external drive. If you are not component enough to do so, ask help from skilled personnel.
Methods:
1: Halt the Windows from Restarting Automatically
2: Making the BIOS up to date
3: Use Blue Screen Troubleshooter
4: Boot Windows 10 in Safe Mode
5: Dismiss All the Virus responsible
6: Don’t Spare the out Drivers, update using Device Manager
7: Install all available Windows Update Patches
8: Fix up Existing Memory problems
9: Clean Up unnecessary files staying as Junk
10: Execute DISM tool
11: Remove Problematic Windows Update Files
12: Uninstall similar apps from the system
13: Use sfc /scannow command
14: Perform System Restore
15: Uninstall the Third Party Anti Malware Tool
16: Adjust the Defective areas in Hard Disk Volume
17: Disconnect Additional Dard Disk connected temporarily
That’s all!!
Thanks!! BIOS Update on my ASrock x370 taichi fixed the issue with 1903 update