Do you know that Windows 10 OS offers two distinct ways to Customize System Unattended Sleep Timeout? This specific Power Options setting comes very handy to wake up the PC in order to execute certain scheduled tasks. You can easily optimize the time period of this setting either through Power Options or by using Command Prompt. You can also give an attempt to Change System Cooling Policy For Your Power Plan in Windows 10.
System unattended sleep timeout is in fact, the amount of time system will wait idly after waking up in an unattended state before automatically going back to sleep or hibernation. You can set the time period of this setting quite long enough so that the intended task gets finish before the OS goes back to sleep automatically. Stick on to our tutorial and let’s learn both the methods one by one.
How to Customize System Unattended Sleep Timeout on Windows 10
Before we begin, it is important to state that in any case the device wakes up and is in use during unattended sleep timeout session, then Windows will stay awake after this timeout period. Instead, it will apply the time slot set in the Power Plan. Secondly, you need to sign in as an administrator to carry out the functions in both the methods.
1. Through Power Options
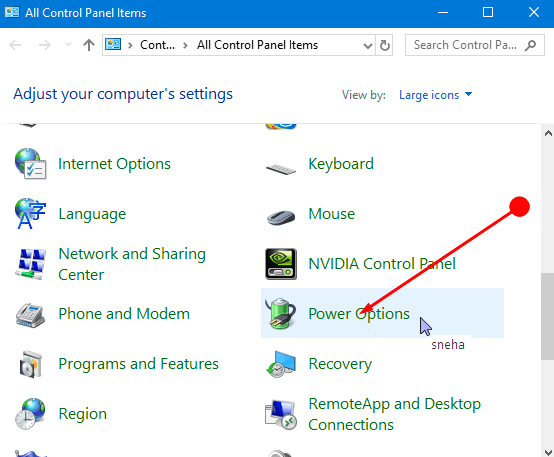
Step 1 – Type cp in Cortana and select the result in the Best Match section. In the Control Panel, reach out to the Power Options.
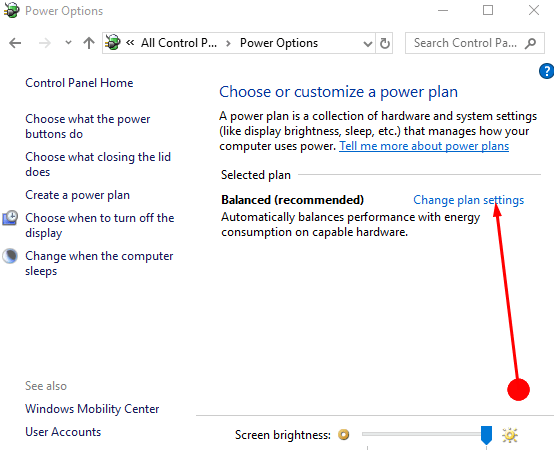
Step 2 – In the next window, you can notice the active plan. So, click Change plan settings option that appears alongside the plan as shown in the given image.
For reference, learn How to Create a Custom Power Plan in Windows 10.
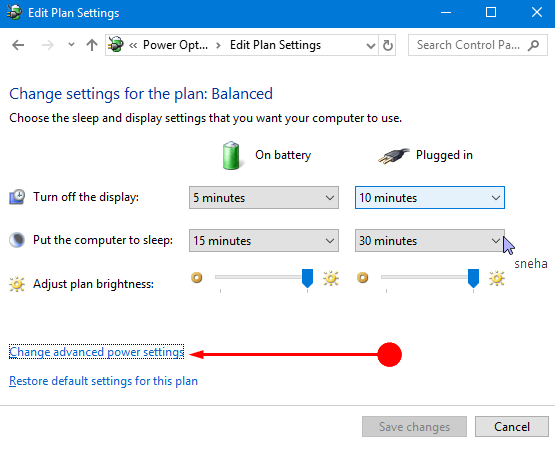
Step 3 – Here, click on the second last option namely “Change Advanced Power Settings” at the bottom of the window.
Step 4 – Moving on, double-click the Sleep setting for its expansion. Here, modify the time for the System Unattended Sleep Timeout setting for both the situations – On battery and Plugged in respectively. Once done do not miss out to click OK for the execution of the time.
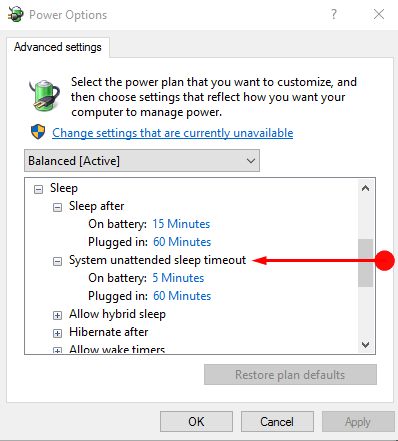
Note – The time setting of the device by default is 2 minutes.
2. Using Command Prompt
Step 1 – First of all, type cmd in Cortana text field. After finding the result input a right-click on Command Prompt. Out of all the options in view click on Run as Administrator.
As an alternative, you can also explore more ways to Launch Elevated Command Prompt on Windows 10.
Step 2 – When UAC prompts up on the PC screen, agree to it by clicking Yes. Next, out of both the commands (On Battery and Plugged In) choose the one that suits the best for your work. You can either type it out or copy-paste the commands but ensure to press Enter to execute them.
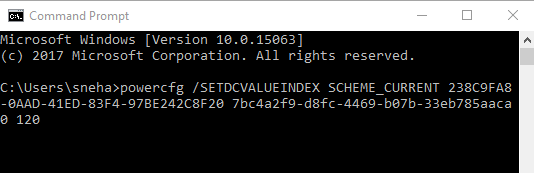
On Battery
powercfg /SETDCVALUEINDEX SCHEME_CURRENT 238C9FA8-0AAD-41ED-83F4-97BE242C8F20 7bc4a2f9-d8fc-4469-b07b-33eb785aaca0 X
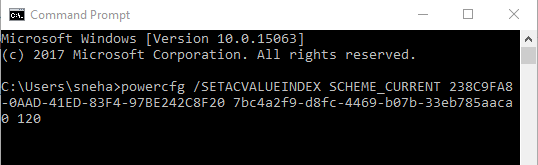
Plugged In
powercfg /SETACVALUEINDEX SCHEME_CURRENT 238C9FA8-0AAD-41ED-83F4-97BE242C8F20 7bc4a2f9-d8fc-4469-b07b-33eb785aaca0 X
Note – Here replace X in the above command lines with the number of seconds. And also, the number of seconds listed will round off to the nearest minute in Power Options.
However, The default time is 120 seconds (2 minutes).
Winding Up
Thus we conclude that the System Unattended Sleep Timeout is a blessing for the Windows users as one need not monitor the device. After setting the time period you can easily relax as the Power Options will take care of everything. Hence, give a shot to any of the above given methods to Customize System Unattended Sleep Timeout on Windows 10 pretty much easily.