Sometimes you find icons on windows 10 PC broken or distorted or messed up. To fix this issue, you need to delete and rebuild icon cache. Here you will read a tutorial for the same issue.
Well, you must be thinking what problems icons create in Windows 10. Because of some unknown reasons, Windows 10 exhibits you wrong icons for different file types. For instance, you have updated an application to its higher level and the new edition has a new icon for the advanced version, but instead of the new icon, you still face the old icon for that application. Some users also face a destructed icon instead of its original best icon or some experience messed up icons also. So, this sort of problem arises when your Windows icon cache gets corrupted.
What does Icon Cache mean?
Windows uses an exceptional file, called icon cache and keeps a copy of all the icons there which are accessible easily. Let me explain this with an example – When Windows needs an icon, it simply fetches a copy of that icon from the icon cache folder instead of fetching it from the actual application file. So, in this way it helps Windows to accomplish work in an easier way. This is when this icon cache gets corrupted; you have to face different issues of icons. But nothing to worry, you need to force Windows 10 to rebuild icon cache for you.
To rebuild an icon cache, the suggested method is to delete the Iconcache.db file because when the file gets missed out completely; Windows 10 will build it again from its basic. But, removing this file is not an easy task. The reason is, in Windows RAM memory a copy of this file is always kept. And when you simply delete it, Windows will establish a new copy of the file from RAM’s copy, without renewing the icon images. Hence, you need to prevent File Explorer from establishing the old icon cache file.
Ways to Delete and Rebuild Icon Cache in Windows 10
The icon cache in Windows 10 is hidden and you need to enable the hidden files and folders option to proceed. To do so, read the below steps –
- Launch This PC on your screen.
- Click View button of the menu bar.

- Take your attention to the right corner of the View ribbon and click Options.
![]()
- A new Folder Options window will pop up.
- Be into the View tab.
- Under the Advanced settings section, find the option Show hidden files, folders or drives.
- Check the radio button of the option.
- Also, make sure to uncheck the option of Hide extensions for known file types.

- To save the changes done, click Apply followed by the OK button.
As you have enabled the display of hidden files, folders and drives, you can easily navigate to the location where iconcache is stored. So navigate to the following location of your File Explorer.
C:\Users\<your username>\AppData\Local\Microsoft\Windows\Explorer
Note: Replace the “username” with the actual username of your Windows 10 computer. For example, my Windows 10 computer’s username is Aum Sai Ram
Now, you can see many database files with names like iconcache_16.db, iconcache_32.db, iconcache_256, iconcache _1920.db, iconcache_2560.db and many more. In order to rebuild icon cache, you have to remove all iconcache files that you see in this folder. It sounds pretty easy right? No dear, not all. Windows cannot remove all the iconcache files because few of them will be active in the File Explorer. Hence, Windows cannot delete the files that are still active. And to delete the files, you need to close the File Explorer, but then how the files will be deleted if the File Explorer is closed? Here, comes everyone rescuer – Command Prompt. The Command Prompt will help you in deleting the iconcache files.
Read the below steps carefully and see how the iconcache files are deleted with the help of Command Prompt.
- Open Command Prompt by using your preferred method.
- Using the cd command navigate to the iconcache folder. Naturally, Command Prompts starts with your user directory. In this example, the user is AUM SAI RAM. So to get into the iconcache folder you need to type
cd C:\Users\AUM SAI RAM\AppData\Local\Microsoft\Windows\Explorer
- Press Enter key and then you will be shown the entire path of the iconcache folder.

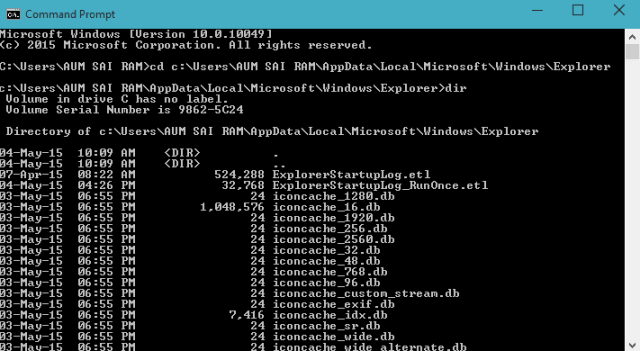
You need to check whether the Command Prompt is in the correct folder or not. So use the dir command and see whether the displayed list has iconcache files or not. Type the following command at the end of the shown path.
dir
Example:
(C:\Users\AUM SAI RAM\AppData\Local\Microsoft\Windows\Explorer>dir)
(C:\Users\AUM SAI RAM\AppData\Local\Microsoft\Windows\Explorer>dir)
![]()
- You can see the list of iconcache files in the folder.
- Now, you have to delete the iconcache files. But before that you must close File Explorer and all other programs that are currently active to make sure that none of them are using the iconcache files.
You need to apply a small tweak which will close the active File Explorer. To close File Explorer do the following steps –
- Execute a right-click on the Taskbar and choose Task Manager option.

- Take yourself to the Details tab.
- Look for explorer.exe in the Details tab.
- Right-click on it and hit select End task option.

- The File Explorer along with desktop will vanish. Nothing to worry, they will be back.
- Again see properly if you left any other program in active mode. Only the Command Prompt that you have opened should be active.
- In case you are unable to see Command Prompt, open it from the Task Manager which is still active. Go to Process Tab => Apps => Command Prompt. Double click on the command prompt and is will open as it was.
- Close Task manager after you get the active Command Prompt window)
- Now go to the opened Command Prompt window and type del iconcache* (the star mark after the iconcache is important so that the delete process should include all the names which start with iconcache files).

- This will delete all the iconcache files.
- Again use the dir command and check if any of the iconcache files got missed or not. If you see any iconcache files it means you have not entered the command correctly or some application is still using the icon cache.
- Now, everything is done, you need to get back the normal and usual desktop. So jointly press Ctrl + Alt + Del keys.
- Choose the option Sign out.
- Again sign in to Windows 10 and see the desktop is back to its normal condition and the broken icons are now repaired.
Delete and Rebuild Icon Cache in Windows 10 using a downloadable bat File
You can directly delete the existing Icon Cache and rebuild them using a bat file. Just download the file given below and double-click to open the file and click any key on your keyboard when asked on a DOS file. After a while write Y to restart your computer.
 If you view Discard button on the downloaded file click on the arrow mark and select Keep. So, when you open the file you will see the message Windows Protected your PC. Click the more info link at the left side and hit Run Anyway Button.