The system facing audio problems sometimes needs to roll back Realtek driver. But here comes a glitch as automatic update nature of Windows the same diver gets updated itself. This occurrence creates the same issue time and again and to deal with is not an easy task.
On Reddit forum, a user has explained the annoyance that he uninstalled Realtek High Definition Audio Driver and Rebooted PC then Windows installed the default version and updated. As Windows always intends to have the latest version of device drivers, the issue appears again. So, today we decided to provide a permanent workaround to Disable automatic Realtek High Definition Audio Driver Update. Read – How to Use Bluetooth Headset as Computer Sound Device for Voice Chat
Disable Automatic Realtek High Definition Audio Driver Update
Here is how to disable automatic Realtek High Definition Audio driver Update in Windows 11 or 10 –
Step-1: Launch File Explorer by Pressing Win+E (either you can use the icon on the taskbar).
Step-2: Click on This PC.
Step-3: Double click on Local Disk (C:) and then Program Files.
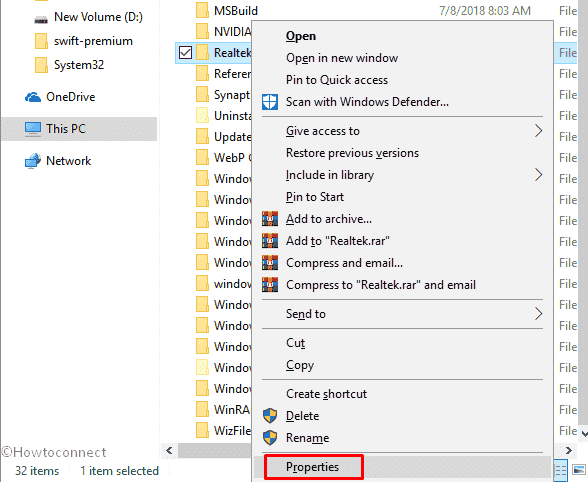
Step-4: Proceeding forwards, In Program Files directory, right click on Realtek and Select Properties.
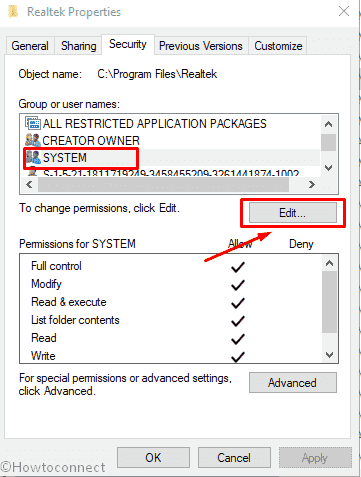
Step-5: A Pop-up will show up in the display. Click on Security tab.
Step-6: Select System in Group of users name section and then click on Edit.
Step-7: On the Permission for Realtek window, click on System.
Step-8: Check Full control in the Deny column under Permissions for SYSTEM section.
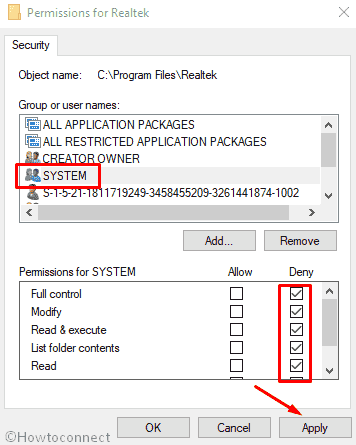
Step-8: Finally, click on Apply and then OK to save the modifications.
You can see the guidelines in this write-up – Windows 10 – How to Configure User Permissions for Files, Folders.
Here, a case may appear that the permissions are locked and you cant make a change in the box. Follow the instruction to deal with –
On the Properties window (you have seen above how to reach there), click on Advanced.
When Advanced Security Settings wizard rolls in, click on Change permissions… (the button having administrator sign).
Now select Disable inheritance from the bottom left of the window.
Once you will view a confirmation pop up, choose the first option “Convert inherited permissions into explicit permissions on this object”.
Now you are able to change the permissions for the system to restrict updating the Realtek driver automatically.
That’s all. If you have any questions regarding this issue, feel free to ask. We would love to help you further.