Many users desperately want to Disable Cortana After Windows 10 April 2018 update 1803 as they are unhappy with the existence of an AI assistant. The built-in digital assistant of Windows 10 generally collects personal information along with browser history and uploads the same into their server. So, every user has their own reason to get rid of Cortana.
Microsoft always tries hard to make Cortana better and they have succeeded to some extent. Still, some people are concerned about their privacy and want to disable it. However, you can’t completely delete Cortana from your system. The only way to keep it away is to disable it. In addition to the Settings app, there are several ways to Disable Cortana. We will discuss all of them in the following context.
Disable Cortana After Windows 10 April 2018 Update 1803
Here is How to Disable Cortana After Windows 10 April 2018-
Way-1: Through Windows Settings
If you are cornered about the privacy issue, then you can prevent Microsoft from collecting your personal information. To do it, follow the below steps-
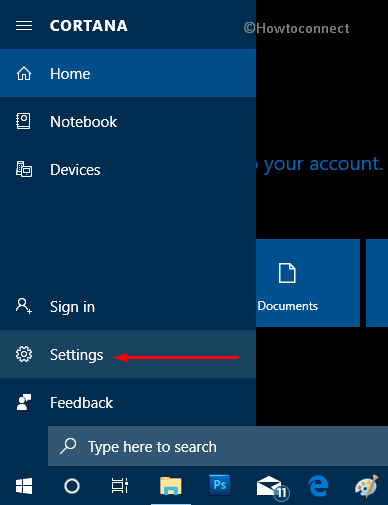
• Make a click in Cortana located beside Start Menu. Now select the gear icon in order to open the Settings.
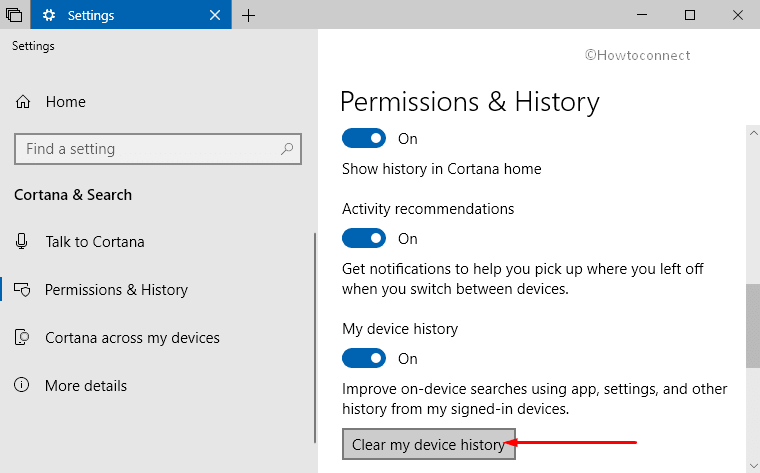
• Once the Settings app comes into the view, do a click on Permissions & History from the left column.
See How to Manage Permissions for Cortana in Windows 10.
• Now shift to the right side and reach out at the bottom of that page. Here you will get the option “Clear my device history“. Once you see it, make a click on it.
After clearing the history, it’s time to disable it. To proceed further follow the below steps-
– First of all, press Win+I hotkeys to open Windows Settings app.
– When it appears, make a click on Privacy.
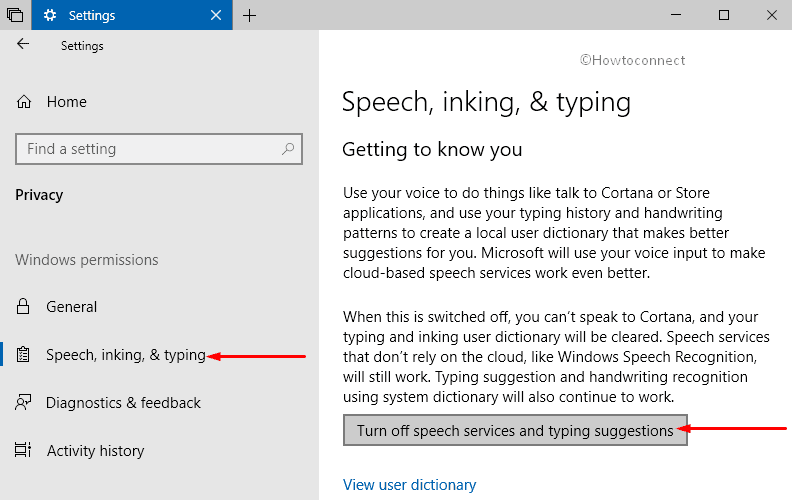
– From the left column, select Speech, inking, & typing.
– Now shift to the right side and do a click on “Turn off speech services and typing suggestions” under Getting to know you section.
You are done. It will disable Cortana After Windows 10 April 2018 and also from taking your personal information.
Way-2: By Renaming Cortana
This way is a little bit complicated but works well to Disable Cortana After Windows 10 April 2018 update 1803. Here is the full procedure, follow carefully.
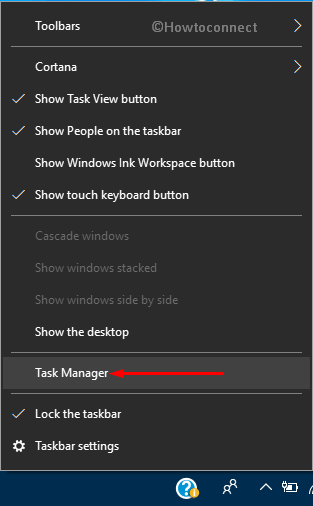
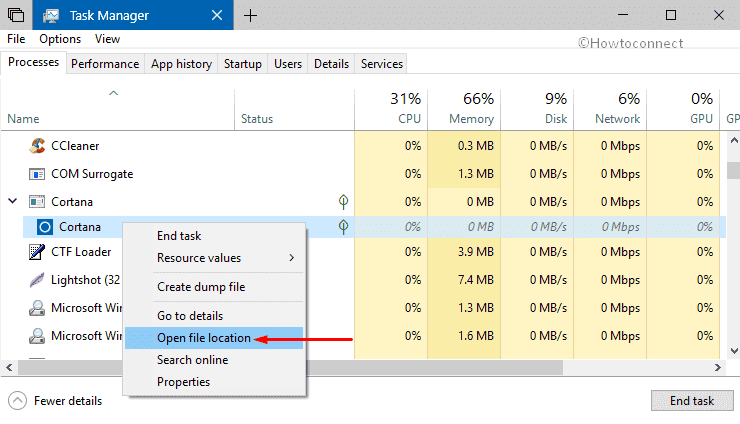
At first, open Task Manager. You can access it by right-clicking on the Taskbar and choosing Task Manager from the list. In addition, by making a combined press of Ctrl+Shift+Esc will also let you launch the tool.
Now make a click on More details if it is not expanded already.
Once the Task Manager shows on the display, locate Cortana in Processes tab.
When you get it, do a right click on it and select Open file location.
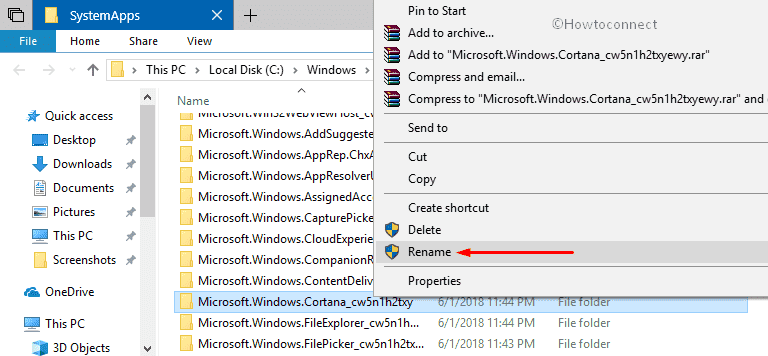
Now SystemApps folder will appear by automatically highlighting the Cortana folder.
Right-click on that folder, select ‘Rename‘ and add .bak at the end of the name. Hit Enter.
After doing these, if an error regarding how Cortana is running in the background shows up, then you have to end it.
To do so, again go back to Task Manager and select Cortana in the Processes tab. Next, do a click on End task. After that perform the above steps again.
In the end, Reboot your PC in order to keep the changes.
Way-3: Use Local Group Policy Editor
This is the best and easiest way to disable Cortana in your Windows 10. Here is the procedure-
Step-1: Perform a click on Cortana and type gpedit.msc in the search box. When the same result appears as the Best match, press Enter on your keyboard.
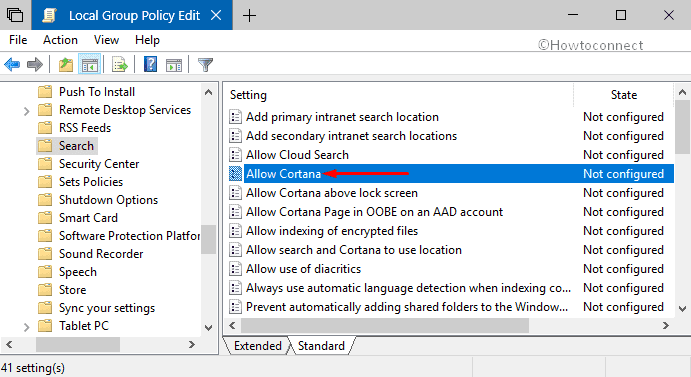
Step-2: Navigate to the below-given path on the left sidebar of Group Policy Editor.
Computer Configuration > Administrative Templates > Windows Components > Search
Step-3: Once you reach the desired path, switch to the right pane, locate the policy Allow Cortana and make a double-click on it.
Step-4: Now the setting configurations of Cortana will pop-up. Do a click on the radio button beside Disabled.
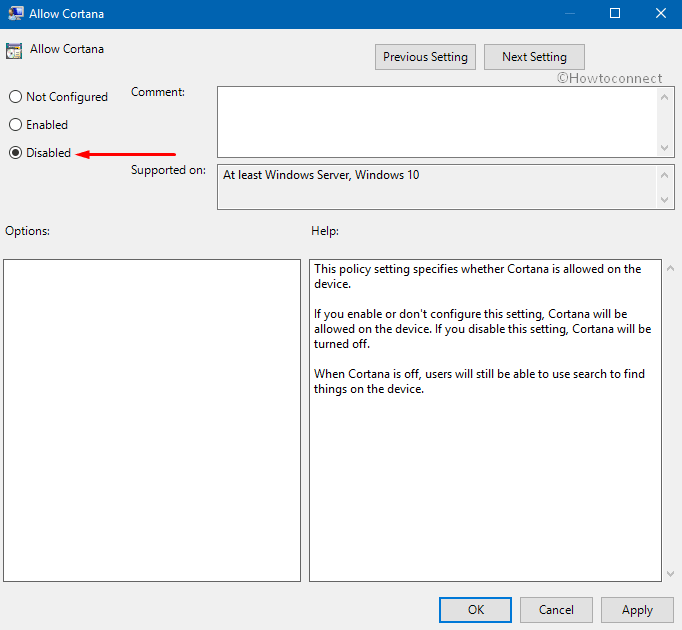
Step-5: Thereafter click on Apply and then OK in order to save the change.
Way-4: Via Registry Editor
Disabling Cortana has become little tough now as Microsoft wants the users to stay with it. But somehow we find out every possible way to get rid of it. Here is another way to disable Cortana-
Make a joint press of Win+R to open Run dialog box on the PC screen.
Type in regedit in the text field and hit Enter. When a UAC prompts up, perform a click on Yes to continue.
Explore more ways to Access Registry Editor in Windows 10.
Now, follow the path to reach out the desired location in the Registry Editor.
HKEY_LOCAL_MACHINE\Software\Policies\Microsoft\Windows
Now locate a key namely Windows Search here. If you don’t get it, there is nothing to worry about. Simply perform a right-click on Windows, hover over New and then select the option Key.
Next, name the key as Windows Search. Make a click on Windows Search and move to the right pane.
Now, do a right click on empty space, click on New and then choose ‘DWORD (32-bit) Value‘.
For reference, you can read How to Create a New DWORD Value in Registry Editor on Windows 10.
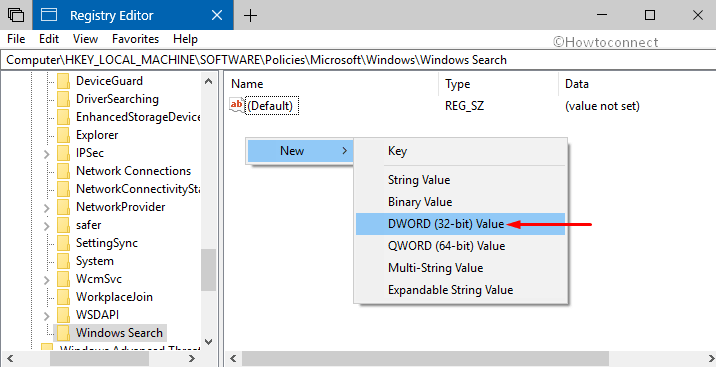
Assign AllowCortana as its name. Moving ahead, make a right-click on the newly created DWORD and select Modify.
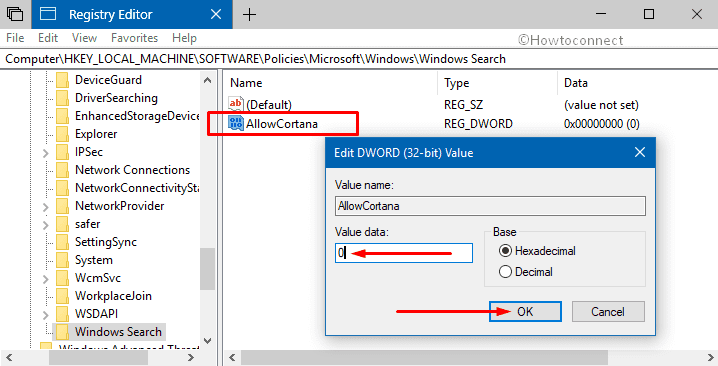
Set 0 as its value and click OK as shown in the below snapshot.
Note: To enable it, set the value as 1, else delete the DWORD AllowCortana.
Once you are done with the above steps, Restart Windows 10 PC. When it will start, Cortana will be disabled and search menu will be simpler as well.
That’s it. However, ensure that with these methods you can Disable this voice assistant but it will not be deleted forever.
#4 only works for the current user even though the changes were made for local machine. I need a registry fix that works for all users of the computer.