To save yourself from incurring additional expenses for the data plan while using a VPN connection, just Allow VPN Over Metered Networks on Windows 10. Commonly, on a restricted data plan if you surpass its usage threshold, you are likely to spend more. However, in a few cases, the Internet provider may not charge you but may throttles down the speed until the billing cycle expires. Focusing on the data package, you can also Enable Metered Connection for Ethernet on Windows 10.
So, the possible workaround to save the data is to always Allow VPN Over Metered Networks on Windows 10. Many of you use this connection either for personal or for work purpose to avail of its benefits. The good thing about VPN is that it provides the best security to your network including the Internet. Therefore, why spend more on data when Windows provides you an option to control it. To keep control of data usage, also learn to Check Monthly Data Usage in Windows 10. The Settings application and Registry Editor offers you ways to manage this specific behavior, let us see how.
Disable / Enable Allow VPN Over Metered Networks on Windows 10
Way 1 – Through Settings Application
Step 1 – To Allow VPN Over Metered Networks on Windows 10, first, launch Settings program on the PC screen. You can do so either by using the key combination Win+I or by selecting Settings option from WinX menu.
If interested in power user menu, read How to Use Win+X Menu Editor v3.0 in Windows 10.
Step 2 – Select Network & Internet icon when Settings application comes into view.
Step 3 – Click VPN on the left sidebar of the next screen. On the corresponding right panel of VPN you can see Advanced Options.
Step 4 – Below Advanced options, use the toggle of the setting namely Allow VPN Over Metered Networks to disable or enable it as per your choice.

Well, you should always enable this specific setting as it keeps your connection safe and also saves you from paying extra charges to the Internet provider.
Way 2 – Using Registry Editor
This is an alternative way that also lets you Allow VPN Over Metered Networks on Windows 10 and is absolutely an appropriate method for advanced users. But at the same time, also be careful and ensure to Import and Export Registry Editor on Windows 10.
Step 1 – Type regedit in Cortana if you prefer to Allow VPN Over Metered Networks on Windows 10. Click the same regedit command when Cortana shows it as the result on top.
Explore additional ways to Access Registry Editor in Windows 10.
Step 2 – Click Yes in case you encounter a UAC prompt on the PC screen.
Step 3 – Navigate to the below-given path on the Registry to reach the destination key –
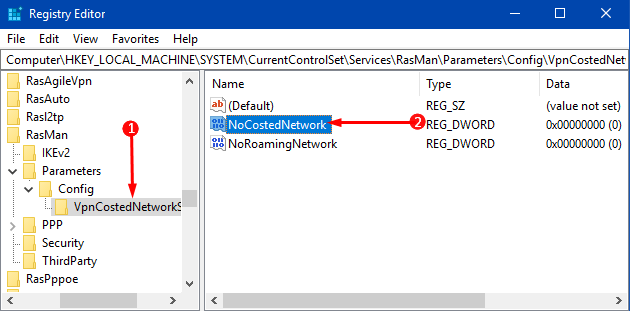
HKEY_LOCAL_MACHINE => SYSTEM => CurrentControlSet => Services => RasMan => Parameters => Config => VpnCostedNetworkSettings
Step 4 – On the opposite pane double-click the DWORD namely NoCostedNetwork.
Step 5 – On its edit box, type either of the below values as per preference to disable or enable Allow VPN Over Metered Networks on Windows 10.
To disable => 1
To enable => 0
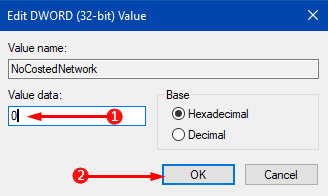
Step 6 – After inserting the required value, click OK to implement the modifications.
Conclusion
Hence, with this specific setting, you can keep control on data usage while using a VPN connection on Windows 10 computer. You can also suggest this small yet significant tip with your friends or colleagues so that they can also get maximum benefit from the connection as well as from Internet provider also. Finally, if you know more procedures that can Allow VPN Over Metered Networks on Windows 10, then feel free to write them in the comments section.