One of the specialties of Windows 11 is you can use it on Touch screen devices. Users particularly those who run the later versions of Surface and tablets from HP, Dell, etc have the option to use touch-capable display. But you might not want to enable this mode because of less comfort, most of all, more battery power consumption. So you might want to disable the touch screen on Windows 11.
If you prefer using keyboard and mouse over touchscreen and want to turn the later off, whatever the reason may be, Device Manager will help. Using this method will again enable the same after a reboot; luckily, you can disable the same permanently through Registry.
Disable touch screen on Windows 11
Here is how to disable touch screen on Windows 11 –
Way-1: Temporary method – Using Device Manager
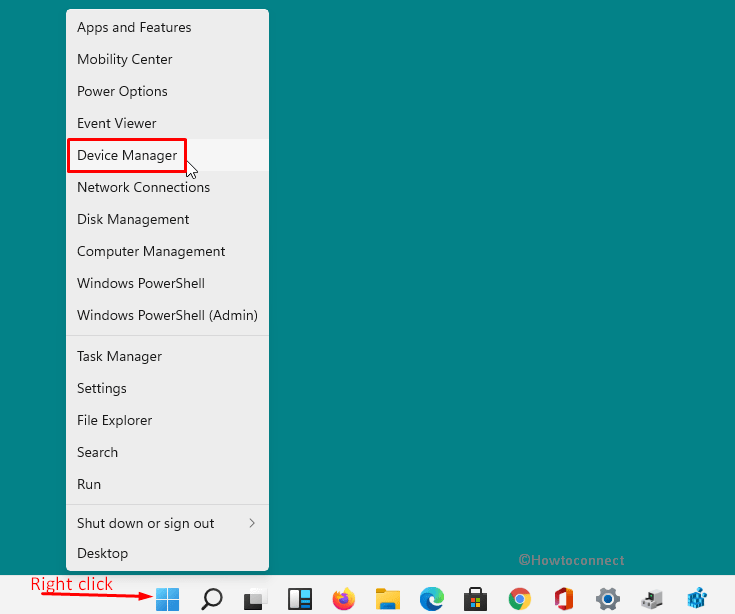
- Right-click on the – Start.
- Select – Device Manager.
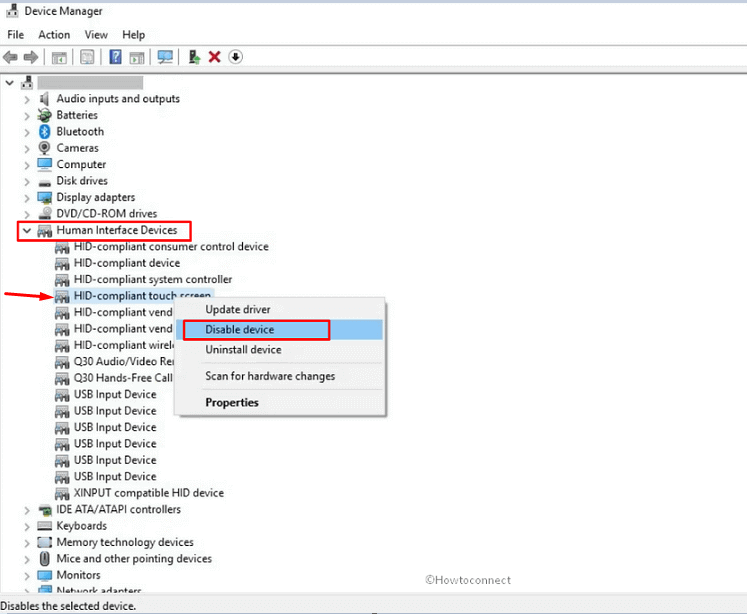
- After Device Manager appears, find Human Interface Devices.
- Double click on it to expand.
- Now, you can see HID-compliant touch screen which is responsible to enable and disable touchscreen on Windows 11.
- To turn it off, right-click on “HID-compliant touch screen” and select Disable.
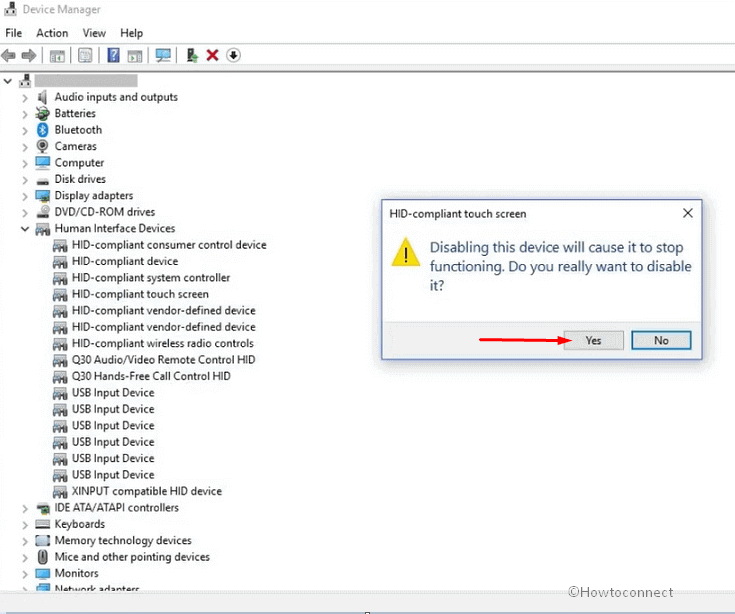
- You will be asked for a confirmation through a dialog box saying – “Disabling this device will cause to stop functioning. Do you really want to disable it?”, select – Yes.
- If you want to turn it back on, right click the device and select Enable from here.
The change simply works after you have disabled from Device Manager but sometimes when it doesn’t a reboot may be necessary.
Way-2: Permanent method – By Modifying Registry Editor
Previous method will work temporarily and the touchscreen will be re-enabled automatically on a restart. If you need to disable touch screen permanently in Windows 11 you need to tweak an entry from regedit/Registry Editor. Follow the steps –
- Click the – Start.
- Type – regedit.exe.
- Press – Enter.
- When User account control appears, Click – Yes.
- Copy the string –
HKEY_CURRENT_USER\Software\Microsoft\Wisp\Touch - Paste into the Registry Editor’s address bar and hit the – Enter.
- Right-click in the right pane and select – New > DWORD (32-bit) Value.
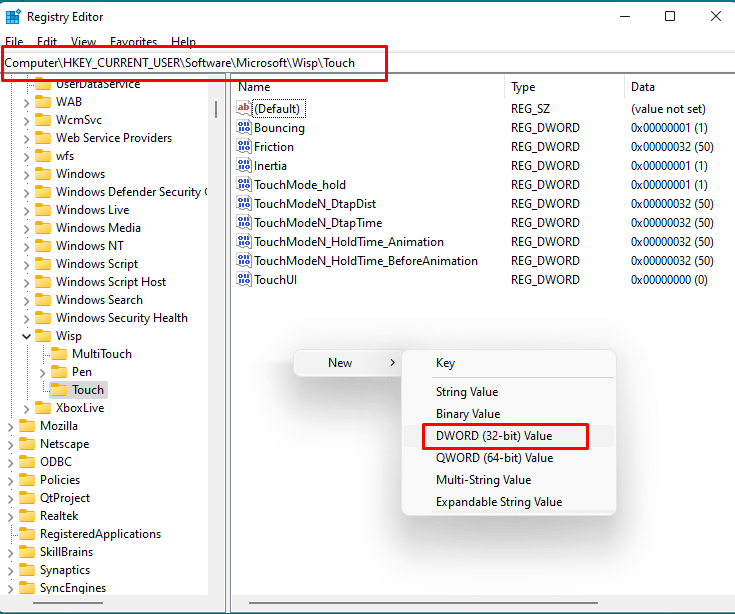
- Name the entry – TouchGate.
- Double click this value and ensure that the value data is 0.
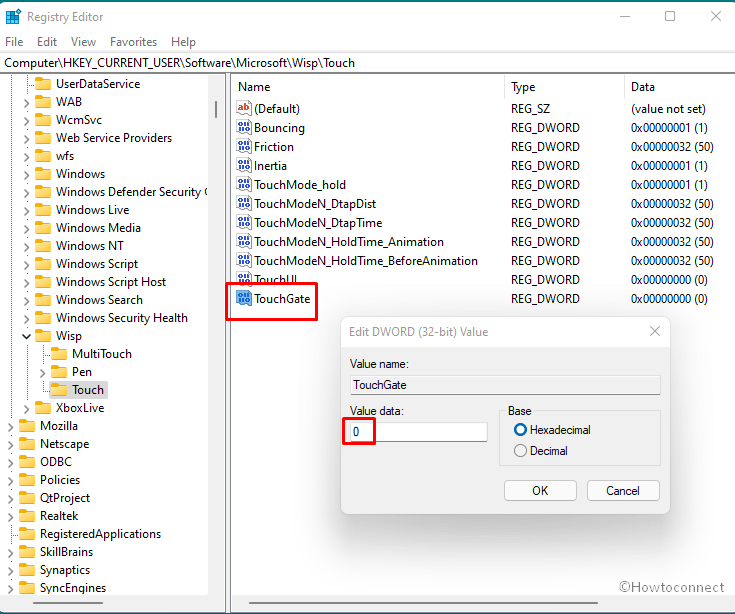
- Close the Registry Editor and restart the device to save the modifications.
- Whenever you want to re-enable, change the value data of TouchGate to 1.
Way-3: Through Registry Script
Users who aren’t proficient with Registry changes can just download and run the following .reg file to enable or disable touch screen –

- Download the above file and unzip it.
- Go to the folder where .reg files are placed.
- Right click on disable_enable_touch_screen.reg and select – Merge.
- Click Yes on both the UAC and registry change warning prompts.
- Restart the PC.
Way-4: Via Windows PowerShell
A PowerShell cmdlet also allows to turn off the touchscreen on Windows 11 tweaking the settings. This will also permanently disable the option making changes in the touch screen hidden settings, you only need to follow steps –
- Press – Winkey+X.
- Select – Windows PowerShell (Admin).
- On the UAC dialog, choose – Yes.
- Copy the following cmdlet and right click on PowerShell to paste the same –
Get-PnpDevice | Where-Object {$_.FriendlyName -like ‘*touch screen*’} | Disable-PnpDevice -Confirm:$false- To enable the touch screen again run the below command –
Get-PnpDevice | Where-Object {$_.FriendlyName -like '*touch screen*'} | Enable-PnpDevice -Confirm:$falseMethods list:
Way-1: Using Device Manager
Way-2: By modifying Registry Editor
Way-3: Through Registry Script
Way-4: Using Windows PowerShell
That’s all!!