Many Mac users have appetency to run Windows OS on Mac PC. After Boot Camp Assistant has got update Windows OS runs quite elegantly and smoothly on Mac. So it is very relevant to install Windows Operating System on Mac so that users run either of Mac and Windows on PC. Windows installation on Mac needs to set up Boot Camp Assistant and install the software update. For this here we are writing steps that will lead to install Windows on Mac PC in an easy way.
Recommended: Tips to Find and Download Update Drivers for Windows 8
Items Required For Installation:
1. A USB mouse and a Keyboard,
2.A disk having ISO Image of either of
a. Windows 7 Professional or Ultimate or Home Premium,
b. Windows 8 or Windows 8 Pro (64 bit) ISO Image.
You can download ISO image from Microsoft Official Website.
3. An MS-DOS Formatted USB external memory.
Steps to Setup Boot Camp Assistant, Run Windows OS on Mac PC
1. Connect your PC with power through adapter before starting installation.
2. Backup all files of Mac PC having great significance.
3. Check for updates on your Mac PC. Although Mac OS automatically receives and install updates on PC, but checking will ensure that no updates are given up anyhow which is must condition to install Windows successfully on your Mac PC.
4. Log in your Mac PC using administrator privilege. Close all apps.
5. Select Apple Menu and then Software update. Now you have to install all present updates. After completion of updates installation, your PC will reboot. After rebooting, again select the options Apple Menu and Software Updates. In this way you will be able to install all updates on your Mac PC. If you are needed of updates anymore go to this webpage.
6. Role of Boot Camp Assistant starts Now. It makes your Mac ready to create a windows partition and launch window installer.
7. Launch Boot Camp Assistant. You will get different instructions time to time after you launch Boot Camp Assistant. Follow these instructions carefully and go ahead.
8. After a few steps, you will be asked for Windows partition. If you are installing Windows 8 you should create partition of more than 30 GB. For Windows 7 you can make partition lower than that. In coming few steps you will be asked to format Windows Partition.
9. Place Windows installation disc to Optical drive.
10. Hit on Install.
11. Now Boot Camp Assistant comes into action again and makes Windows Partition. It also Reboots Mac PC and launches Windows Installer.
12. After launching Windows installer go after the instructions you see. You will have to choose either custom Installation or upgrade. Here, select Custom Installation.
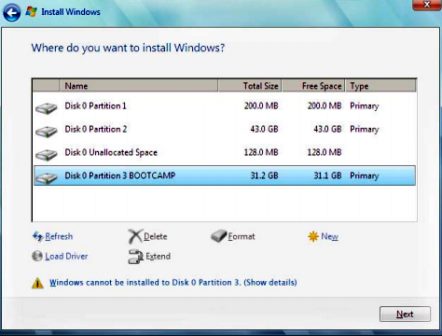
13. After these processes finish you have to tell the place where the windows will be installed. Choose the Partition Bootcamp.

14. Hit on the Drive options (advanced).
15. Click on Format.
16. Click on OK.
17. Hit on Next. Windows Partition will be formatted with NTFS File System.
18. During installation, you will again get different instructions time and again. Follow these instructions carefully. These will lead to complete the installation and configuration process of the Windows.
19. After finishing the installation Mac reboot. Configure the OS using Setup screen.
20. Windows installation process completion will administer Support Software and drivers installation. It will also install Bootcamp drivers. The support software will install all the drivers and software that will help to run the Windows OS on the Mac PC hardware. You can have the latest support software from here. Copy the support software to formatted USB external memory as MS DOS (FAT).
21. After then an installer will be launched on its own. If it is not launched click setup.exe in Bootcamp folder of the external memory.
22. While the setup is being installed may instructive messages will be prompted one by one. Follow what the messages tell. A message written the software you’re installing has not passed Windows Logo testing hit on Anyway. Wait until few installer dialogues pass away. If everything goes still Check Taskbar.
23. Your PC will reboot again. Here again, go after the instructions you get. Search for updated Windows support software through Software update or clicking here.
24. Start your PC after the installation of windows is finished. Here select the disk with which OS you want to start your PC and restart.
Enjoy Windows OS on Mac PC.
