Hotspot 2.0 aka HS2 and Wi-Fi Certified Passpoint is a new technology related to network standard that allows connecting public WiFi automatically keeping security intact. It’s nothing but makes the process easier and offers an encrypted connection between client and access point. Most of all, you don’t need to look through multiple networks manually to find out which one is available nearby.
Windows 10 automatically determines the safe one for you and set up a connection between. Hotspot 2.0 uses IEEE 802.11u to be in contact with the provider. And once connected, authentication and encryption are provided by using WPA2-Enterprise together with one of several EAP methods.
Enable and Disable Hotspot 2.0 Networks in Windows 10
Here is how to enable and disable Hotspot 2.0 Networks in Windows 10 –
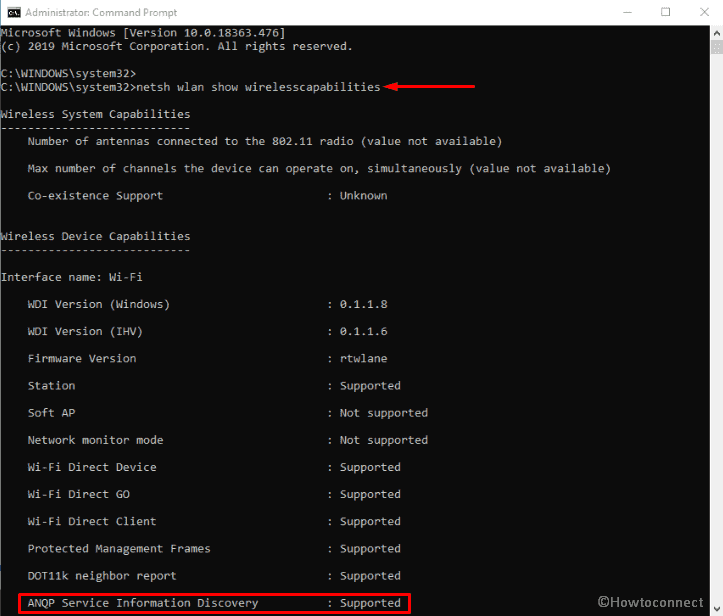
Before jump into the process straight away, we suggest you check whether your PC supports Hotspot 2.0 Network or not. Here are the steps to do so –
- Click on Windows search icon located at the taskbar and type cmd.exe.
- Select Command Prompt from the appearing result.
- Copy the following line and paste it after the blinking cursor –
netsh wlan show wirelesscapabilities
- Hit Enter to execute the command line.
- Move down and check the status of ANQP Service Information Discovery. If it’s Supported then you can continue further otherwise stop here as below described procedure will not work on your PC.
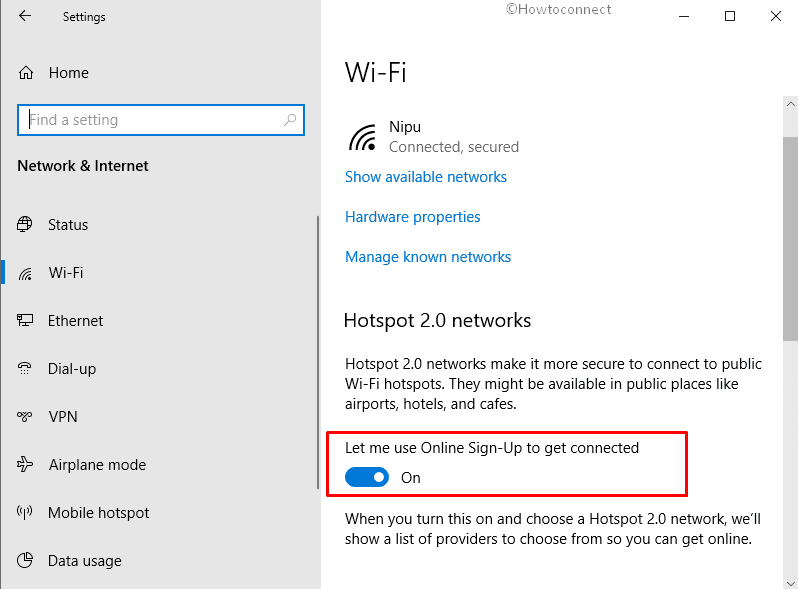
1] Through the Windows Settings app
- Press Win+I and select Network & Internet.
- Choose Wi-Fi from the left surface and go to right.
- Turn on the toggle button for Let me use Online Sign-Up to get connected.
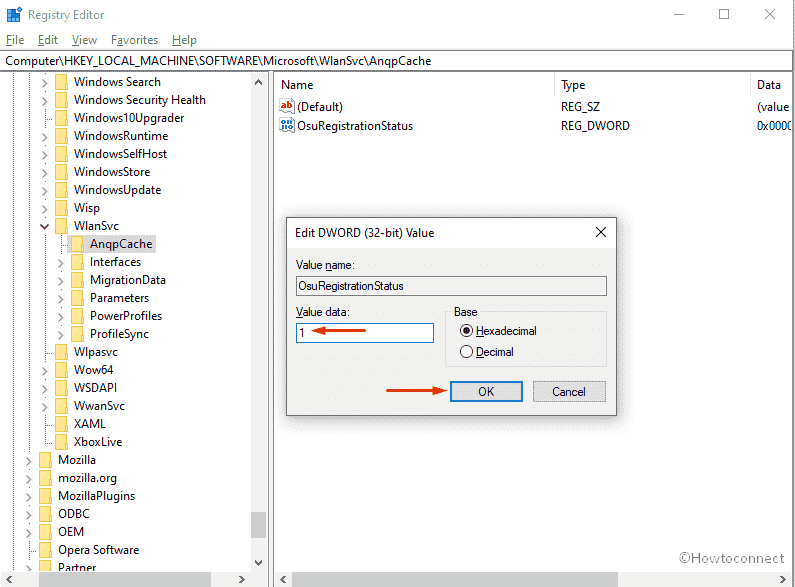
2] Tweak the registry to turn on the Hotspot 2.0 network
Follow the below steps carefully while configuring the registry as a wrong move can harm the PC –
- Press Win+R and type regedit.exe in the dialog box.
- Click the OK button.
- On Registry Editor, navigate the following path –
HKEY_LOCAL_MACHINE\SOFTWARE\Microsoft\WlanSvc\AnqpCache
- Double-click on OsuRegistrationStatus DWORD from the right-pane to modify the value.
- Put 1 in the Value data box and click on OK to Enable Hotspot 2.0 Network in Windows 10.
See more posts on network –
1] How to Edit Network Name, Password for Mobile Hotspot Windows 10
2] How to Choose a Network to Share via Mobile Hotspot in Windows 10
3] How to Copy Network Properties to Clipboard in Windows 10
4] How to Enable / Disable Allow VPN While Roaming on Windows 10
5] 4 Ways to Connect to WiFi on Windows 10
Methods:
1] Through Windows Settings app
2] Tweak the registry to turn on Hotspot 2.0 network
That’s all!!