Methods to Enable and Disable Location Services in Windows 10 with steps. – Multiple apps and third-party tools need and use the location of your PC to provide their services. Map traces the location of PC and helps you in exploring nearby restaurants. But there are many users who don’t want certain applications to use the location service. Well, for those users, Windows includes few location settings so that they can have control over it. So, in this guide, we present you the guidelines to Enable and Disable Location Services on Windows 10.
There are certain applications that need to know the location information of your device before it can render its service. So, when these applications are run for the first time, they seek your approval to track the location details of the device. After granting permission, in future if you don’t want to share the location of the device with any app, you can anytime disable location services on Windows 10. Pursue a similar guide on [How To] Change App Permissions On Windows 10. So, Windows 10 includes specific location settings to manage location services for account, apps, and device respectively.
Ways to Enable and Disable Location Services on Windows 10
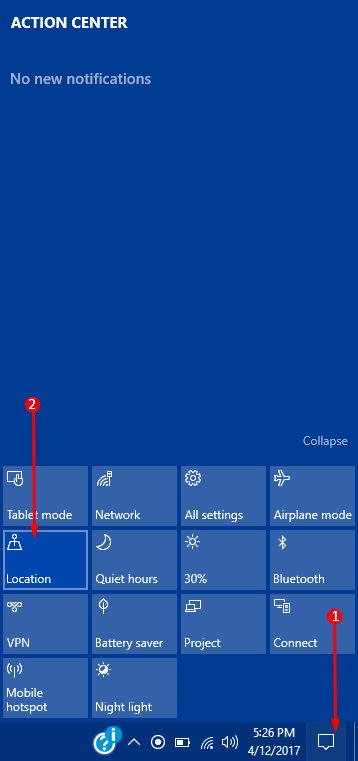
Method 1 – Through Action Center
Step 1 – Launch Action Center and to do so click the tiny icon that exists on the extreme right of the taskbar. Alternatively, you can also make it appear by pressing Win+A keys altogether.
You can Determine App Notification Count to Show in Action Center Windows 10.
Step 2 – If you cannot see the buttons on the Action Center, click Expand to view all of them. Now, locate Location button and click on it to enable or disable it. If Location button is highlighted, then the service is enabled and if it is not highlighted, the feature is disabled.
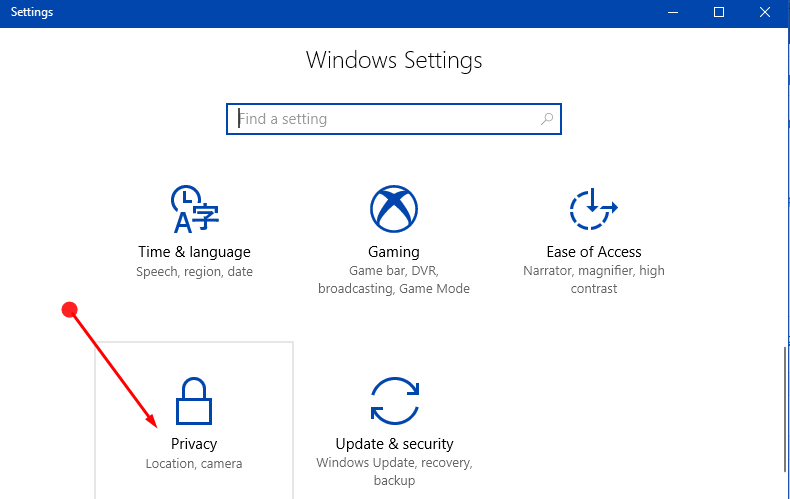
Method 2 – Using Settings Application
Step 1 – Open Settings program by jointly pressing Win&I keys. When various categories appear on its homepage, locate and select Privacy.
Read our similar guide on How to Avoid Privacy Issues on Windows 10.
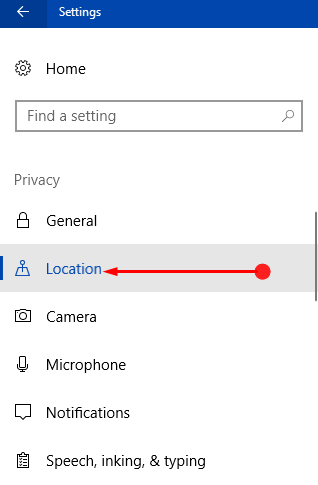
Step 2 – Privacy settings page provides few segments on its left sidebar, so click Location.
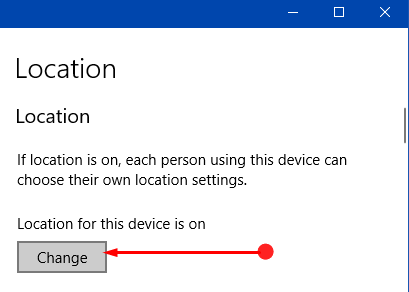
a. Enable and Disable Location Services for this Device
Note – Settings program gives you the provision to control location services for your device (PC). In addition, keep in mind that you must possess administrative authorities before performing the below steps.
Step 3 – Shift to its right pane and click the Change button that appears underneath Location heading.
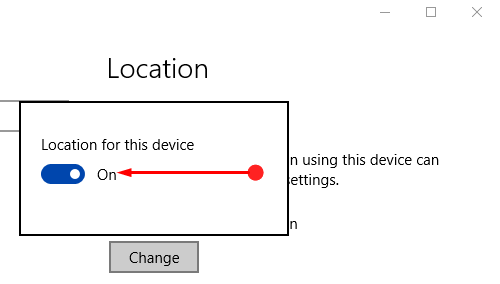
Step 4 – On another pop-up, use the slider and turn ON the slider for the option Location for this device. This will enable the location service for this (your) device.
Noteworthy point is that Location service for this device is enabled by default.
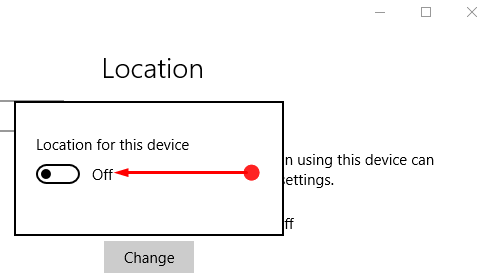
Step 5 – To disable the service, click on Change button and moreover, toggle OFF the slider of Location for this device by pulling it towards left.
b. Enable and Disable Location Services for Apps and Account
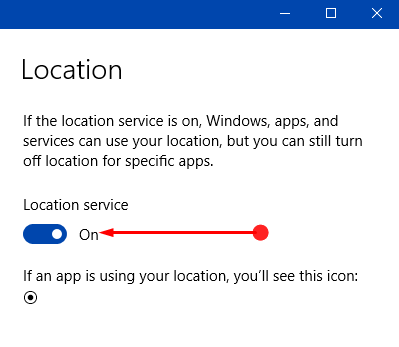
Note – Before you follow the below directions, make sure that the Location service for this device is enabled by the administrator either using Method 2a or 3a.
Step 6 – On the right panel of Location, find the option Location service. Switch ON the setting and this will enable location service for apps and account (This is the default setting).
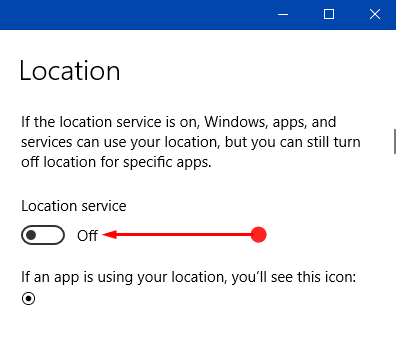
Step 7 – Switch OFF the option Location service and specifically disable the feature for both your account and applications.
Method 3 – Via Registry Editor
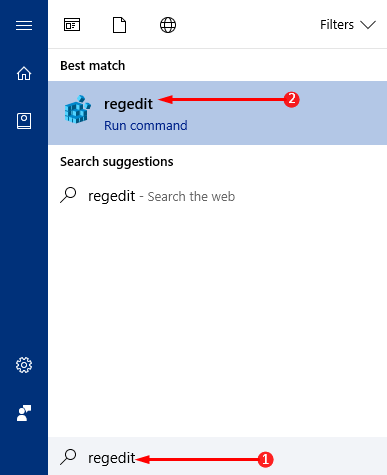
Step 1 – On Cortana search field, type the command regedit and when she displays the same command, click on it.
For reference, you can read How to Access Registry Editor in Windows 10 – 5 Simple Tips.
Step 2 – UAC prompt will come up displaying the details of the tool. Give permission by clicking Yes and let Registry Editor open.
a. Enable and Disable Location Services for this Device
Note – Registry Editor also gives provision to enable and disable location service for this device but to carry out this procedure you must hold admin authorities.
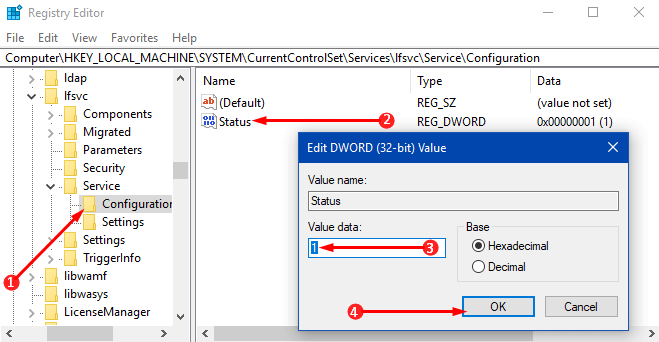
Step 3 – On the Registry Editor, browse to the below path.
HKEY_LOCAL_MACHINE => SYSTEM => CurrentControlSet => Services => lfsvc => Service => Configuration
Step 4 – Shift to the right pane of Configuration key where a DWORD with a name Status will be visible, double-click on it.
Step 5 – To Enable Location for this device, input the value 1 on its edit box. Click OK to implement the change in the service.
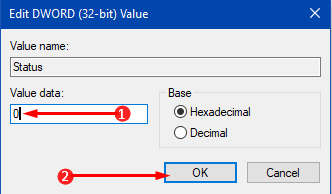
Step 6 – To Disable Location service for this device, set 0 as its value and finally, click OK to make the changes effective.
b. Enable and Disable Location Services for Apps and Account
In order to follow this way, ensure that Location for this device is enabled using Method 2a or 3a.
Step 7 – After opening Registry Editor, navigate to the below path on the left sidebar.
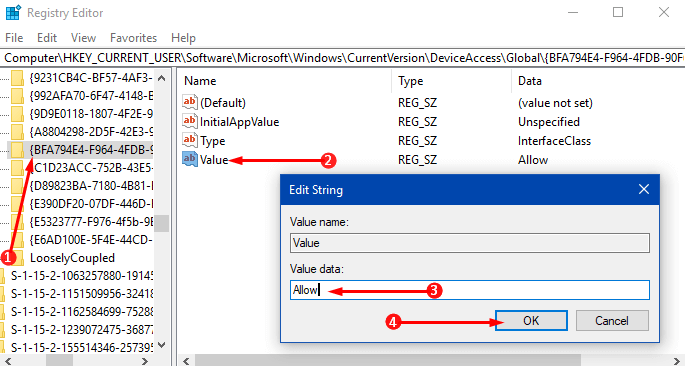
HKEY_CURRENT_USER => SOFTWARE => Microsoft => Windows => CurrentVersion => DeviceAccess => Global => {BFA794E4-F964-4FDB-90F6-51056BFE4B44}
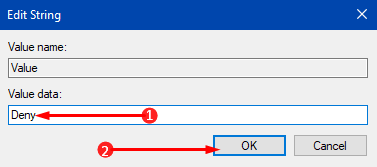
Step 8 – Once you reach the above key, find the string value with a name Value on the right pane and double-click on it.
Step 9 – To enable location services for apps and account, set its value as Allow on the edit box. Click OK.
Step 10 – To disable location services for apps and account, assign the value as Deny and click OK.
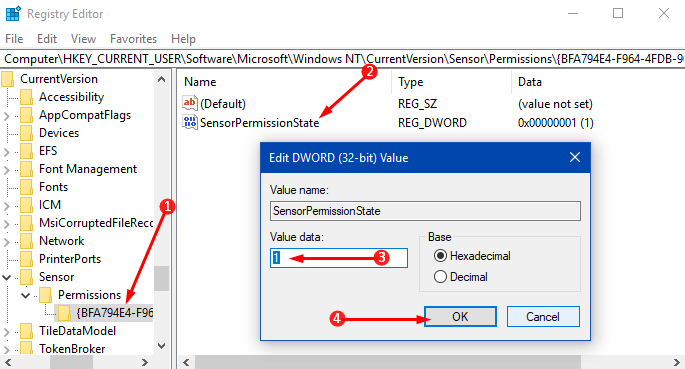
Step 11 – Once you change the string value, you have to modify DWORD also. To do so, travel to the below path.
HKEY_CURRENT_USER => SOFTWARE => Microsoft => Windows NT => CurrentVersion => Sensor => Permissions => {BFA794E4-F964-4FDB-90F6-51056BFE4B44}
Step 12 – On its right pane, find and double-click the DWORD SensorPermissionState.
Step 13 – A small edit box will pop-up, so, type 1 to enable or insert 0 to Disable Location Services for Apps and Account.
Conclusion
Hence, to Enable and Disable Location Services on Windows 10, the OS provides you a few distinct ways. Well, Registry Editor is generally for the advanced users. Normal users can manage location services using other ways pretty much easily. If you have more tips to manage location services on Windows 10, please write down to us.
Local group policy is another way. Anyone know a way via script that doesn’t include the registry?