Guide and Steps to Enable moreover Disable New OneDrive Flyout on Windows 10. – You might have known that Windows 10 has replaced the old Notification Flyout of OneDrive with a new one with the effect of Build number 14986. The pane of the new OneDrive Flyout one is larger in size and has a menubar on the top. But certain users still like the long-standing traditional Notification Pane for the built-in Cloud Store. You can go through a similar guide – How to Restore Old Battery Flyout on windows 10 in this concern.
A Registry hacking is Quite helpful when you are eager to Enable and Disable New OneDrive Flyout on Windows 10. So if you like to reject the change you can use this registry manipulation. In addition, you can restore the flyout with a small change in the Value data of the key.
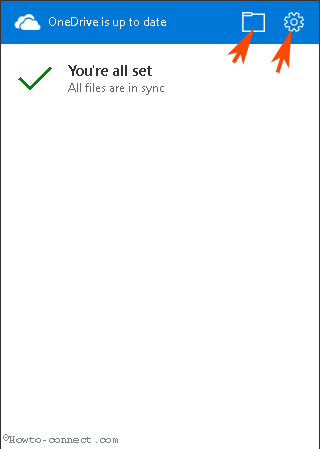
The changed bigger OneDrive Flyout shows you the notifications on the tile below the title bar. You can view two icons on the title bar – one for Settings cog and another for OneDrive Directory. Setting Cog navigates to the Microsoft OneDrive Dialog box allowing you to customize different sections of Settings. The Folder icon on this bar launches the OneDrive Directory.
Enable and Disable New OneDrive Flyout on Windows 10
Step 1 – Press Winkey, type regedit and lastly gently hit Enter key on your Keyboard.
Step 2 – A pop up will ask you “Do you want to allow this app to make changes to your device?” having two options – Yes and No. Select Yes and allow the interface to come.
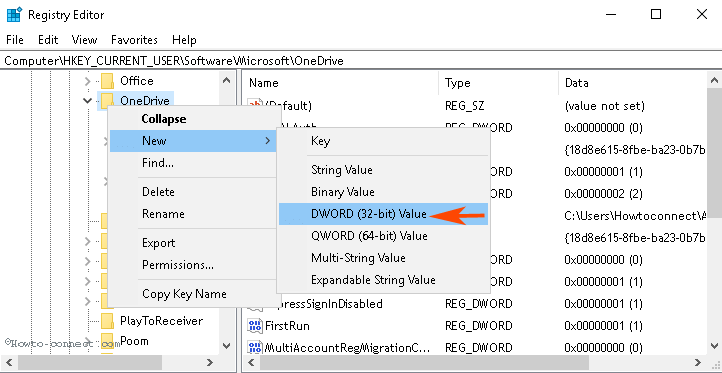
Step 3 – Once the Registry Editor appears, Navigate to the following path
HKEY_CURRENT_USER\Software\Microsoft\OneDrive
Step 4 – Before starting a registry manipulation, take a backup of the OneDrive key. Right click on OneDrive and select Export on the list. Determine a favorable location and save the registry file. If you have no idea follow this guide How to Import and Export Registry Editor on Windows 10.
Step 5 – Right click on OneDrive string in the right pane and pick New afterward DWORD (32-bit) Value on the list of options. Name the new key ForceLegacyLayout.
Step 6 – Now go to the left pane and double-click on ForceLegacyLayout.
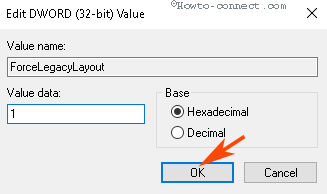
Disable New OneDrive Flyout
Type 1 in the Value data field of ForceLegacyLayout value and select OK. Go to the OneDrive flyout and make sure that it is the old one.
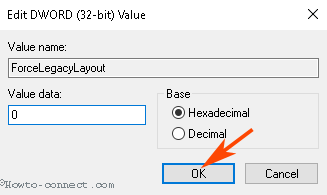
Enable New OneDrive Flyout
If you again want to get the New OneDrive Flyout, type 0 in the value data field of ForceLegacyLayout value and select Ok.
Conclusion
Ergo the registry hacks and Steps to Enable and Disable New OneDrive Flyout on Windows 10 work like wonder. The new flyout of OneDrive is elegant and suitable for the modern look of Windows 10. So now you can opt for keeping or lay off.