DISM Error 50 occurs when users try to run certain commands using this built-in tool in Windows 10. The root cause of this problem is that the OS assumes that the location from where you execute the command is within WinPE (or Pre-installation Environment). This presumption of Windows actually happens because of a misplaced registry key.
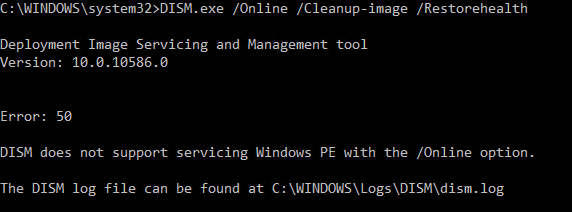
You all know that DISM is generally used to refresh as well as prepare an image on Windows. Not only that but when a system checker finds some corrupted files, it helps to repair them based on the scan results. But very few users coming forward with complaints about DISM Error 50 recently. They are repeatedly getting the following error message after running a DISM command on their computers. Let’s move towards the promising solutions that help you to carry out the scans without error.
“Error 50 DISM does not support servicing Windows PE with the /online option. The DISM log file can be found at x:windows\dism\dism.log”
How to Fix DISM Error 50 in Windows 10
There are three different ways to fix DISM error 50 in your Windows 10 computer. They are:
- Refresh DISM Tool.
- Delete Registry Key.
- Reset the BIOS.
Let’s go to the details.
Solution 1 – Refresh DISM Tool
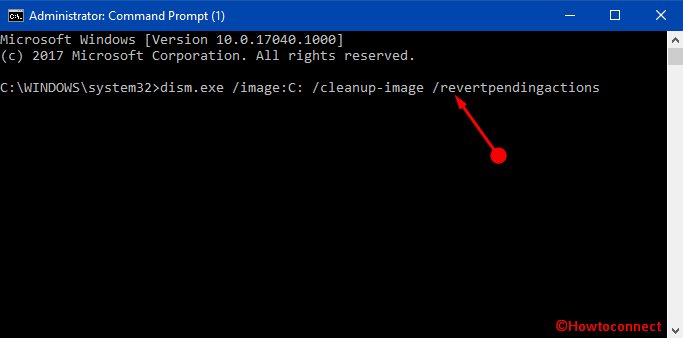
Step-1: First of all, launch an elevated Command Prompt to overcome DISM Error 50 in Windows 10. To do so, type cmd on Cortana text field. Then, keeping a hold on Ctrl and Shift keys, hit Enter. At the prompt of UAC, click Yes.
Step-2: Now, type in or copy/paste the below command and hit Enter to execute it.
dism.exe /image:C:\ /cleanup-image /revertpendingactions
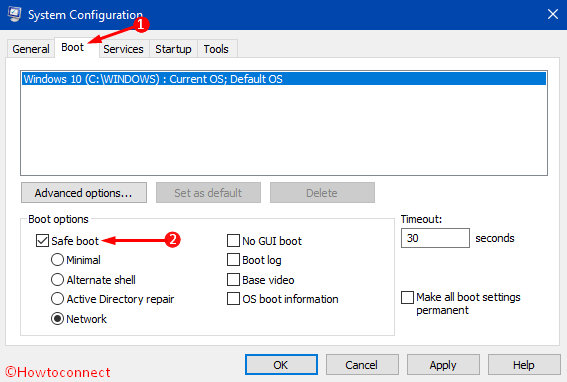
Step-3: Moving ahead, open Run dialog and type msconfig. This immediately shows up System Configuration on the PC screen. Switch to the Boot tab and tick mark the option namely Safe Boot.
Explore more 3 Ways to Boot Windows 10 Into Safe mode.
Step-4: After successfully entering the “Safe Mode”, again launch Command Prompt with admin rights.
Step-5: Now, type in sfc /scannow and wait for the scan to finish. Once the scan gets over, finally, boot into Windows normally.
Note – If you are unable to carry forward the steps from Safe Mode, then there is a way out. Switch to the local user account and run the above command to refresh the DISM tool.
Solution -2: Delete Registry Key
The other workaround to fix this DISM issue is to delete the associated Registry Key.
Step-1: Open Run dialog by using any of your preferred methods. However, the quick one is to press Windows key + R shortcut keys on your keyboard.
Step-2: In the text box of the dialog, type regedit and click OK button. A UAC warning may evoke, click on Yes in order to agree to the terms.
Step-3: It straight opens the Registry Key window, navigate to the below-given path on the left sidebar.
HKEY_LOCAL_MACHINE\SYSTEM\CurrentControlSet\Control
Note – Additionally, copy/paste the path in the Registry to directly reach the key.
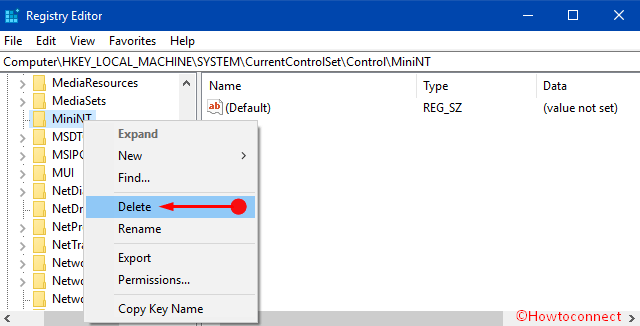
Step-4: Once you reach the Control key, locate a folder namely MiniNT. Put a right click on it and click on the option Permissions.
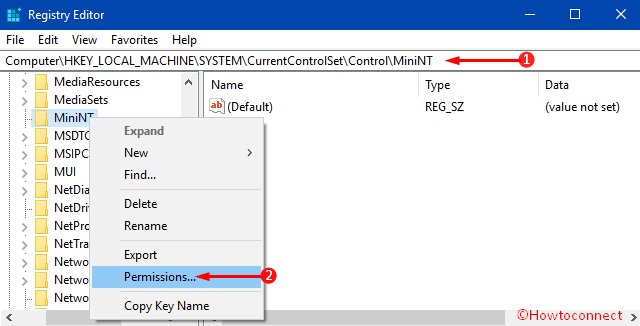
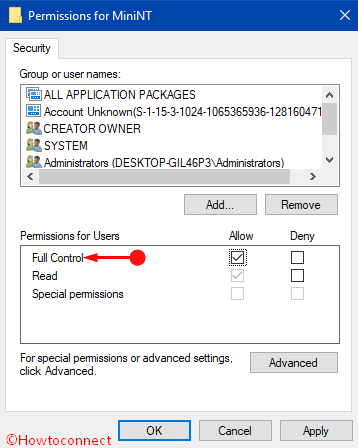
Step-5: On the dialog that pops-up, you can notice Group or user names list. Go through the list and select your username. After choosing it, select the checkbox against the option Full Control. Lastly, click on OK when you are over modifying the permissions.
Step-6: Now hit a right click on the MiniNT key again and select the option Delete.
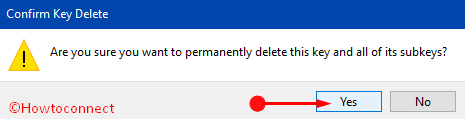
Step-7: You may get a message for the deletion process, click Confirm in the first place.
After finishing all the tasks successfully, restart Windows 10 PC. When you start the computer again, run the command and error should be abolished. Hence, it is easy to get rid of DISM error 50 in your computer by deleting the registry key. In case, you can’t resolve the problem using this way, proceed to the next method.
Solution-3: Reset the BIOS
You may find this DISM error persisting even after deleting the registry key. In such situation, we commend you to Restore your “BIOS“ to default settings. Booting the BIOS should be enough too. The booting procedure varies from model to model of computer. Therefore, you should follow the maker’s manual and instructions in order to boot your BIOS as well as restore your BIOS to default.
Conclusion
Refreshing as well as preparing the image to repair the corrupted files, it DISM part actively. As a result, any malfunction in this tool is not acceptable at all. Therefore, we have discussed the ways to fix DISM error 50 in your Windows 10 operated computer. Hope these will be effective in your case too and you can enjoy the operation of DISM again.
Thank you Tom, corrected
dism.exe /image:C: /cleanup-image /revertpendingactions
This command is incorrect and should read
dism.exe /image:C:\ /cleanup-image /revertpendingactions