Do you encounter Error Code 0x80070643 along with a warning message Failed to Install MSI Package in Windows 10 PC? If yes, then don’t worry as this article provides a decent range of solutions to fix this issue. Microsoft releases system updates to rectify the already present bugs and problems on your current operating system. If connected to the internet, Windows 10 based device automatically looks for updates to make the system more efficient and smoother as well.
Failed to Install MSI Package in Windows 10 is one of the more frequent error messages as compared to its previous versions. In general, this problem pops up while performing KB3106246, KB2267602 installation. Update or its installation often fails with the presence of stop code 0x80070643. This is associated with MSI software update registration, MS 2003 Components moreover .NET Framework. It mostly occurs if any of them is corrupted or if the system files get damaged somehow. In such scenarios, Windows update fails to access certain user data and thus leading to this issue on your PC. Here in this article, we will discuss several promising solutions such as Configuring .NET Framework, repairing Windows Updates Components, checking and system files to fix this bug entirely.
Error Code 0x80070643 Failed to Install MSI Package in Windows 10 Solutions
Here is how to fix Error Code 0x80070643 Failed to Install MSI Package in Windows 10 –
Repair or Update Windows .NET Framework
The outdated or corrupt file might be responsible for occurring of Error Code 0x80070643. Therefore you must update all of them. The “.Net Framework” is an application for software installation or system update. Now, if .NET Framework is active on your device, always make an attempt to keep it up to date. Therefore, the most feasible way to get rid of Error Code 0x80070643 Failed to Install MSI Package in Windows 10 is to either update or troubleshoot .NET Framework.
Downloading the .Net Framework Repair Tool from Microsoft and running it in your PC may resolve this trouble.
Manually Repair .NET Framework
If the above solution doesn’t work efficiently on your PC, try to manually repair this tool by going through these easy series of steps.
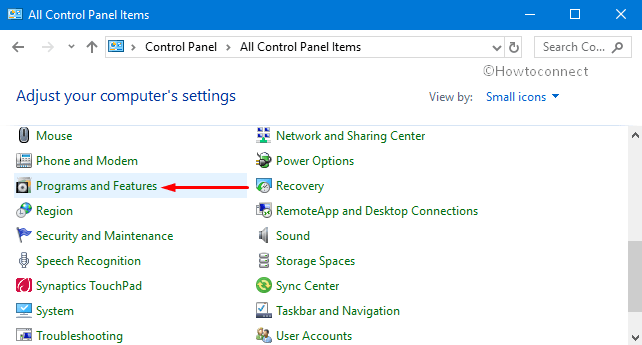
At first, click on the Cortana box and type Control Panel. Hit on the result to open Control Panel.
Make the icons into smaller view and then choose Programs and Features.
Move to the right pane and right-click Microsoft .NET Framework 4 Client Profile from the visible list of programs. Now, hit the Change option.
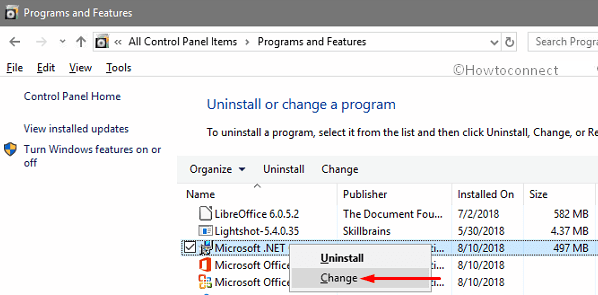
Mark the first option from pop-up window namely Repair .NET Framework 4 Client Profile and click the Next button.
Now go through the onscreen instructions and wait for a few seconds to repair this tool.
Note: If you cannot locate the “Microsoft .NET Framework 4 Client Profile” then download as well as install it to bypass the error.
Check Office Source Engine Service
If you occupy MS Office 2003, you may need to every now and then install its components. So, if you are confronting Error Code 0x80070643 including Failed to Install MSI Package in Windows 10, ose.exe file of Office 2003 might be the culprit. In that case, you need to restart Office Source Engine (OSE) to solve the problem.
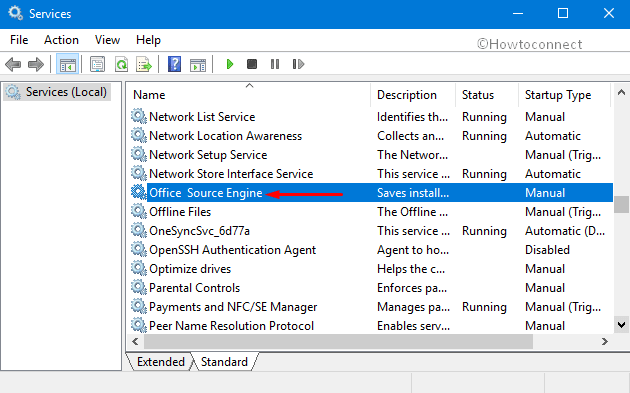
Access Run dialog box and type services.msc on the available space. Click OK to open Services.
On the console, locate and double-click the service namely Office Source Engine (see snapshot).
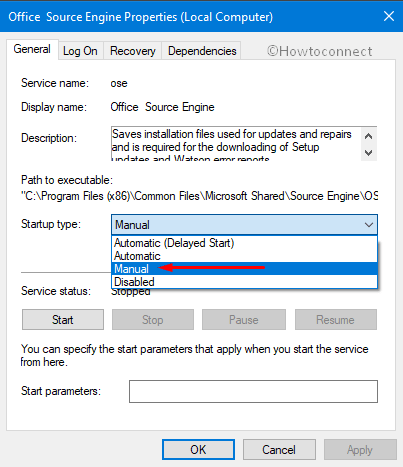
Click the Startup type drop-down and pick Manual. Click OK to save the changes of the service and check for the error code.
Use Windows Update Troubleshooter
Windows 10 has yet another useful inbuilt troubleshooter to resolve the common issues that occur. After running, it will make an attempt to solve this problem automatically and let your system run error free.
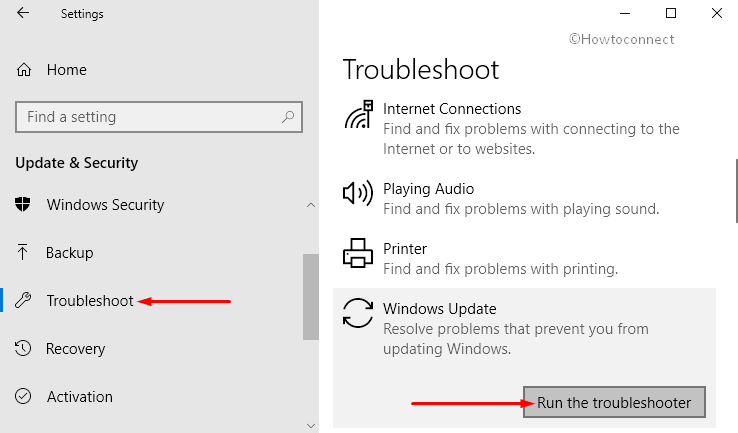
Open Windows Settings program by jointly hitting Win + I shortcut keys. From the main interface, click the Update & security category, the last one.
On the left sidebar, choose the Troubleshoot option.
Now, jump to the right pane, locate Windows Update. Select it and click Run the troubleshooter button from the detail pane.
When the wizard will come, it will start detecting the issues related to Windows Update. Follow the on-screen instructions to choose the problematic area and wait for some time until it tries to fix.
Finally, check whether this resolves the Error Code 0x80070643 Failed to Install MSI Package in Windows 10.
Restart Windows Update Components
There is a possibility that several Windows Update components are basically the reason behind the occurrence of ‘Failed to Install MSI Package in Windows 10’ Error message. You need to restart these components and the security center of your system to fix the issue. You should first stop all these services and rename the SoftwareDistribution and cartoon2 folder, then start these components again.
Open Run dialog box by hitting “Win + R” shortcut keys altogether. Here, type CMD in the blank text field of Run. Now, to access it with admin rights, jointly press “Ctrl + Shift + Enter” hotkeys.
See our article on How to Open Command Prompt as Admin From Run Dialog in Windows 10.
If UAC prompts up on the computer screen, go ahead with the Yes option. Type the given below commands to stop these services and hit Enter after each command.
net stop wuauserv
net stop cryptSvc
net stop bits
net stop msiserver
net stop wscsvc
Rename SoftwareDistribution and catroot2 folders just by running the underneath commands.
ren C:\Windows\SoftwareDistribution SoftwareDistribution.old
ren C:\Windows\System32catroot2 Catroot2.old
If you are not comfortable with Command Prompt you should access ‘File Explorer‘, navigate to this path and right click on it.
C:\Windows\SoftwareDistribution
Here, perform a right-click on it, select Rename option. Change it as SoftwareDistribution.old.
Repeat these steps for the catroot2 folder as well.
Once the renaming process is completed start again those services. Just type or copy/paste the below-given commands and hit Enter at the last of each.
net start wuauserv
net start cryptSvc
net start bits
net start wscsvc
Once you successfully execute the above commands, restart Windows 10 PC. Hopefully, after going through this workaround, the system will no more encounter issues like Error code 0x80070643.
Perform Windows Update
For many, performing Windows Update helped in resolving Error Code 0x80070643.
Click the Start icon on the left of the taskbar and select Settings. Choose Update & Security tab on the homepage of the application.
On the right-hand side of Windows Update, make a click on the Check for updates button.
If they are available, grab and install them right away.
Check and Repair System Files
SFC /Scannow and DISM.exe are impactful commands that use to detect moreover repair corrupted Windows system files. In multiple cases, when internal Windows error occurs on your device, Windows updates will just stop functioning and display failure messages with various stop codes. Just execute these commands on elevated Command Prompt and you are done.
Open the taskbar search box and type cmd. Command Prompt icon will appear as the Best match. Right click on its icon and select ‘Run as Administrator‘ option from the context menu.
When this prompts up UAC dialog on your display screen, hit Yes.
Now type sfc /scannow and press Enter. This will take some time to search corrupt files present on your PC. You have to be patient and wait till the built-in tool repairs the faulty system files automatically.
Proceeding forward, execute this given list of DISM commands to bypass Error Code 0x80070643 Failed to Install MSI Package in Windows 10.
DISM /Online /Cleanup-Image /CheckHealth
DISM /Online /Cleanup-Image /ScanHealth
DISM /Online /Cleanup-Image /RestoreHealth
For reference, see SFC /Scannow, DISM.Exe, CHKDSK Windows 10.
Uninstall Antivirus Completely
Most of the time, the presence of third-party antivirus solutions can also lead to the Error Code 0x80070643. Their installation or configuration method may interrupt certain areas of your system which results in this specific issue.
Perform a right-click on Start icon and from the WinX menu, choose Apps and Features option.
Apps Settings page will appear. Switch to the right pane and select the 3rd party antivirus from the list of installed applications. Finally, make a hit on the “Uninstall” button and remove the software from your PC.
However, the remnants of the program may also cause issues on your system. So, you can Use Revo Uninstaller On Windows 10 to Force Uninstall Stubborn Programs.
Wrapping Up
The above-mentioned are the best workarounds to bypass Error Code 0x80070643 Failed to Install MSI Package in Windows 10.