AcpiVpc.sys is a file from Lenovo and its full form is ACPI-Compliant Virtual Power Controller Driver. Internal name of this file is EnergyVpc.sys and it is located in c:\Windows\System32\drivers\ or c:\Windows\System32\DriverStore\FileRepository\vpc.inf_amd64_37c65821ee7b9e70. You might find Blue Screen of death error with a message What failed: AcpiVpc.sys with bug check as DRIVER_VERIFIER_DETECTED_VIOLATION, DRIVER_OVERRAN_STACK_BUFFER, IRQL_NOT_LESS_OR_EQUAL, UNEXPECTED_KERNEL_MODE_TRAP, SYSTEM_SERVICE_EXCEPTION, Critical Process Died, or other. The BSOD issue starts with an unexpected system crash and after a restart, it shows the error message.
Because this sys file is driver software from Lenovo it is obvious that the reason for this Blue screen is the app itself. Furthermore, using memtest and runner running Driver verifier you may also confirm this. So it is clear that the BSOD might appear because AcpiVpc.sys is outdated or corrupt or creating collisions with system files.
Table of Contents
AcpiVpc.sys Blue Screen Error or BSOD Windows 10 and 11 solutions
Here is how to fix Fix AcpiVpc.sys BSOD Blue Screen error in Windows 11 or 10 –
Way-1: Rename AcpiVpc.sys
Several times the AcpiVpc.sys driver is unstable and it interferes with normal operations of Windows ending up with system crash and bug checking. In this case, you can simply rename this file to deal with the BSOD –
- Press – Windows+R.
- Type –
c:\Windows\System32\drivers\
or
c:\Windows\System32\DriverStore\FileRepository\vpc.inf_amd64_37c65821ee7b9e70.
- Click on – OK.
- Find AcpiVpc.sys and right-click on it.
- Select – Rename.
- Give an alternate name to this file such as AcpiVpc.sys.bak or AcpiVpc.sys.old.
- Close the folder and reboot your system.
Way-2: Check if the Installed driver version is the latest
Old version of a driver is always found to trigger problems on Windows 10 or 11. So the AcpiVpc.sys BSOD you are facing might be occurring due to an obsolete version of the file. Follow the steps and check the driver you have installed is the most recent –
- Press – Winkey+R.
- Type – msc.
- Press – Enter.
- When Device Manager loads, find ACPI Virtual Power Controller Driver.
- Right-click on this one and select – Properties.
- On the Properties window, go to the Driver.
- See the – Driver Version.
- Now go to this page.
- Enter the model number of your Laptop or computer
- Navigate to the driver’s page.
- Check the version of AcpiVpc.sys. If the updated version is there download and install it.
- Restart the PC and check if the blue screen again shows.
Way-3: Disable the device driver
In case, installing the latest driver version doesn’t work it means it is creating glitches with some incompatible software present on your Windows. If this driver is less important for you then it can be disabled using the below guidelines –
- Right-click on – Start.
- Select – Device Manager.
- Go to ACPI Virtual Power Controller Driver.
- Right-click on this one and select – Disable.
- A warning dialog will appear; click on Yes.
- Reboot the machine and the error should be fixed now.
Way-4: Uninstall and reinstall AcpiVpc.sys driver
Sometimes the driver file is intact but it is not correctly installed on Windows and this gives rise to a blue screen error. The same might happen with AcpiVpc.sys Bsod issue so uninstalling this and then reinstalling may work for you as a solution. Here’s the method –
- Open Device Manager as you have done in the earlier 2 methods.
- Right-click on ACPI Virtual Power Controller Driver and Lenovo Nerve Center Driver one by one.
- Select – Uninstall.
- On the warning pop-up, click on “Uninstall”.
- Restart the machine.
See – How to Uninstall, Disable, Roll Back, Update Device Drivers in Windows 10 / 8 / 7.
Way-5: Use a diagnostic tool offered by Lenovo
Lenovo offers a diagnostic tool to fix corrupt AcpiVpc.sys driver causing blue screen sometimes being trapped in reboot loop. The issue is pretty annoying but you can try this program –
- Click this link.
- Run the setup ldiag_4.41.0_windows_x64.exe and install the program.
- Follow the instruction until last to solve the error.
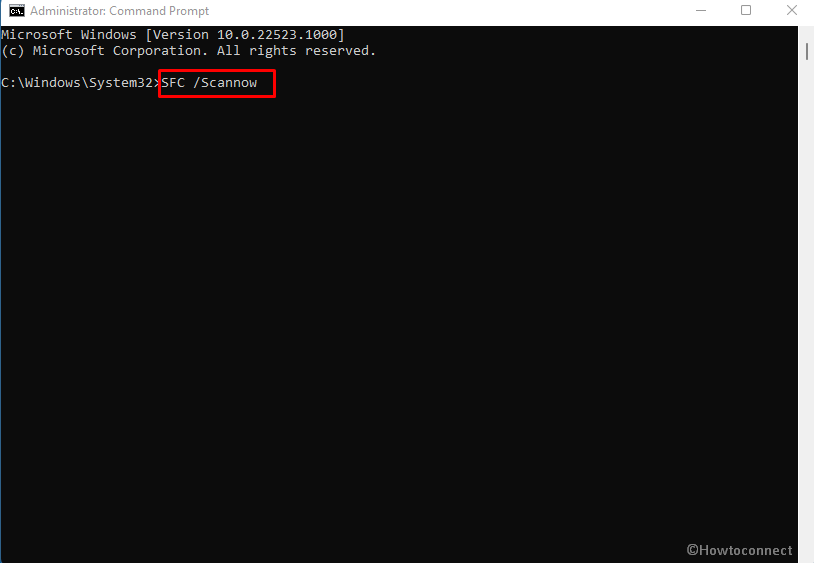
Way-6: Bring SFC /Scannow into action
AcpiVpc.sys error might also occur due to corrupted or missing system files in Windows 11 or 10. When a registry, driver, .sys, .exe, etc files are broken Windows becomes unable to find AcpiVpc.sys during startup of the system. As a result, the error code appears subsequent to the crash of the operating system. Don’t worry System File Checker is a powerful command line utility that works as a rescuer in this respect by repairing malfunctioning system elements. Most of all running this built-in tool is super easy to move with the underneath guide –
- Click on – Start.
- Type – cmd.
- Press – Ctrl + Shift + Enter.
- User account control will prompt up; click – Yes.
- Once the Command prompt comes on the screen, type – SFC /Scannow.

- Press – Enter.
- The tool will take more or less 5 to 10 minutes to complete the repair in normal circumstances.
- After it shows to reach 100% reboot the computer.
- See if AcpiVpc.sys bsod error still persists.
See – SFC /Scannow, DISM.Exe, CHKDSK Windows 10.
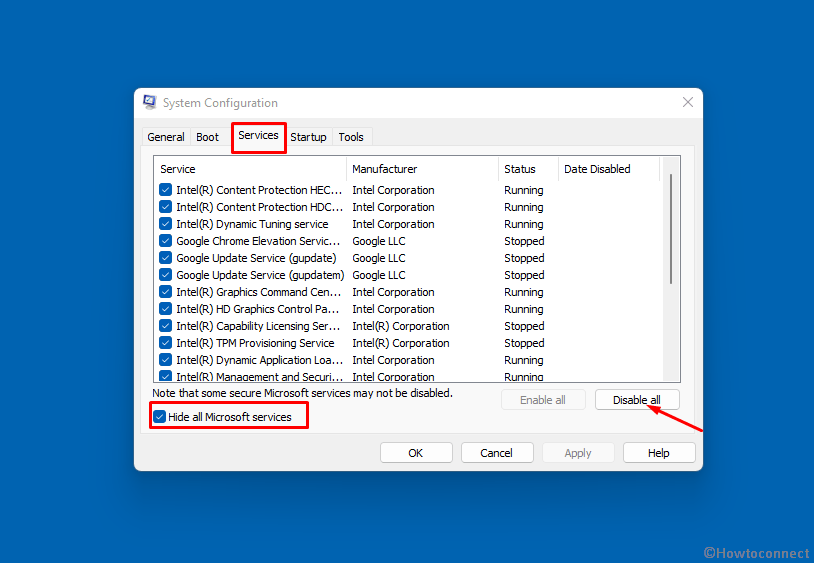
Way-7: Clean boot the system to solve AcpiVpc.sys BSOD problem
Clean boot is a feature in Windows 10 or 11 that lets only a minimum set of drivers run the operating system. In this way, unnecessary third-party apps do not load and lessen the chances of getting any error. Here is the method –
- Click on Search from the taskbar.
- Type – msconfig.
- Hit – Enter.
- Select the tab named – Services.
- Check the box for – Hide all Microsoft services.
- Click – Disable all.

- Now go to the Startup tab.
- Click the link for – Open Task Manager.
- The task manager comes up on the screen with the Startup tab selected automatically.
- Right-click on each item there and choose – Disable.
- Exit the Task Manager.
- On the System Configurations window, click on Apply and Ok.
- Now restart the PC as the AcpiVpc.sys error should be settled.
You can follow – How to Clean Start Windows 10 PC.
Way-8: Restore the system
According to.dmp analysis the culprit of this Blue screen error is the AcpiVpc.sys file. If you could not overcome the issue you can choose to restore the system to a past date and time when Bsod wasn’t showing. Pursue the method –
- Click on – Start.
- Type – rstrui.
- Press – Enter.
- After the System Restore wizard appears, click on – Next.
- Highlight the date and time when the error didn’t start showing.
- Click on – Next.
- Select the Finish button and approve on the warning pop up by clicking on Yes.
Methods list:
Way-1: Rename AcpiVpc.sys
Way-2: Check if the Installed driver version is the latest
Way-3: Disable the device driver
Way-4: Uninstall and reinstall AcpiVpc.sys driver
Way-5: Use a diagnostic tool offered by Lenovo
Way-6: Bring SFC /Scannow into action
Way-7: Clean boot the system
Way-8: Restore the system
That’s all!!
