Windows often experience an exception error leading to fatal system crash commonly known as Blue Screen of Death. CLUSTER_CLUSPORT_STATUS_IO_ TIMEOUT_LIVEDUMP is a BSOD error generated by the system as a result of a complete crash. The issues lead Windows to such a condition where it can no longer operate normally. Therefore, continuous error messages keep coming in mentioning the name of the BSOD along with its bug check code. The system will attempt to reboot unexpectedly as well leaving no option to take any measure. CLUSTER CLUSPORT STATUS IO TIMEOUT LIVEDUMP error has a code of 0x00000179 similar to all other BSOD. The bug check code points out a complaint from SMB client on the initiator node as an IO to target node is taking a long time to operate fails all IOs with STATUS_IO_TIMEOUT.
Blue screen error in Windows 10 may appear for a variety of causes but in most cases, the exact reason is always unknown. From past experiences, the issue mostly arises due to driver incompatibilities, memory problems, critical system resource missing, outdated BIOS, and formation of bad sectors in the hard disk. A few computers may have low disk space and hardware problems leading to cause the CLUSTER_CLUSPORT_STATUS_IO_ TIMEOUT_LIVEDUMP error. With the exact cause is yet to be known, it may seem really hard to resolve the error but the goal can be achieved real easy oftentimes as well. We will mention some conventional workarounds found to be very easy and effective while fixing the BSOD error previously in the following segment. Let’s get to the method lists right on –
CLUSTER_CLUSPORT_STATUS_IO_ TIMEOUT_LIVEDUMP
Here is how to fix CLUSTER_CLUSPORT_STATUS_IO_ TIMEOUT_LIVEDUMP in Windows 10 –
1] Toggle Off Automatic Restart of Windows
Blue Screen error is the worst consequence of a critical system crash and the OS is pushed to the point of losing valuable resources. As the system data is on the verge of imminent damage, Windows will attempt to shut down itself in order to minimize the loss. The representation will show up on display with error name associated with bug check code. Frequent restarting will make the system immobilized and unstable to carry out any further action. Eventually, the troubleshooting gets delayed so as the fix.
Automatic Restarting is a default feature in Windows OS and it’s a basic safety to protect the system data. Despite it comes as pre-enabled in the operating system, you can tweak the same anytime in case necessary. Unless we disable automatic restart, it’s impossible to try out any of the workarounds and fix the error. Therefore, we need to turn of this before proceeding to resolution and you have to follow the below steps –
- Make a combined press of Windows and R hotkey.
- Type sysdm.cpl in the Run Dialog box and hit Enter key.
- When the System Properties wizard presents itself, switch yourself to the Advanced tab.
- Take the mouse pointer to Startup and Recovery segment and eventually click the Settings button.
- Reach to System failure area of imminent wizard and untick the checkbox set for Automatically restart.
- Finally, click the OK button from the bottom to save changes you made.
2] Update the drivers using Device Manager
Driver incompatibilities in the system cause variety of damages including the blue screen error. In fact, most BSOD errors are related to this issue rather than a few common causes. The task of a device driver is to maintain the interaction and communication between hardware devices and computer bus. These components help Windows to detect as well as recognize them and put them into operation.
Outdated drivers cause instability in the system and responsible for CLUSTER_CLUSPORT_STATUS_IO_ TIMEOUT_LIVEDUMP error to a greater extent. In order to keep the system up and running always, we have to install the latest updates for these key components. Windows Device Manager is the default tool to accomplish this task smoothly and you can also detect the outdated drivers easily by checking yellow indication. To update them, follow the below guidelines –
- Press Win+S to bring forth Windows search.
- Insert devmgmt.msc in the appearing bar and then hit Enter key.
- When Device Manager emerges, check the devices exists there and locate the ones have yellow exclamation mark beside them.
- Once found, double-click the same to extend its driver lists.
- Right-click on the driver that has question mark next to it and thereafter choose Update driver option from the context menu.
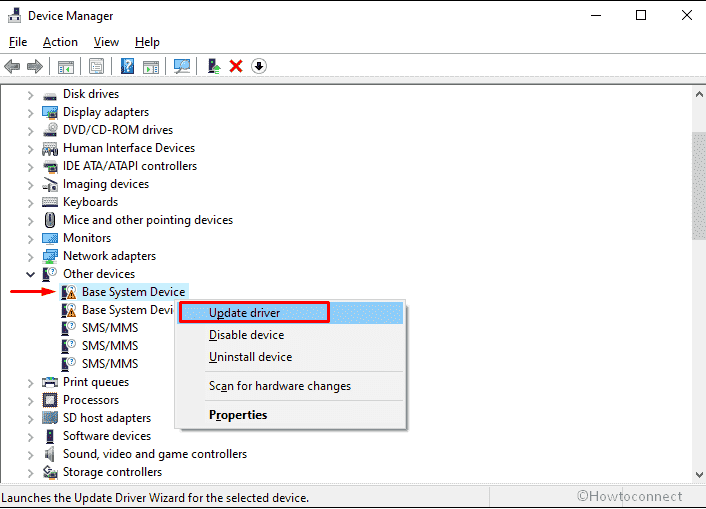
- From the forthcoming pop-up, pick the option that says Search automatically for drivers.
- The system will now start searching for updates online, therefore, make sure that the PC is connected with an active internet connection.
- If the system gets any, the driver will be downloaded and installed automatically.
- When the process finishes, restart the PC and check if the blue screen issue is fixed.
3] Install latest patches for Windows 10 to fix CLUSTER_CLUSPORT_STATUS_IO_ TIMEOUT_LIVEDUMP
Every released Windows update file comes with latest changes in the features, inclusive tools, security improvements, and most importantly, fixes for reported bugs. Therefore, installing them will give Windows 10 a new flow and build an advanced strength against various bugs. In fact, outdated drivers are at higher risk have a critical system crash leading to blue screen error than an updated one.
Microsoft releases the updates quite regularly and the process is autonomous in Windows 10 as well. In presence of an active unmetered data network, downloading starts automatically, and installing will be followed. Some users have claimed to resolve the CLUSTER_CLUSPORT_STATUS_IO_ TIMEOUT_LIVEDUMP error quite easily by updating the operating system only. Since Windows may delay the process for some reasons, we recommend proceeding to the task manually using below steps –
- Press Win+I hotkeys simultaneously to launch Settings app.
- When the app turns up, click Update & Security tile.
- Move to the right pane of Windows Update page.
- Hit the button Check for updates even if it says you are up-to-date.
- After finishing online search, if the system presents any newer version of Windows then click Download button.
- When the downloading process is fully complete, installation will be done automatically.
- During the process, the system may request a manual restart to finish the installation process. So, be available in front of the PC and do it on time.
4] Perform Clean Boot to diagnose the blue screen error
Windows is a large as well as complicated operating system containing a huge number of programs; settings and different drivers. Many applications competing for the space in the disk and oftentimes end up causing a software conflict. Sometimes you may notice the computer is not starting normally or showing some error messages indicating blue screen error. In that case, you can find out the root cause potentially by performing clean Boot to Windows 10. Basically it is an advanced troubleshooting technique allowing users to make the system up and running so that you can carry out a few diagnoses or tests to detect which element is actually causing the trouble.
In the Clean Boot, system opts out non-essential programs, device support, optional features as well as appearances for the sake of accurate troubleshooting. You can try performing a clean boot to detect from where the CLUSTER_CLUSPORT_STATUS_IO_ TIMEOUT_LIVEDUMP error is generated and then take necessary actions. Follow the below guidelines to perform Clean Boot –
- Open Run dialog box using any convenient way.
- Type msconfig in the void text bar and then hit Enter key.
- When System Configuration wizard comes into the sight, click the radio button reserved for Selective startup.
- From the below options, uncheck the box set aside Load startup items.
- Transfer yourself to Services tab and click the checkbox against Hide all Microsoft services from the top left bottom.
- Following that, click the button Disable all.
- Now, enter into the Startup tab and click the link says Open Task Manager.
- When the dedicated window makes an appearance with Startup tab opened, right-click on each program listed here gradually and choose Disable.
- Close Task Manager and go back to System Configuration window. Click on Apply followed by OK so that the changes can be effective.
5] Try out Windows Blue Screen Troubleshooter
Blue Screen error is usually a very destructive issue and immobilizes the system permanently. The proper cause behind it is often mysterious and hence, the troubleshooting gets delayed always. You may have to go through a lot of common causes and try out a series of workarounds in order to recover the system.
Technicians in Microsoft came with an online webpage that helps with important troubleshooting process based on the problems faced by users and guide them to fix it. You can directly access the page from Microsoft’s troubleshooting webpage. The procedure is as following –
- Launch a web browser you prefer.
- Visit the official page that Microsoft offers to troubleshoot blue screen errors. For direct access, click the link.
- Once in the dedicated webpage, scroll down a bit and stop at When did you get the error? area.
- Under the segment, you will get 2 pre-determined scenarios, select any of the radio buttons according to the problem you are getting.
- The next page will suggest you some step-wise solutions that you need to follow in order to fix the Windows 10 blue screen error.
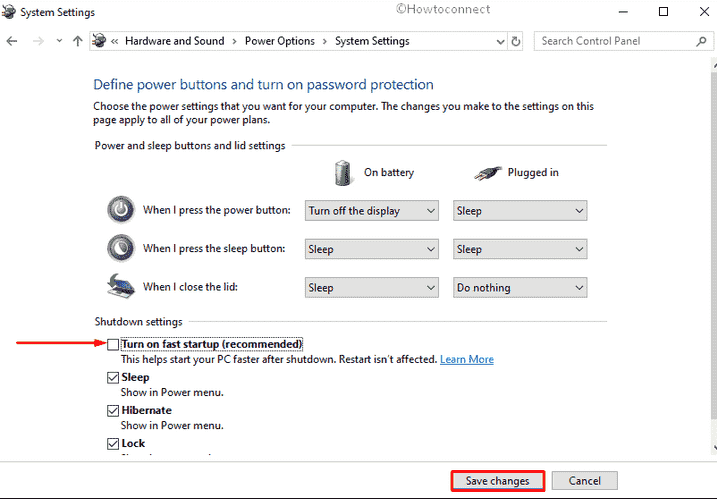
6] Disable Fast Startup to restrict carrying over CLUSTER_CLUSPORT_STATUS_IO_ TIMEOUT_LIVEDUMP
Windows Operating System is full of amazing features and offers users wide-ranging ease of access. Fast Startup is a handy feature that makes booting faster by collecting necessary data to load various processes in the succeeding session. Fast Startup or Fast Boot is a combined feature of computer’s usual shutting down and hibernate comes pre-installed in Windows 10. As the process saves every possible data from an ongoing process, it may also collect BSOD error and carry over to next startup.
While having this feature enabled, it’s not possible to resolve the CLUSTER_CLUSPORT_STATUS_IO_ TIMEOUT_LIVEDUMP blue screen error. Despite the feature is so helpful for making the boot faster, you have to disable for instance in order to restrict carrying over the BSOD error. To do that, here are the guidelines to follow –
- Bring forth taskbar search by pressing Windows key and Q simultaneously.
- Type Control Panel in the empty text field and hit Enter when you see the same in search result.
- Set the View by option to Large icons.
- From the available links, click Power Options.
- Once the consequent page turns up, hit the link Choose what the power buttons do present in the left pane.
- Now, click Change settings that are currently unavailable link to make the below options active to work with.
- Hover the pointer to Shutdown settings section and uncheck the box you will get beside Turn on fast startup (recommended).
- After doing so, click Save changes button.
7] Load the previous state of Windows using System Restore
We often install some applications in the system that are a little bit problematic and cause additional issues. Mostly these are third party programs released by unauthorized vendors and carry defective internal components. Once you install these programs, the Windows Registry gets tweaked adversely and creates invalid DWORD. Additionally, you may sometime cancel on going uninstalling tasks which also cause abnormality in Registry. Both of these lead the system to a fatal crash and eventually generate blue screen error.
In order to resolve the BSOD error generated after such abnormal changes to the system, you have to modify the Windows Registry correctly again which is not really so easy. Instead, we have a very simple way to bypass the evolved issue and load the previous Windows state back to a point where everything was normal. The process is called System Restore where system is turned back to a previous error free state. To carry out the workaround, follow the below steps –
- Right-click on Start icon and choose Run from the appearing Power user menu.
- Insert rstrui in the available text box and then hit Enter key.
- When System Restore wizard arrives, click Next button from the bottom to proceed.
- From the next page, click the checkbox set for Show more restore points.
- When you see all available points, select the most recent Restore point where you want to go back.
- Thereafter, click the Next to continue the process.
- At this moment, hit the Finish button immense the restoring process.
- A warning message will prompt for your consent, click Yes to give permission.
- After completion of restoring procedure, the system will restart itself.
- Once the new session starts, you will see a confirmation message saying System Restore completed successfully.
8] Scan malware in the system and clean threats
By far, virus has been the worst enemy to the computer system as they cause almost irrecoverable damages. Internet being so available everywhere, you can be affected easily by clicking a link coming in web pages or spam mails. Malware are strongly coded programs and acts as a usual file hence, it become impossible task to recognize them. Some of these also disperse through USB devices too and get the entrance to the system. If there isn’t enough security to safeguard the system, these bugs will damage necessary resources. Some DLL files will be erased as well leading to generate the CLUSTER_CLUSPORT_STATUS_IO_TIMEOUT_LIVEDUMP BSOD error.
Microsoft had always been very much dedicated to protecting the Windows operating system from malware. Tech giants introduced a new security system in Windows 10 with robust construction so that to provide maximum security. Windows Security keeps the system protected both online as well as offline. A full system scanning with this app will keep the system malware free and will ensure no virus is causing the trouble. Here is how to run a full scan –
- Open the Start menu by pressing Windows key.
- Scroll down alphabetically in the appearing app list until you get Windows Security.
- Once you get it, select the same to launch the app.
- From the app UI, click the option Virus & threat protection.
- Shift to the adjacent right of subsequent page and hit Scan options link.
- Next, opt for the radio button set alongside Full scan option and eventually click Scan now button from the bottom.

- After finishing of scanning process, check if there is any malware found.
- If yes, hit the Clean Threat option to get rid of them.
- From the impending page, click Remove first and then Start actions to clear all vulnerable threats that were causing Windows 10 blue screen error.
9] Rollback the defective update installed for a driver
Since most of the blue screen errors are originated from the driver incompatibilities especially from the outdated drivers. Unfortunately, some of the users have failed to resolve the CLUSTER_CLUSPORT_STATUS_IO_TIMEOUT_LIVEDUMP BSOD error by updating the drivers. The reason though quite frustrating but understandable that software vendors often release defective or incompatible updates for the drivers. Installing these updates will cause additional trouble rather than resolving the generated blue screen error.
If you have also encountered the same issue, rolling back to the previous edition and removing the defective update will help the most. To do so, Windows Device Manager has an option i.e. Roll Back driver which you can make good use. If that doesn’t help as well, uninstalling device will resolve the error possibly. Follow the below instructions to carry out these two –
- Open Device Manager at first instance.
- When the app opens up, find out the dreadful device whose driver you opt to disable or restore to default.
- Double-click on the same to stretch out its driver list.
- Right-click on the driver that seems defective and choose Properties option from the context menu.
- From the next pop-up, enter into Driver tab
- According to your preference, click the button Disable or Roll Back Driver.
- After completion of the process, do the same for all corrupted drivers and upon in the end, reboot Windows 10.
10] Clear up the junk files from disk space to resolve CLUSTER_CLUSPORT_STATUS_IO_ TIMEOUT_LIVEDUMP
Every task creates temporary files in the system and they are usually stored in the drive like usual ones. Slowly they increase in number and cover up considerable amount of space in the disk. As the storage gets low, some problems including memory issues, freezing of desktop area, continuous lags will start showing up. Junk files include not only the temporary files but web browser cache, trashed items in the recycle bin and Delivery optimization files, Shader caches, etc. But the highest amount of space is occupied by Previous Windows Update files which are no longer useful unless you need to perform a System Restore.
Cleaning all these files oftentimes recover gigabytes of space in the disk and helps the computer to regain the normal functionality. With low disk space, some users have experienced CLUSTER_CLUSPORT_STATUS_IO_TIMEOUT_LIVEDUMP error too in Windows 10. To delete these files in bulk amount, built-in Disk cleaning tool is the most suitable utility. To run the disk cleanup, follow the below steps –
- Open the Taskbar search by pressing Windows key and Q hotkeys together.
- In the search box given here, type cleanmgr.exe and also select Disk Cleanup app when arrives in the result.
- In a moment, a small box will float up asking you to choose the desired drive where you opt to run the cleanup task.
- Make sure C: Drive is selected and click OK.
- The tool will now calculate total amount of space it can recover from junk files and let you to select areas to delete.
- Scroll down in the appearing popup and reach to the bottom left corner.
- Click the Clean up system files option from here to proceed.
- From the upcoming popup, again click OK.
- After the Disk Cleanup for (C:) appears upon calculating total space, check all boxes from Files to delete area.
- Leave Downloads unmarked and ensure nothing important is leftover in Recycle Bin.
- Click OK button to begin cleanup.
- Reboot the Windows after completing the action.
11] Update the BIOS of your Operating System regularly
Basic Input/Output System or simply BIOS is an integral part of the Operating System which is firmware allowing users to set up a system from the most basic level. This is a ROM chip located on the Motherboards and it provides the hardware initialization during booting process. Furthermore, it acts as an energizer of the system and also controls data flow from Operating System and the attached accessories such as video adapter, keyboard, mouse, printers, hard disk, etc.
BIOS comes pre-installed with the operating system and it’s the software that runs initially once the device is powered on for the first time. Outdated BIOS is responsible for making the device technically unstable, non-functional being unable to pass the control to microprocessor. The same may also cause a critical fatality leading to CLUSTER_CLUSPORT_STATUS_IO_TIMEOUT_LIVEDUMP BSOD error. In order to update the BIOS, follow the below guidelines –
- Click the magnifier icon from the Taskbar and type msinfo32 in the void text area.
- Select the System Information app when arrives in the result.
- When it opens in a separate window, scroll down and reach a search box located at the bottom.
- Edit the search box and type BIOS version followed by clicking Find button.
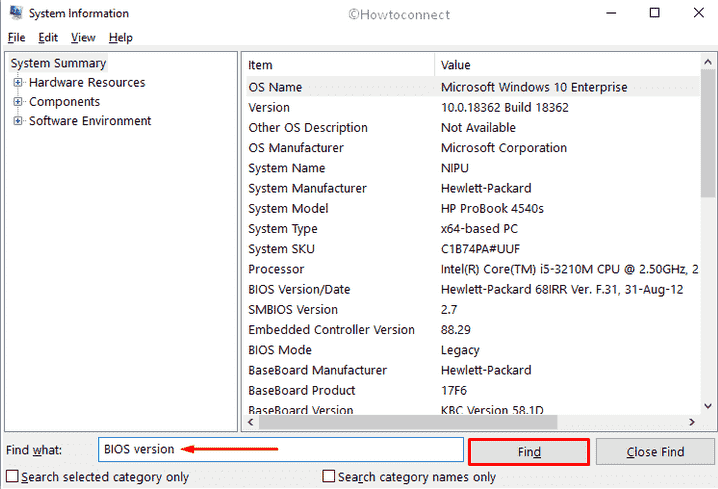
- When you will see BIOS Version/Date, note down the information given against this from the adjacent right side pane.
- Close the current System Information window and launch the web browser for your windows.
- Visit the BIOS vendor’s official website using information noted down previously.
- From this page, locate the latest version of your BIOS checking compatibility with the system configuration.
- Download the software and when the process ends, install it to the system.
12] Remove unnecessary software programs to fix CLUSTER_CLUSPORT_STATUS_IO_ TIMEOUT_LIVEDUMP
While carrying out various tasks in Windows, we need a lot of tools, applications in order to make it quicker. Nevertheless, Windows has a wide range of default tools, we need some more oftentimes. Most of these applications are available in the Microsoft Store but for few, we look for vendors. Third-party applications are not always trustworthy and cause additional trouble after being installed.
Some applications come with slightly different names but contain same internal components. These programs engage in collision and erase many important system files leading system to generate CLUSTER_CLUSPORT_STATUS_IO_TIMEOUT_LIVEDUMP BSOD error. If you have installed some of these programs, try removing them soonest possible before something happens worst. You can uninstall an application proceeding through below steps –
- Press Windows key and R together and invoke Run dialog.
- In the given search box of it, type appwiz.cpl followed by clicking OK button.
- When the Program and Features windows will open up, reach to the problematic application in the list.
- Right-click the defective one and select Uninstall option.
- Click Yes to confirm when a popup asks permission.
- Once the uninstalling task ends, restart the computer to make the changes effective.
13] Run the System File Checker tool for fixing corrupted resources
System files in the computer are critical components without which Windows may not operate correctly. These files contain a fixed internal structure where specific elements sit to make it an executable one. When a system file encounters corruption due to power surge, power outage, windows update faults, or malware infection, the structure remains no longer valid. Instead, some components go missing the file appears as unreadable and generate CLUSTER_CLUSPORT_STATUS_IO_TIMEOUT_LIVEDUMP BSOD error eventually.
System File checker is a built in utility for fixing the corrupted system files and it’s a hotfix to recover missing .dll components as well. When we execute SFC /scannow command tool in the elevated Command Prompt, the utility starts checking for vulnerabilities and fix the detected ones. Here is how to run the System File Checker tool –
- Open up Power user menu by pressing Win+X hotkeys and select Run from appearing list.
- Edit the empty text box of Run and type cmd in there.
- Now, press Ctrl+Shift+Enter keys altogether.
- Once the UAC prompts up for permission, click Yes to provide consent.
- Elevated Command Prompt will open up next in few seconds. Enter the following command at the blinking cursor –
Sfc /scanow
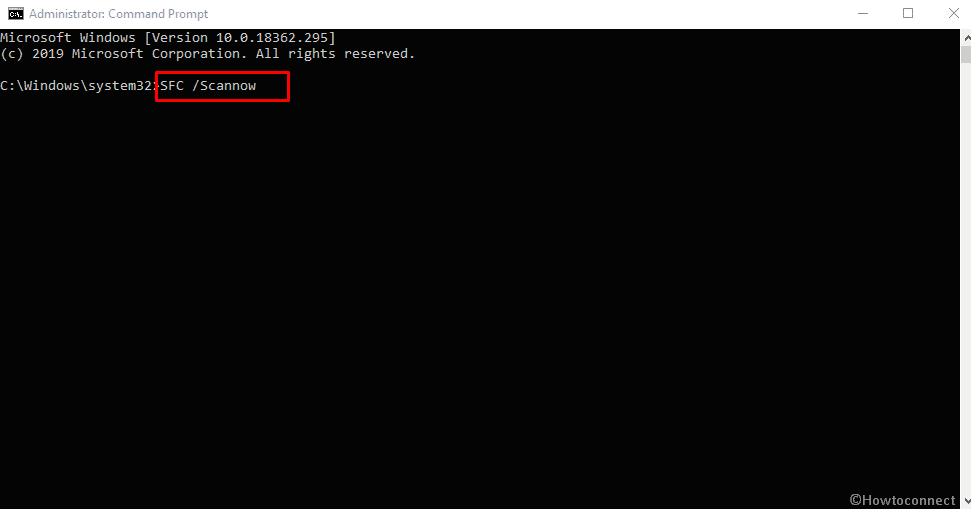
- Press Enter key to execute the command and run the System File Checker.
- This utility carries out thorough check-in all the system resources to detect corrupted files and fix them automatically hence, it might be a lengthy process.
- Once it ends, restart the computer and check if BSOD has resolved once next session starts.
14] Uninstall the problematic patch installed recently
Windows update files become available to download quite regularly and many of us have resolved the CLUSTER_CLUSPORT_STATUS_IO_TIMEOUT_LIVEDUMP BSOD error only by installing them in time. Unfortunately, few have failed to do so as Microsoft releases some patches that are partially defective, incomplete, and buggy. Furthermore, there might be a poor internet connection for which autonomous updating process stuck in an unexpected loop and cause trouble.
If you have come across the blue screen error after installing some of the latest patches, try uninstalling that one. To remove an installed patch, follow the below steps –
- Open the Windows settings app pressing Win+I hotkeys together.
- From the fully loaded app UI, click Update & Security tile and load the additional settings page.
- Move to the right pane of consequent Windows Update page.
- Opt for View update history.
- From the succeeding page upon opening, click Uninstall updates link.
- A new page will open up from Control Panel namely Program and Features holding the list of Installed Updates.
- Reach to the last installed patch and select it.
- Click Uninstall option located at the top ribbon.
- When a confirmation popup arises, click Uninstall to continue.
- Follow the on-screen guidelines and complete the process.
- Perform restart to Windows 10 and check if the error is resolved.
15] Fix up bad areas in hard disk to resolve CLUSTER_CLUSPORT_STATUS_IO_ TIMEOUT_LIVEDUMP
Hard disk is the most important part of a computer and it stays with the system for the whole lifetime of it. Many people have compared it as the soul of a system as all the necessary data, system files, everything that is required to make a device up and running. Using the same hard disk continuously and not maintaining it in good health may cause trouble especially bad areas. Both of the traditional magnetic hard disk and external ones if connected may have these defective areas.
Digging to deep, these areas are formed due to sudden power outage or forcibly pulling a cable from CPU. Oftentimes a bad area can be caused by production fault or when the hard disk is subjected to external damage. Bad sectors in the hard disk are very much dangerous as they often generate CLUSTER_CLUSPORT_STATUS_IO_TIMEOUT_LIVEDUMP BSOD error in Windows 10. Fortunately, Windows has a default utility called disk checking tool to repair them easily. To run the utility, follow the below guidelines –
- Press Windows key once and enter the Start menu.
- Click the Power icon and choose Restart option meanwhile hold the Shift key as well.
- Windows will now restart and will boot to Automatic Repair screen.
- From here, select Troubleshoot => Advanced options => Command Prompt.
- Once the Elevated Command Prompt is upfront, enter the following command tool at blinking cursor –
chkdsk /f /r C:
- Press the Enter key in order to execute this command and run the disk checking tool.
- If any bad area is found out, the tool will also fix them accordingly. Being a quite lengthy process, you have to wait patiently to finish it.
- Once done, restart the Windows 10 and check Blue screen error when the device is up and running again.
16] Engage Windows Memory Diagnostic tool and detect vulnerability
Windows 10 oftentimes experience memory problems which basically rise up due to bad RAM. This mostly happens because of production fault, incorrect installation, incompatibility, or external thrusts that gives rise to hard error. Excessive heat, magnetic interference, power surge and faulty microscopic can also make the RAM bad but when such occurrence takes place, system generates soft errors.
Soft errors usually cause read and write issues and sometimes blue screen like CLUSTER_CLUSPORT_STATUS_IO_ TIMEOUT_LIVEDUMP. Fortunately, these issues can be corrected with a simple reboot in most cases. Unlike soft errors, hard errors are tenacious and can not be fixed in any way. Before you decide to replace the RAM stick straightway, we suggest you run memory diagnostic tool. This will detect any problem associated with memory and suggest to you what should you do next. Here is the process –
- Invoke Run Dialog box by pressing Windows key and R at once.
- Put mdsched in the command box and then click OK button.
- When a pop-up prompts, opt for the option Restart now and check for problems (recommended).
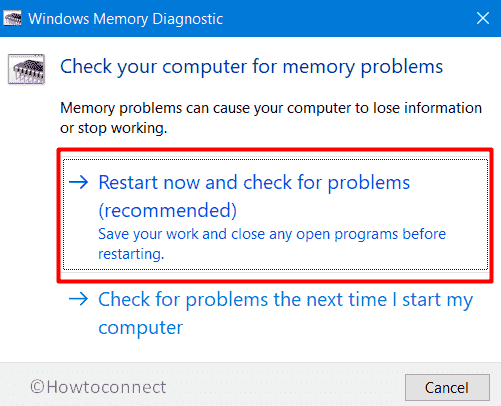
- Doing so will make Windows 10 machine reboot.
- When a new session starts, a blue screen will be visible where you will see the diagnostic tool is scanning the entire system to detect memory issues.
- When the procedure is done fully, the system will reboot itself one more time.
- After logging in, check out the result of diagnosis from the Notification area and take further steps to solve Windows 10 blue screen error.
17] Run DISM command tool and fix the corrupted Windows images
Generally, Microsoft releases Windows image files before rolling out a major update. These are actually snapshots in CD/DVD layout saved in the drive as ISO-9660 format and we use them to write a blank CD-R or DVD-R to make an identical copy of updates. If any of these become corrupted or defective, Windows 10 Blue screen error CLUSTER_CLUSPORT_STATUS_IO_ TIMEOUT_LIVEDUMP may evolve.
To fix the corrupted image files, Microsoft offers a built-in tool that capture, control, and split .wim items moreover rectify offline images as well. To run the utility, here are the steps you need to follow –
- Click the search icon placed in taskbar or simple press Windows and S keyboard shortcut together.
- Type cmd.exe in the specific bar.
- Once you see Command Prompt at the top of search result, press Ctrl+Shift+Enter at one go.
- A UAC will come up for asking your permission, click Yes button to allow.
- When the black console rolls out, type the below command at the base of blinking cursor and hit Enter key –
DISM.exe /Online /Cleanup-image /Restorehealth
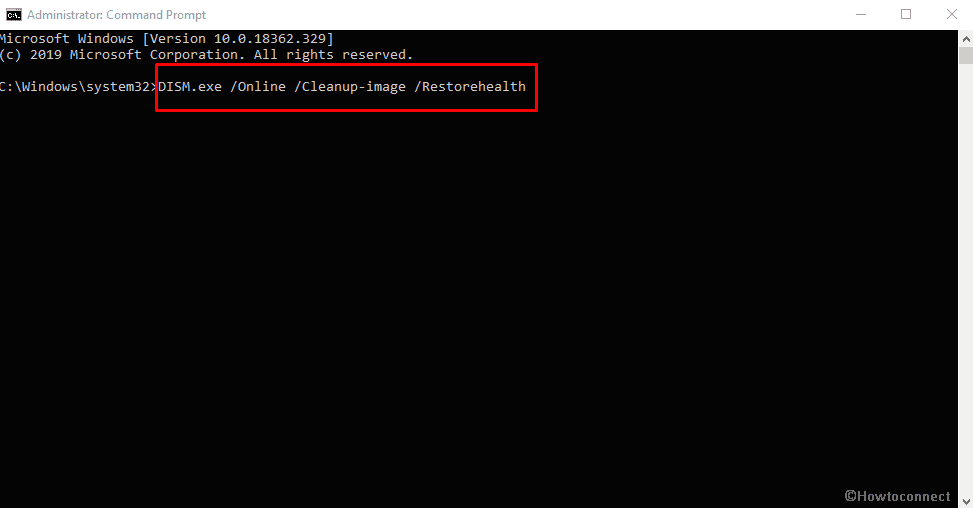
- Now, the tool will scan the entire system in order to detect the defective image files. So, wait patiently as it may take longer.
- Once done, reboot Windows 10 and check if BSOD error code still exists.
18] Analyze minidumps to check out the reason behind CLUSTER_CLUSPORT_STATUS_IO_ TIMEOUT_LIVEDUMP
Reading minidumps doesn’t help to fix CLUSTER_CLUSPORT_STATUS_IO_ TIMEOUT_LIVEDUMP automatically but you will surely get to know what actually caused it. These are basically small files that get saved whenever Windows 10 shutdown without any prior warning or notice. Procedure to analyze minidumps may seem complicated in the first view but it is actually not hard at all if you follow the below steps precisely.
- Move into desktop screen by pressing Win+D at one go.
- Once there, right-click on This PC and then select Properties from the appeared context menu.
- When the dedicated settings page turns up, click the link Advanced system settings lying in the extreme right column.
- From newly showed up wizard, hit Settings button located beneath Startup and Recovery segment.
- Next, check the boxes placed aside Write an event to the system log and Automatic restart.
- Click the drop-down list you will get under Write debugging information and set it to Small memory dump (256KB).
- Put D:\Minidump into the text field of Small Dump directory or you can insert any preferred location.
- Click OK button to carry out the changes.
- Thereafter, navigate https://docs.microsoft.com/en-us/windows-hardware/drivers/download-the-wdk and download the compatible version suits your system configuration.
- After completion of download, visit the folder where system saves all the downloaded items.
- Double-click the file you just got and install the same by complying on-screen direction.
- Henceforth, open Command Prompt as administrator and run the below command to the Debugging Tools for Windows folder –
cd c:\program files\debugging tools for windows
- To load the dump file into a debugger, execute any of the following commands in the same Command Prompt –
windbg -y SymbolPath -i ImagePath -z DumpFilePath
or,
kd -y SymbolPath -i ImagePath -z DumpFilePath
- Following that, run the below command-line to let the system save minidump file –
windbg -y srv*c:\symbols*http://msdl.microsoft.com/download/symbols -i c:\windows\i386 -z c:\windows\minidump\minidump.dmp
- Once you are done, navigate C:\windows\minidump\minidump.dmp to read the minidump.
Methods:
1] Toggle Off Automatic Restart of Windows
2] Update the drivers using Device Manager
3] Install latest patches for Windows 10
4] Perform Clean Boot to diagnose the blue screen error
5] Try out Windows Blue Screen Troubleshooter
6] Disable Fast Startup to restrict carrying over BSOD error
7] Load the previous state of Windows using System Restore
8] Scan malware in the system and clean threats
9] Rollback the defective update installed for a driver
10] Clear up the junk files from disk space
11] Update the BIOS of your Operating System regularly
12] Remove unnecessary software programs
13] Run the System File Checker tool for fixing corrupted resources
14] Uninstall the problematic patch installed recently
15] Fix up bad areas in hard disk
16] Engage Windows Memory Diagnostic tool and detect vulnerability
17] Run DISM command tool and fix the corrupted Windows images
18] Analyze minidumps
That’s all!!